by Cybie
I. Introduction and Guide Scope
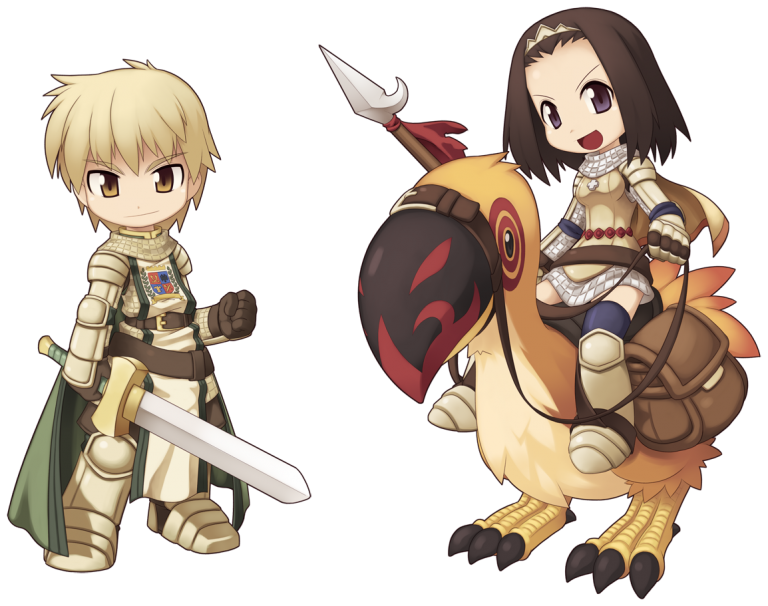
The Knight is one of the possible 2nd job advancements for the Swordsman class. With Swords and Spears in-hand, these hefty tanks march into battle with their mounts and engage their foes head-on. They take their roles with pride, ensuring that they take blows as their companions in the backlines aid them in their battles. Should you decide to take the path of chivalry as a Knight, this leveling guide will be a great supplement to give you an idea on how to begin your journey as one!
This guide will contain the basics of what you need to know about leveling a Knight – which stats to invest in, what monsters to target, what loot to look out for and some possible tips and tricks that you may find useful. Do note that this guide is not in absolution and is not required to follow by the letter. You as a young Knight have free range on how to traverse and explore the ups and downs of your characters, and may this guide at least provide you some options that you may deem beneficial with that.
II. Stat Breakdown
STR: Boosts ATK and increases max weight limit.
AGI: Provides FLEE and ASPD, helpful for normal attacks or offensive skills like Bash and Bowling Bash.
VIT: Boosts HP, HP RECOVERY, DEF, resistance to STAT AILMENTS and increases healing amount of HP POTIONS.
INT: Boosts SP, SP RECOVERY and MDEF.
DEX: Provides HIT, minimal ATK/ASPD boost and decreases CAST TIME (some Knight skills like Bowling Bash have cast times despite having no visual cast bar).
LUK: Increases CRIT and slightly increases ATK.
III. Possible Knight Stat Builds
A. Basic Auto-Attacker
High STR, moderately high AGI, mid DEX
Probably one of the most F2P-friendly builds, this Knight variant lets you dish out hard single-target hits quite quickly while dodging enemies, thus effectively saving potions. Tanking can be tricky because of having FLEE reduced with multiple mobs around, but you can quickly use AoE skills like Magnum Break and Bowling Bash for crowd control. A suitable amount of DEX (paired with foods or gear which increase HIT) will help you land those attacks as well.
B. Crit Auto-Attacker
High STR, moderately high AGI and LUK
This is a more expensive version of the previous Knight Build as it heavily depends on having high CRIT rate for hits to actually land, which is much harder with just stats alone. CRIT rate and CRIT damage items can be more costly especially if you’re after the highest possible numbers attainable (not to mention the leveling style for this build will mostly be point-and-click), but single-target DPS will be higher compared to the basic Auto-Attacker build. Keep those in mind if you decide to pick this route for your Knight.
C. Human Meat Shield
High STR, moderately high VIT, mid DEX and AGI
What other players will call as the “Carabao” build for being tanky, this Knight variant focuses on soaking up damage from hordes of monsters when mobbing, while unleashing AoE skills like Bowling Bash and Brandish Spear to clear them. VIT becomes an important stat to further boost the Knight’s Max HP and healing potency of potions. AGI doesn’t play that much of a role on FLEE, but having some points in for ASPD is recommended for faster release of said AoE skills.
| High: 99~80 | Moderately High: 79~61 |
| Mid: 60~31 | Low: 30~1 |
IV. Gear and KP Preparation (+F2P Options)
Before proceeding with your Swordsman, one may opt to have some items prepared to help ease with leveling. These items are not required, but getting the best amount of EXP possible will definitely be worth the investment. Below is a list of sample gear and consumables that you may consider acquiring beforehand to ease up the leveling process:
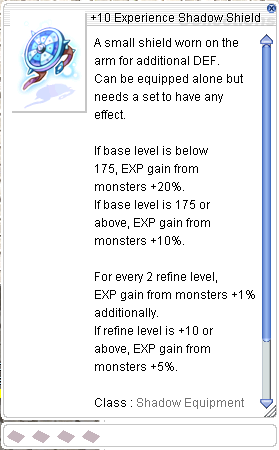
- Beginner (LV1-49), Rookie (Lv50-99) Shadow Sets and Experience Shadow Shield to increase EXP gained from defeating monsters

- Class-specific Shadow Equipment (preferably Swordsman Shadow Pendant for Magnum Break and Knight Shadow Set for Bowling Bash / Pierce)


- Equipment which provide +% EXP such as Kafra Uniform/Kafra Staff Headband set, Blue Rear Ribbon, Marin Balloon, EXP Rings from Cash Shop, Footgear with EXP-Race Cards

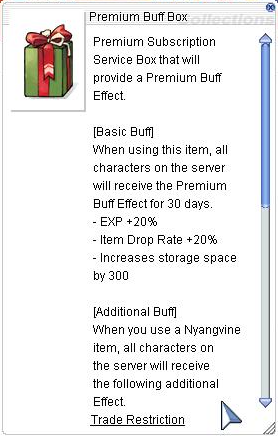
- Premium Buff Box (Increased EXP/Drop Rate and Kafra Storage space for 30 days) + Battle Manual Box (10pcs)
- World Teleport Ticket Box (allows easy access to fields and dungeons without having to traverse long walks or teleports from town; done via World Map or Navigation System, and must be used outside a building)

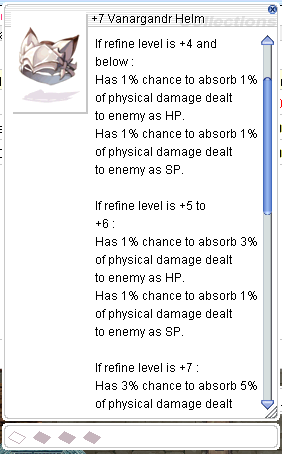
- HP/SP Sustain (aka leeching) Equipment such as Rideword Hat, Vanargandr Helm, Catherina von Blood, Evil Dragon Armor and Hunter Fly Card-compounded weapons


- Equipment which provides Lv1 Greed such as Bravery Bag, Greed Shadow Weapon or Greed Amistr Bag

- Garments which increase ATK or damage potential (ex: Wakwak Card-compounded garment for additional ATK, Violet Halo + Sigrun Wings/Crimson Booster for CRIT damage or Clashing Spiral damage respectfully)

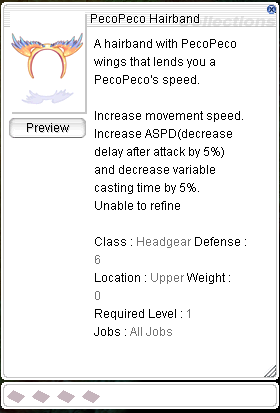
- Pecopeco Hairband for Movement and Attack Speed (movement speed bonus stacks while mounted)
- Double Attack Equipment such as +9 Chick Hat, Nagan or Sidewinder Card-compounded weapon (preferably a high Weapon ATK 2H Sword)

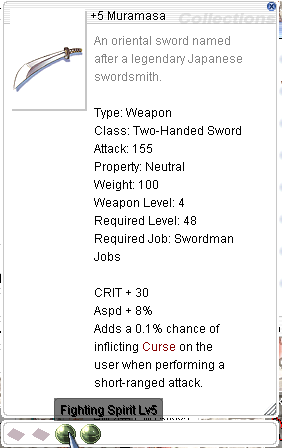
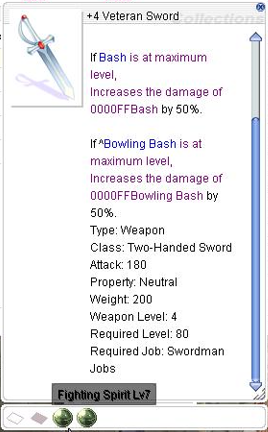
- Muramasa (for CRIT build), Veteran Sword (for Bowling Bash build), Zweihander or any Lv4 2H Swords or Spears (preferably with heavy Weight for future Clashing Spiral build) with Fighting Spirit, Sharp, ASPD or Expert Archer enchants (EA enchant for Clashing Spiral)
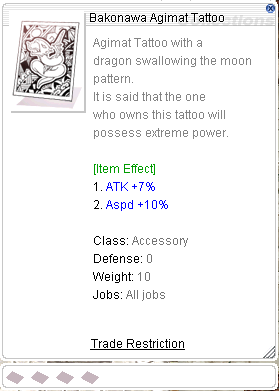
- Bakonawa Agimat Tattoo, Physical Enhancer Ring, Angel Egg or any accessory which increases ATK, ASPD, HP, CRIT or HIT (depending on what stat you need or want to prioritize)

If you are a new player though with limited resources or just want to take the free-to-play (F2P) route, you may go for these viable options:
- New User Box (free potions/consumables)
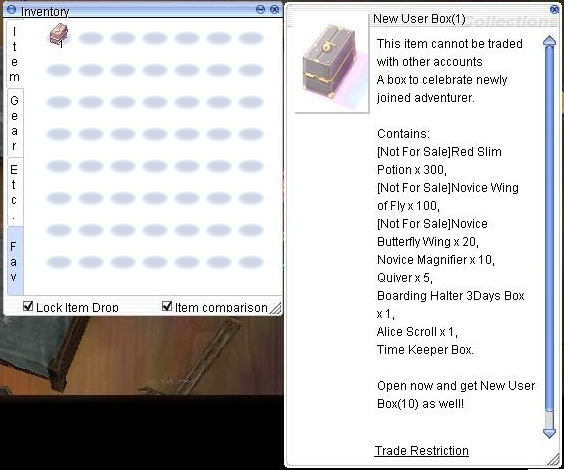
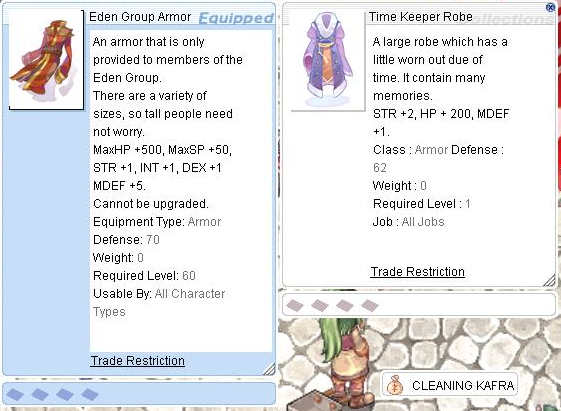
- Time Keeper Equipment and Metal Weapons (also included in the Time Keeper Box from New User Box) which are enough to carry you in the early to mid-game
- Eden Equipment Quest (preferably those done within Lv50-59, LV70-79 or Lv80-89 range for easy kill quests)
- Alice Mercenary Scrolls (via New User Box) summon an Alice companion to fight alongside you. She can use AoE skills such as Brandish Spear and Magnum Break that can kill multiple monsters at once, making early leveling effective. If you wish for Alice to automatically attack and use skills, consider downloading and setting up AzzyAI in the AI>USER_AI Folder.
- 5x [NFS] Battle Manuals via Jellopy Quest in Prontera; basically need to bring Jellopy to an NPC located at /navi prontera 204/53 (click to copy the command and enter in game chat)


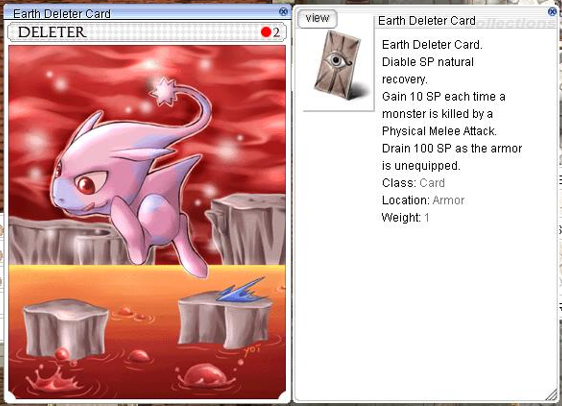
- Any affordable armor compounded with Earth Deleter Card (negates natural SP regen in exchange for restoring 10 SP per kill, effective for mob-leveling)
- Event consumables such as [NFS] Small Life Potion, [NFS] Almighty and [NFS] World Teleport Tickets (depending on which ones are available in the current patch)


V. Leveling Guide (Swordsman)
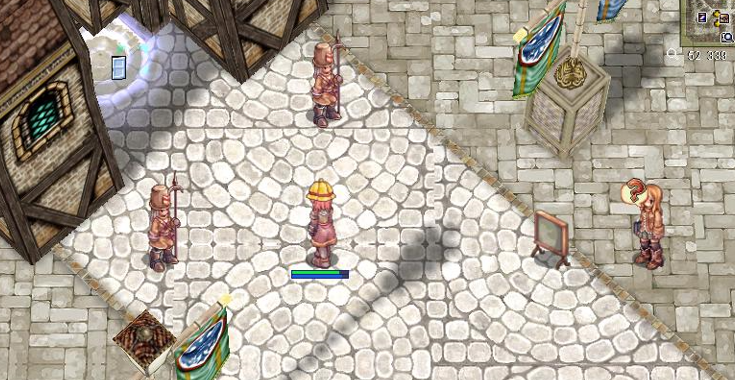
[Lv1 – 10]: Criatura Academy Quest (until receiving Eden Group Mark), Prontera Field (Rocker, Fabre, Lunatic)
Loot Priority: Grasshopper’s Leg, Fluff

![]()
![]()
[Lv10 – 25]: Ambernite, Pecopeco, Muka, Payon Field (Spore, Boa, Wormtail), Payon Dungeon 1F
Loot Priority: Snail Shell, Crystal Blue, Bill of Bird, Cactus Needle, Strawberry, Venom Canine
![]()

![]()

![]()

[Lv25 – 40]: Bigfoot, Thara Frog, Ant Hell 1F, Payon Dungeon 2F
Loot Priority: Bear’s Footskin, Honey, Poopoo Hat, Jellopy, Iron Ore, Sticky Webfoot

![]()

![]()

[Lv40 – 55]: Wolf, Argos, Orc Village, Orc Dungeon 1F, Byalan Dungeon 3F/4F, Comodo Field (Grove, Flora, Alligator)
Loot Priority: Strawberry, Bug Leg, Cobweb, Orcish Voucher, Emperium, Mermaid’s Heart, Gill, Mystic Frozen, Crystal Blue, Maneater Blossom, Stem, Aloe Leaflet, Anolian Skin, Yggdrasil Seed


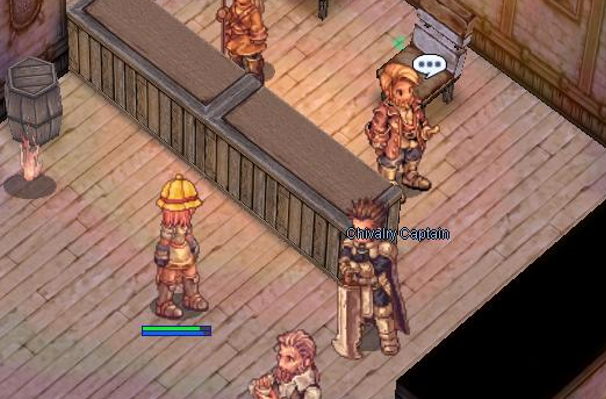
VI. Knight Job Change
Swordsmen with Job levels between 40 to 50 can proceed to change into a Knight. It is highly recommended (especially to new players) to level up to Job 50 to waive the entire quest requirement and instantly change your job. Once you’ve decided to change job, proceed to the Knight Guild located in the Northwest area of Prontera.
VII. Gutter Lines
A common term known to Knights; Gutter Lines are a particular map feature which affects the damage output of the Bowling Bash skill. As of writing (21 March 2023), in any map, an invisible grid is present which affects the said skill’s mechanic, making targets receive only one line of damage instead of two, as well as knocking them back by around 4 cells.

(Bowling Bash without Gutter Lines)
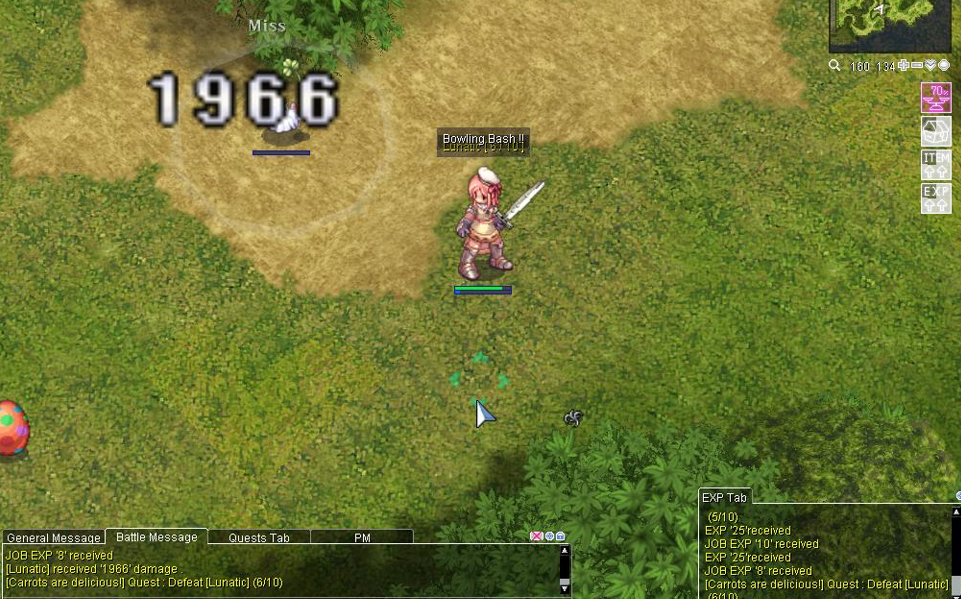
(Bowling Bash with Gutter Lines)
In order to avoid such a mechanic, Bowling Bash Knights are advised to stay away from Gutter Lines especially when mobbing. A simple trick to keep in mind is to look at the coordinates of your minimap or typing /where, and avoiding X, Y coordinates which are divisible by 40 + 5 cells adjacent (sample coordinates which fall on a Gutter Line: 80/120; 42/203; 74/40). Keep these in mind when you plan your next Bowling Bash on mobs during leveling.

VIII. Leveling Guide (Knight)
[Lv55 – 70]: Orc Dungeon 1F/2F, Beach Dungeon 2Pyramids 4F, Sphinx 3F, Mantis, Geographer, Sidewinder,
Loot Priority: Zenorc’s Fang, Orc Archer Bow, Shining Stone, Elunium, Star Crumb, Great Nature, Round Buckler, Rough Elunium, Rough Oridecon, Panacea, Rotten Bandage, Memento, Scale Shell, 3carat Diamond, Pantie, Undershirt, Iron Ore, Old Blue Box, Flame Heart, Maneater Blossom, Maneater Root, Venom Canine, White Herb
![]()


![]()

![]()
[Lv70 – 85]: Juno Field (Goat, Grand Peco, Sleeper), Petites, Einbech Mines Malangdo Dungeon, Stem Worm, Bathory
Loot Priority: Antelope Skin, Peco Peco Feather, Wind of Verdure, Mastela Fruit, Gold, Great Nature, Sand Clump, Grit, Rough Oridecon, Elunium, Dragon Tail, Dragon Scale, Dragon Canine, Petti’s Tail, Insect Feeler, Lantern, Steel, Coal, Used Iron Plate, Grit, Tattered Clothes, Rough Elunium, Old Blue Box, Yggdrasil Seed, Maneater Root, Witch Starsand, White Herb, Old Broom


![]()
![]()

![]()


![]()

[Lv85 – 95]: Stapo (preferably in hitters party), Glast Heim Underground Prison, Turtle Dungeon, Magma Dungeon 1F, Rachel Maps
Loot Priority: Jellopy, Green Live, Maneater Blossom, Maneater Root, Stem, Mandragora Flowerpot, Drosera Tentacle, Elunium, Oridecon, Rotten Bandage, Red Gemstone, Steel, Brigan, Cyfar, Izidor, White Herb, Turtle Shell, Lava, Mastela Fruit, Burning Heart, Glacial Heart, Ice Cubic, Crystal Blue, Wind of Verdure, Venom Canine, Scale Shell, Rough Oridecon, Harpy Feather, Harpy Talon


![]()
![]()

![]()

[Lv95 – 99]: Magmaring, Kobold, Magma Dungeon 2F (via party), Nifflheim Fields
Loot Priority: Burning Heart, Blue Hair, Burning Horseshoe, Dragon Tail, Dragon Scale, Dragon Canine, Dragon Skin, Little Evil Horn, Dead Branch, Elder Branch, Dullahan Armor Piece, Tangled Chains, Honey, Rough Elunium, Rough Oridecon


![]()


IX. The World Bounty Repeatable Quests and Boong Boong Drinks

Introduced in the Sept 2023 patch, World Bounty is a set of repeatable quests the player can accept, turn-in and reset in order to speed up the leveling process than just normally grinding monsters or doing Eden’s Daily Mission Board Quests. In various cities and towns, the NPC Magical Boy will teleport you to maps with bounty boards available, depending on your current location, at the cost of Boong Boong Drinks. These can be bought at the fixed cost of 100z from the Boong Boong V. Machine nearby. It is advised to bring a couple of them if you wish to grind for a good amount of time in bounty maps (around 500-1000), or have them in your storage which you can access via Kafra Card or Kafra Bell.
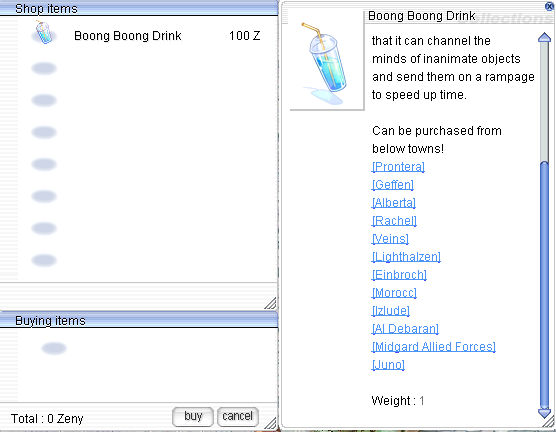
These drinks can also be used to reset the quest cooldown of bounty boards when you have finished turning in your quests. Depending on the bounty, simply talk to the board and bring the correct number of Boong Boong Drinks to refresh the cooldown. Afterwards, you may accept the bounty quest and kill monsters once again. More details about the World Bounty System may be viewed through the link below:
X. Rebirth / Transcending via Escaped Book Quest
Once you have reached Base Lv99 and Job Lv50, proceed to Juno where you can rebirth or transcend into a High Novice. Make your way to the Sage’s castle (yuno 90, 318) and find Metheus Sylphe.

He will give you an option to either donate some Zeny or do a simple monster-hunting quest (Escaped Book) in order to transcend. More information may be viewed via the Free Transcending Guide:
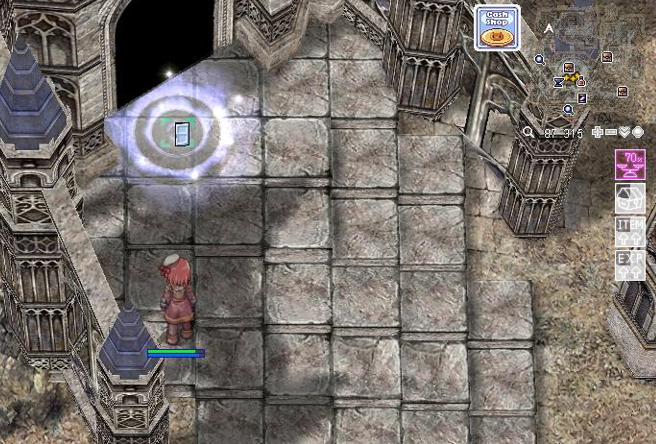
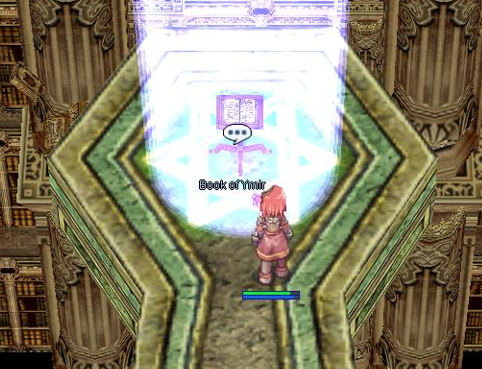
Once finished, he will direct you to walk north towards the Book of Ymir which will teleport you to Valhalla.
Before speaking to the Valkyrie NPC who will change you into a High Novice, make sure that you are below 500 weight, have no remaining skill points and not on a mount via Peco Peco or Boarding Halter. Once you have transcended, it’s all a matter of following the leveling guide once again until you max out as Lord Knight.
XI. Possible Lord Knight Stat Builds
A. Pre-Dragon Breath Path
High DEX and INT, moderately high to mid VIT
Current meta for Rune Knights, whether it be for PvE/MvP or PvP/WoE, is the Dragon’s Breath Build, which heavily focuses on VIT, INT and DEX in their stats. Early on, it is recommended to get high enough DEX and INT for fast cast time, then have enough VIT for a suitable Max HP. While leveling as a Lord Knight, these stats need to be focused, as well as relying on Clashing Spiral and a heavy weapon for leveling. Lord Knights are advised not to invest points into STR to make sure they have optimal Dragon’s Breath damage during their Rune Knight days.
B. Crit Auto-Attack Path
High STR, moderately high AGI and LUK, low VIT
A stronger version of the CRIT-Knight Build, this variant of Lord Knight is able to dish out stronger hits due to having more stat points to invest in STR or LUK, as well as gaining access to Transcended gear. Leveling can be challenging due to relying on single-target playstyle as opposed to mobbing (especially once the Lord Knight changes into a Rune Knight), but so long as you have the proper gear and tactics, you should perform well. A few points in VIT can help increase one’s Max HP to help tank attacks like magic spells which normally cannot be dodged or blocked by Parry.
C. Pre-Ignition Break/Hundred Spears Path
High STR, moderately high VIT, mid DEX and AGI
Though not as common as the previous two Rune Knight pre-requisite builds, this variant uses the “Carabao” build and takes it a step further. Lord Knights that take this path usually go for Ignition Break or Hundred Spears as their damaging skills when they change into Rune Knights. As of writing though, these skills’ damage outputs may not shine as much as the previous two builds, and reworks for these skills are still to-be implemented in the future. Nonetheless, they can come out as a surprise to opponents unprepared for them, and you can surely find some fun in trying this build out.
XII. Dual Client Partymates (Optional)

Knights are naturally capable of dishing out destructive damage, whether it be single target or crowd control, while they are active in the field. However, their DPS capabilities can still be pushed further with the help of some supportive skills. Here are some optional classes to have in an alternate account should you decide to help boost your Knight or Lord Knight’s leveling experience:
- Priest (for heals, buffs and warps)
- Alchemist (for higher HP recovered via Potion Pitcher)
- Sage (for elemental endow skills) / Scholar (for SP Battery)
- Spouse (for recall and SP Battery)
- Soul Linker (for Knight Spirit’s One Hand Quicken)
XIII. Additional Tips and Tricks
A. To reduce damage while kiting/mobbing enemies, whether tanking for your party mates or before releasing your AoE skills, consider wearing a Shield with resistances (ex: Thara Frog, Hodremlin, Platinum Shield). You can then quickly switch to your DPS weapon when you have gathered enough mobs to kill (note that you need to reapply Two-Hand Quicken if you choose to switch back to a 2H Sword with this tactic).
B. Keep a lookout on some important loot that you can sell at a fair price to players looking for them (refer to the items listed at the different leveling brackets above). These are either used by other classes as catalysts for their skills or as items for BQ turn-ins.
C. To save up on SP when using Provoke to gain aggro on monsters while mobbing, consider using Lv1 Provoke (4 SP vs higher levels of Provoke). This ensures that you’ll be able to grab the attention of more monsters and makes tanking for magic-type classes in your party easier (since they do not benefit from the -% DEF debuff on provoked targets). Undead monsters cannot be Provoked though, using other skills to gain aggro like Spear Boomerang may be used on these targets.
D. Before transcending your Knight into a High Novice, hoard and do one run of BQ Lv70 to 90 and turn the quests in once you reach Lv70 as Lord Knight. Unlike Word Bounty Repeatable Quests, you can interact with Eden Mission Board Quests at a much lower level requirement. Doing so will give you an insane amount of EXP (especially when increased with Battle Manuals and server’s EXP Boosts), raising your level to around Lv80+ and making you skip a whole lot of grinding.

E. Lord Knights have access to the skill, “Spear Dynamo,” which gives the same ignore-flinch effect as Endure. Compared to the latter though, this skill does not have a cool down, so you can cast Lv1 of this when you need an emergency Endure buff up while Endure is on cool down.
XIV. Epilogue
The path to valor and righteousness can be a rough and challenging one but can be overcome with the help of others. At the end of the day, what matters most is the friends we meet along our journey, and the memories we share with them which make our bonds strong with one another. We hope this guide has become informative to you, and that you have become more knowledgeable on how to effectively progress with leveling your Knight or Lord Knight. Should you have any questions, please leave a comment below or visit us over at the GGH Discord. Best wishes and happy leveling!
Special thanks to leingier and XeonFair from RO GGH Discord for sharing their knowledge on the class and making this guide possible.
Was this helpful?
6 / 2
