
Introduction
“Take the high road. It’s far less crowded and the view is much better.”
Warren Buffet

Magic classes have it rough in renewal. Renewal mobs have high magic defense (MDEF) and it does not take much MDEF to drastically lower magic damage. Without expensive gear, magic classes in the greater scheme of things have a hard time navigating the RO world vis-a-vis their physical class counterparts. However, if you find satisfaction in taking the difficult (but rewarding) road, you are in the right place.
Warlocks are the next progressions of High Wizards, which stem further from the Wizard class tree of the Magician class. Unlike their predecessors who are party-play oriented and specialize in Area of Effect (AoE) Spells only, Warlocks have great solo damage potential, but not at the expense of their further polished AOE skills. They also now have access to several crowd control skills, departing significantly from the normal glass-cannon builds of their predecessor.

Scope of this Guide
This guide is made for Ragnarok Online by Gravity Game Hub (GGH). It is an official, low-rate, renewal server. As such, the information in this guide may not apply to other servers.
This guide is built for Player versus Monster (PVM) or Player versus Environment (PVE) experiences, with very minor tips in relation to Player vs. Player (PVP).
Pros and Cons
| Pros | Cons |
| High Damage Per Second (DPS) (can dish out 4m+/second with max gear) | Skills have relatively high cast times (can be bypassed by Release) |
| High Damage Burst Potential (can reach about 10m damage for one skill with max gear) | Long skill cooldowns (can be bypassed by Release) |
| Most spells are AOE-based; good for mobs | Weak to holy/shadow mobs |
| Can switch to different elements anytime | Dependent on party members for best DPS potential (some builds are not) |
| Can skip cast time and skill cooldown with Release | Easily overweight |
| No ammunition needed and no catalyst needed for most skills | (Very) Expensive to gear (well) |

Stats
| Stat | Comments |
| INT (Intelligence) | This is your main stat. Every point of int adds + 1.5 Status Magic Attack (MATK). Every 6 points adds +1 SP Recovery. This stat also decreases your Variable Cast Time (VCT) by half the effectiveness of dex. It is recommended to max this stat to 120. All of these effects are useful to you as a magic user. It is generally not worth it to go past 120 on any stat because stat points would be expensive from that point moving forward. If you want more damage, it would be better to dump those extra stat points to LUK. |
| DEX (Dexterity) | This is your secondary stat as it affects your VCT. Every 5 points of Dex also gives MATK +1. This stat becomes less relevant as you gather more VCT gears. It is usual, however, for Warlocks to get 120 DEX to avail the FCT-reducing effect of Temporal Dex Boots and get the best out of the Mob Scarf combo. |
| VIT (Vitality) | This stat is for survivability. Every point adds 1% Max HP. You can choose either to add health through vit or add flee through agi for survivability. |
| AGI (Agility) | This stat is for attack speed (ASPD) and also for survivability. ASPD affects animation delay, which is the delay your character suffers for casting skills between casts. Getting ASPD should not be prioritized because our main problem is global delay and cooldown of skills, which are not affected at all by agi. Agi also gives flee, but it is recommended to get vit instead, as flee needs to be stacked to get the most benefit, and warlocks have no flee adding skills (or gear). |
| LUK (Luck) | This stat is for extra points. If you want to go full glass cannon, you can add points here instead of adding some for survivability stats because every 3 points in luk gives +1 MATK. LUK also helps increase the chance of resisting select bad status effects. |
| STR (Strength) | This stat is not that relevant for warlocks except that it helps increase our low weight limit. |
Most warlocks will run a 120 INT + 120 DEX stat build, with the remaining stats distributed between VIT, AGI and LUK, depending on preference and build.

Magic Attack Formula
The main formula for MATK is the following:
MATK = StatusMATK + WeaponMATK + ExtraMATK + BuffMATK

In that formula, we have:
- Status MATK. This is from your stats like Int, Dex, and Luk. Basically, Int adds the most damage, then Luk, then Dex. This is the left side of xx + xx MATK in your stat window. The formula is:
StatusMATK = floor[floor[BaseLevel ÷ 4] + Int + floor[Int ÷ 2] + floor[Dex ÷ 5] + floor[Luk ÷ 3]]
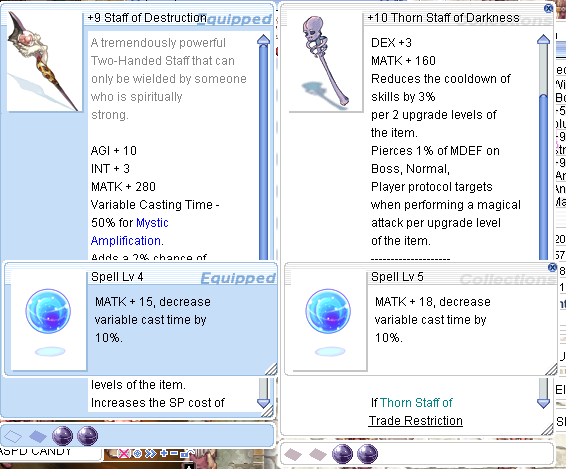
- Weapon MATK. This considers the base MATK given by your weapon (like +280 MATK of your Staff of Destruction), the weapon level, its refinement rate, and variance. This makes up the most of your magical damage. The right side of xx + xx MATK in your status window is your WeaponMATK + EquipMATK. Formula is:
WeaponMATK = BaseWeaponDamage + Variance + RefinementBonus + OverUpgradeBonus
While the formula for Variance is:
Variance= ± 0.1 × WeaponLevel × ((BaseWeaponDamage + (RefinementBonus ÷ 2)) + (WeaponRefinement × 2.5))
- Extra MATK. This is further composed of 3 subparts:
- EquipMATK. When your equipment or card gives +MATK, that added MATK goes here. For example, the +30 MATK of Gyges Ring.
- ConsumableMATK. When your consumable gives +MATK, that added MATK goes here. For example, Mana Plus gives +20 MATK.
- PseudoBuffMATK. Too minor to discuss.
The formula for Extra MATK is:
ExtraMATK = EquipMATK + ConsumableMATK + PseudoBuffMATK
We add all these different categories of MATK and we get our total “MATK”. It is this MATK that is used as base for the different multipliers we have in game.
Multiplier – Example:
RaceMultiplier – Example: Witch’s Pumpkin Hat
SizeMultiplier – Example: Skeleton Worker Card (physical damage only).
TargetPropertyMultiplier– Example: Windy Shadow Armor.
MonsterMultiplier – Example: Rainbow Angel Hairband
MATKMultiplier – Example: Rainbow Scarf.
SkillPropertyMultiplier – Example: Iron Staff.
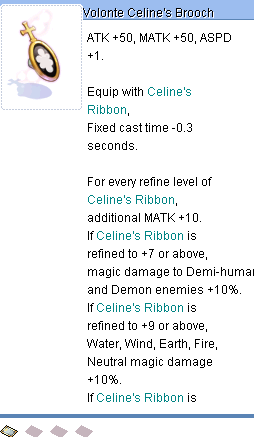
BossMATKMultiplier – Example: Celine’s Brooch.
Inferences from these formulas:
- Gears/Cards/Options that increase “magical damage” or the magical damage of a specific skill are more valuable than MATK enchants.
- It is best to balance flat MATK and MATK% bonuses, favoring flat MATK by a respectable margin.
- For significant damage increases, get a new high level weapon with a high MATK base and/or wear MDEF piercing gear.
Magic Defense Formula

Magic defense (MDEF) is a damage reduction mechanic based on the stats, gear, items and skills of players and monsters that reduces magical damage received. It composed of two parts: Soft MDEF and Hard MDEF. Soft MDEF is what you see in the left part of the MDEF portion of you stat window and HARD MDEF is what you see in the right part.
MDEF = Soft MDEF + Hard MDEF
Soft MDEF: Soft MDEF basically is the MDEF you get from stats (int, vit, and dex) and your base level, as you will see in the formula below. It gives a flat reduction to all incoming damage equal to the value of Soft MDEF. In other words, the reduction is direct (and not multiplicative). Basically, 120 MDEF reduces 120 magical damage received. Due to this flat reduction nature, you do not need to focus on Soft MDEF so much, as compared to reducing Hard MDEF, which reduces magical damage much more substantially. The formula for players’ Soft MDEF is:
Soft MDEF = Floor[(Total INT)+(Total VIT/5)+(Total DEX/5)+(Base Level/4)]
The formula for monster’s Soft MDEF is:
SoftMDEF = floor(BaseLvl ÷ 4) + floor (VIT ÷ 10) + floor(INT ÷ 5)

Tip: "floor" just means you round down.
Hard MDEF: Hard MDEF is a relative reduction to magical damage and thus, the more (if not, the only) signficant portion of the MDEF formula. It is the MDEF coming from equipment/shadow equipment/cards/options/skills/items (for example: WoE Robe, Goat Card, Arclouse Card). It reduces incoming damage multiplicatively. To compute the percent of damage reduced by Hard MDEF, we use the following formula:
Percent of Damage Reduced = (1-[(1000+Hard MDEF)/(1000+Hard MDEF*10)])*100
Applying this formula, let’s say you have 50 MDEF. This translates to reducing about 30% of incoming magical damage. Note: This also means that 100 Hard MDEF does not mean 100% magic damage reduction, but 45%.
MDEF Pierce: Given the discussion on how MDEF significantly reduces magical damage, it thus highly recommended to stack as much damage MDEF piercing gear as much as possible if you wish to see a significant magical damage improvement.
In some cases, MDEF piercing gear is the only way to go, especially when you are against high MDEF mobs (for example when you’re at Abyss Dungeon 4).
MDEF Pierce can come from gears (see Tempest Shadow Set), from skills (see Expiatio). It caps at 100%.
MDEF Pierce affects Hard MDEF, meaning 100% MDEF Pierce means your magical damage completely ignore the Hard MDEF of the mob you are fighting (and the related damage reduction that Hard MDEF gives).

Tip: As of the current patch, it is possible to achieve 100% MDEF Pierce using the Tempest Shadow Set (see suggested equipment section below). It is highly recommended to collect the whole set as you will notice significant damage improvement with it.
VCT vs. FCT
The main formula for Cast Time is:
Cast Time (seconds) = VCT + FCT

In this formula we have:
1. Variable Cast Time (VCT). VCT depends on the stats and gear of the caster. Most cast-reducing effects of gears relate to VCT. For example, the +30% VCT Reduction of Violet Halo. Stat-wise, dex reduces VCT twice as much as int.
Note: VCT-reducing gear STACKS.
Formula is:
VCT = BaseVCT × (1 − SQRT[{DEX × 2 + INT} ÷ 530]) × (1 − Sum_GearVCTReduc ÷ 100) × (1 − Sum_SkillVCTReduc ÷ 100)
This includes:
- BaseVCT = Base Variable Cast Time of a skill.
- Sum_GearVCTReduc = Sum of reductions for Variable Cast Time, like Malangdo Spell Enchants, Crown of Deceit and Kathryne Keyron Card. Note: It seems like Magic Strings operates like GearVCT (and not SkillVCT)
- Sum_SkillVCTReduc = Sum of reductions for Variable Cast Time from specific skills like Wizard Shadow Armor and Siroma Card.
Skill-specific VCT: The %VCT reduction in general is NOT additive to %VCT reduction for a certain spell. For example, if you have 60% VCT reduction in general, getting 40% VCT reduction for Storm Gust (from Wizard Shadow Shoes) does NOT make you 100% instant cast for Storm Gust. From the formula above, the remaining general VCT you have (Sum_GearVCTReduc) will still be multiplied with the remaining skill-specific VCT (SkillVCTReduc). As an illustration, if you have 95% general VCT reduction, and a 5% VCT reduction from a specific skill, you would still have 4.75% VCT remaining. This is solved as follows:
5% general VCT remaining * (100% – 5% skill reduction) = 4.75% VCT remaining
Getting VCT 100%: As stated, to reduce VCT, you have two options: stat-route and VCT-gear route. You remove VCT completely through stats if your (DEX x 2) + INT >= 530. You remove VCT through VCT% reducing gear if your VCT% reduction totals to 100%. It is generally advised to stick to one route because of the nature of the formula. Some cheap sources of VCT from gear include: Hero Nepenthes Shoes, Malangdo-enchanted weapon (see Tips Section), enchanted MIR/anti-magic suit, crown of deceit, VCT shadow enchant stones, caster shadow enchant stones, anemos shield, tower manager card, Kathryn Keyron card.
2. Fixed Cast Time (FCT). Unlike VCT, only a handful of skills (for example, Sacrament) and gear (for example, Temporal Dex Boots, Bellum Arc Wand) reduce FCT.
Important Note: Gears and skills that reduce FCT by % (for example, Radius, Sacrament and Puente Robe) DO NOT stack. The highest % will be the only effect applied. On the other hand, gears and skills that reduce FCT by a fixed amount (for example, Temporal Dex Boots, Fixed Cast Shadow Stone, Ancient Hero Boots, Bellum Arc Wand) STACK and are applied before percentage modifiers.
Formula is:
FCT = (BaseFCT – Sum_FCT) × (1 − Max_FCTReduc ÷ 100)
This includes:
- BaseFCT = Base Fixed Cast Time of a skill.
- Sum_FCT = Sum of all effects that directly subtract from Fixed Cast Time, like Ancient Hero Boots
- Max_FCTReduc = Highest reduction modifier of Fixed Cast Time, usually Sacrament.
Instant Cast: Note that instant cast is possible here. We have enough flat FCT-reducing gear to effectively instantly cast Warlock skills (which are mostly pegged at 1.0 second FCT, save for Comet) with completely no cast time, assuming 100% VCT reduction is also covered (either through gear or stats). To reach 1.0 FCT reduction, you may look at the following flat FCT-reducing gear:
- Temporal Dex Boots (0.5 FCT)
- Casting Stone (0.5 FCT)
- Minor Casting Stone (0.3 FCT)
- Bellum Arc Wand (0.2 FCT in pvp maps)
- Celine Set (0.3 FCT as a set)
- Predator Set (0.5 FCT)
- Amistr Beret/Spell Circuit (0.1 FCT per refine after +10)
- Ancient Hero Boots (0.3 FCT at +9, 0.5 FCT at +12)
Cooldown vs. ACD
Now that the differences between VCT and FCT have been settled, it’s time to discuss another aspect of skills management that also confuses many people. While Skill Cooldown and Skill After-Cast Delay start at the same time (upon casting of the skill), they have different effects and they end at different times.
Skill Cooldown:
- When skill-specific cooldowns trigger, you will be unable to cast the same skill again until that skill’s cooldown finishes.
- In your shortcut bar, you will know the problem is skill cooldown if only that skill is grayed out. You can freely cast other skills during that skill’s cooldown.
- Some skills have high cooldowns (like Comet and Earth Strain) and some skills have no cooldown (like Chain Lightning). This is important to note in party-play because only those skills with no innate cooldown are spammable with Poem of Bragi/Magic Strings.
- Some equipment reduce specific cooldowns (see Iron Staff that reduces cooldown of Earth Strain).

After-Cast Delay (ACD):
- When ACD triggers, you are unable to cast ANY SPELL for the duration of the delay.
- In your shortcut bar, you will know that ACD has triggered if all of your skills are grayed out.
- Most skills have ACD, but some exceptionally do not, for example, Jupitel Thunder. No ACD and no cooldown means the skill is spammable.
- Poem of Bragi (assuming the Minstrel has the correct stats) will eliminate your ACD.
- Several gear reduce ACD (see Reload stones, Heart Wing Hairband, TSOD, Fallen Angel Shield, Diabolus Robe). Stacking ACD reduction can be a strategy in building your warlock.

Elemental Table
As high wizards, one of our key advantages over other classes is our ability to switch elements at will without any converter or ammunition swapping. As such, it would be a waste to be not familiar with how the different elements work with each other.
The table below shows the attacking element in columns (vertical), and defending element in rows (horizontal). If the cell is beyond 100%, meaning the attacking element has increased damage over the defending element. Less than 100% means reduced damage. For example, Fire attacks deal 150% damage to Earth monsters.
In renewal, mobs have different levels of defending elements. The resistances and weaknesses of a defending element are amplified relative to its level. Attacking elements are not separated into levels. The defending elements span until level 4.
Tip: Use Sense (2nd job skill) to see a mob’s characteristics/element/size/race.
(a) Defending Element (horizontal/rows) Level 1
| Neutral | Water | Earth | Fire | Wind | Poison | Holy | Shadow | Ghost | Undead | |
| Neutral | 100% | 100% | 100% | 100% | 100% | 100% | 100% | 100% | 70% | 100% |
| Water | 100% | 25% | 100% | 90% | 175% | 100% | 100% | 100% | 100% | 100% |
| Earth | 100% | 100% | 25% | 150% | 90% | 125% | 100% | 100% | 100% | 100% |
| Fire | 100% | 150% | 90% | 25% | 100% | 125% | 100% | 100% | 100% | 100% |
| Wind | 100% | 90% | 150% | 100% | 25% | 125% | 100% | 100% | 100% | 100% |
| Poison | 100% | 100% | 100% | 100% | 100% | 0% | 100% | 50% | 100% | 50% |
| Holy | 100% | 75% | 75% | 75% | 75% | 75% | 0% | 125% | 75% | 100% |
| Shadow | 100% | 100% | 100% | 100% | 100% | 50% | 125% | 0% | 75% | 0% |
| Ghost | 70% | 100% | 100% | 100% | 100% | 100% | 100% | 100% | 125% | 100% |
| Undead | 100% | 100% | 100% | 125% | 100% | −25% | 150% | −25% | 100% | 0% |
(b) Defending Element (horizontal/rows) Level 2
| Neutral | Water | Earth | Fire | Wind | Poison | Holy | Shadow | Ghost | Undead | |
|---|---|---|---|---|---|---|---|---|---|---|
| Neutral | 100% | 100% | 100% | 100% | 100% | 100% | 100% | 100% | 50% | 100% |
| Water | 100% | 0% | 100% | 80% | 175% | 75% | 100% | 100% | 75% | 75% |
| Earth | 100% | 100% | 0% | 175% | 80% | 125% | 100% | 100% | 75% | 75% |
| Fire | 100% | 175% | 90% | 0% | 100% | 125% | 100% | 100% | 75% | 75% |
| Wind | 100% | 80% | 175% | 100% | 0% | 125% | 100% | 100% | 75% | 75% |
| Poison | 100% | 100% | 100% | 100% | 100% | 0% | 100% | 25% | 75% | 25% |
| Holy | 100% | 50% | 50% | 50% | 50% | 50% | −25% | 150% | 50% | 125% |
| Shadow | 100% | 75% | 75% | 75% | 75% | 25% | 150% | −25% | 50% | 0% |
| Ghost | 50% | 100% | 100% | 100% | 100% | 75% | 100% | 100% | 150% | 100% |
| Undead | 100% | 100% | 100% | 150% | 100% | −50% | 175% | −50% | 125% | 0% |
(c) Defending Element (horizontal/rows) Level 3
| Neutral | Water | Earth | Fire | Wind | Poison | Holy | Shadow | Ghost | Undead | |
|---|---|---|---|---|---|---|---|---|---|---|
| Neutral | 100% | 100% | 100% | 100% | 100% | 100% | 100% | 100% | 0% | 100% |
| Water | 100% | −25% | 100% | 70% | 200% | 50% | 100% | 100% | 50% | 50% |
| Earth | 100% | 100% | -25% | 200% | 70% | 100% | 100% | 100% | 50% | 50% |
| Fire | 100% | 200% | 70% | −25% | 100% | 100% | 100% | 100% | 50% | 50% |
| Wind | 100% | 70% | 200% | 100% | −25% | 100% | 100% | 100% | 50% | 50% |
| Poison | 100% | 100% | 100% | 100% | 100% | 0% | 125% | 0% | 50% | 0% |
| Holy | 100% | 25% | 25% | 25% | 25% | 25% | −50% | 175% | 25% | 150% |
| Shadow | 100% | 50% | 50% | 50% | 50% | 0% | 175% | −50% | 25% | 0% |
| Ghost | 0% | 100% | 100% | 100% | 100% | 50% | 100% | 100% | 175% | 100% |
| Undead | 100% | 125% | 100% | 175% | 100% | −75% | 200% | −75% | 150% | 0% |
(d) Defending Element (horizontal/rows) Level 4
| Neutral | Water | Earth | Fire | Wind | Poison | Holy | Shadow | Ghost | Undead | |
| Neutral | 100% | 100% | 100% | 100% | 100% | 100% | 100% | 100% | 0% | 100% |
| Water | 100% | −50% | 100% | 60% | 200% | 25% | 75% | 75% | 25% | 25% |
| Earth | 100% | 100% | −50% | 200% | 60% | 75% | 75% | 75% | 25% | 25% |
| Fire | 100% | 200% | 60% | −50% | 100% | 75% | 75% | 75% | 25% | 25% |
| Wind | 100% | 60% | 200% | 100% | −50% | 75% | 75% | 75% | 25% | 25% |
| Poison | 100% | 75% | 75% | 75% | 75% | 0% | 125% | −25% | 25% | −25% |
| Holy | 100% | 0% | 0% | 0% | 0% | 0% | −100% | 200% | 0% | 175% |
| Shadow | 100% | 25% | 25% | 25% | 25% | −25% | 200% | −100% | 0% | 0% |
| Ghost | 0% | 100% | 100% | 100% | 100% | 25% | 100% | 100% | 200% | 100% |
| Undead | 100% | 150% | 50% | 200% | 100% | −100% | 200% | −100% | 175% | 0% |
Note: Elemental magic attacks are weak against holy and shadow mobs and bosses.
- For Holy 1-3 Mobs: Use Chain Lightning or Hell’s Inferno (or Comet/Drain Life).
- For Holy 4 Mobs: Use Hell’s Inferno, which deals shadow damage, or Comet (or Drain Life), which deals neutral damage. Elemental attacks will miss.
- For Shadow Mobs: Use Chain Lightning or Comet (or Drain Life).
Skills
Warlock Skills
| Skill | Description | Comments |
|---|---|---|
 Summon Fire Ball Summon Fire Ball | As the name suggests, this summons a Fire elemental ball. You can summon up to five at a time. The Fire ball can either be (1) thrown individually at an enemy using Release, dealing Fire magic damage to a single target or (2) merged with other elemental balls (minimum of 4 required) to deal massive damage to a single target with Tetra Vortex. | Not recommended to be used using the Release skill. The single property fire damage is low and the time needed to recast each ball is not worth the puny damage. Best use of this skill is to add fire property for Tetra Vortex. See Tetra Vortex Section. |
 Summon Lightning Ball Summon Lightning Ball | Same with the above skill, except this summons a lightning ball with wind property damage. | Same as above, but adds wind property to Tetra Vortex instead. |
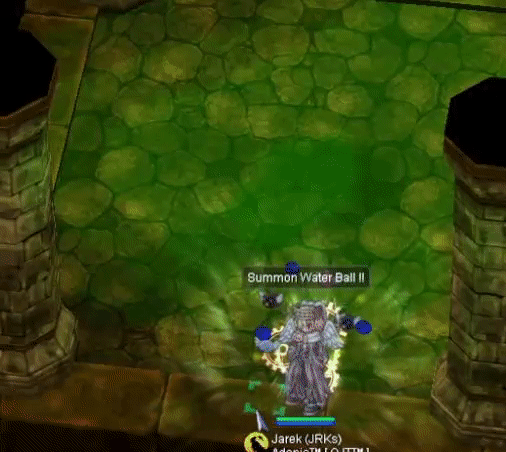
 Summon Water Ball Summon Water Ball | Same with the above skill, except this summons a water ball with water property damage. | Same as above, but adds water property to Tetra Vortex instead. |
 Summon Stone Ball Summon Stone Ball | Same with the above skill, except this summons a stone ball with earth property damage. | Same as above, but adds earth property to Tetra Vortex instead. |
 Tetra Vortex Tetra Vortex | Use all the balls around the caster summoned via Summon X Ball skills above to inflict massive elemental magical damage on a single target. The element of the magical damage will follow the elements of the balls summoned in a Last In, First Out way. For example, if you summoned Wind, Fire, Water, Fire balls, your TV will deal Fire, Water, Fire, and Wind damage. This skill will fail if the Warlock has not summoned at least 4 element balls. If the Warlock summoned 5 balls, this skill will ignore the very first ball summoned (but will still consume all balls). Depending on the ball released, this skill will also randomly deal a status: Fire ball – Burning Water ball – Freezing (not Frozen) Wind ball – Stun Earth ball – Bleeding | This is one of the ultimate skills of a Warlock. Positives: It has the highest damage potential in solo-play (arguable with SE+IT); flexible with elements; one of the choices for Boss-hunting Negatives: needs to have 4 balls summoned to work (i.e., not spammable); not good against Shadow or Holy mobs Note: When you store TV, remember, you would need to separately resummon the 4 balls each time before you can Release the next stored TV. Note: Study the statuses that each ball inflicts. Some, like Freezing are especially helpful in slowing down enemies to start your other spell combos (Jack Frost would deal greater damage to targets subject of Freezing). Tip: Needless to say, summon the elemental balls that correspond to the element that the mob you are fighting are most weak to. If you are unsure, summon the element you are wearing the most damage modifiers for. |
 Release Release | You can toggle between Levels 1 & 2 for this skill. The Lvl 1 version casts the most recently stored spell by Reading Spellbook without any cast time. If there are no spells stored, casting this skill will release one of the elemental balls summoned using the Summon X Ball skill/s. The magical damage will follow the element of the balls summoned. The Lvl 2 version releases all balls summoned using the Summon X Ball skill/s. It will deal magic damage following the element of the balls summoned. | This is one of the key spells of a Warlock. Releasing a stored lets warlocks completely bypass the cast time (both VCT and FCT) of the stored warlock/high wizard/mage skills. Apart from bypassing the cast time, the Reading Spellbook and Release combo also bypasses the skill’s cooldown. This is especially significant for high cooldown skills like Comet. With this skill, you can cast succeeding Comets by storing multiple comets and releasing them in succession. Note that the after cast delay of the stored skills are not bypassed. Released skills follow the ACD of the stored skills. Note further that Releasing a stored ground spell transforms it to a Target-based spell, i.e., you cannot cast a Released Earth Strain to the ground unlike a normal-cast Earth Strain. You will mostly use the Lvl 1 version of this skill. The damage of the elemental balls of Lvl 2 is subpar compared to your other Warlock skills. However, you will need Lvl 2 as it is a pre-requisite for Recognized Spell, which you will definitely get. |
 Reading Spell Book Reading Spell Book | This skill is used in conjunction with Release. It allows a Warlock to memorize or store an offensive damaging skill/spell by reading that skill’s specific spell book. Thus, to successfully memorize a skill, you need to have the spell book of the specific skill in your inventory and you need to have leveled that skill already. The amount of spells that you can store with Reading Spell Book depends on several factors, such as your INT stat, Base Level, Freezing Spell level (as will be discussed below), and the kind of spells you are storing. This can be observed from the formula below. The full formula is said to be as follows: Mind Slots = (FreezingSpell_Lv × 8) + Floor(BaseLv ÷ 10) + Floor(INT ÷ 10) As to what skills you can store, here’s a complete list, arranged according to how much mind slots they will take: 7 Slots Fire Bolt Cold Bolt Lightning Bolt Earth Spike 8 Slots Drain Life 9 Slots Thuderstorm Jupitel Thunder Water Ball Heaven’s Drive 10 Slots Lord of Vermilion Meteor Storm Storm Gust 12 Slots Jack Frost Earth Strain Crimson Rock Chain Lightning 22 Slots Comet Tetra Vortex | This is one of the key spells of a Warlock. If you are new to the class, to visualize the skill combo, you cast Reading Spell Book first to memorize a skill. This opens a prompt for you to choose which skill you want to memorize (remember to have the spell book in your inventory + the skill leveled up). You recast Reading Spell Book as much as you can until your memory is full (your chat box will prompt you that your memory slots are full). Generally, the more powerful the spell, the more it fills up your “memory”. The less powerful the spell, the more of it and its kind you can store. Then, when you find your target, you use Release to release the stored spell to a specific target. You recast Release until your memory is empty again. You then repeat the process as necessary. This method lets warlocks skip the cast time and cooldown of spells. Usual spells stored are those with high cast time and high cooldowns. For leveling these are Crimson Rock and Earth Strain. If you are a Comet-build Warlock, Comet is also very high up on the commonly-stored spells as it has a long cooldown if otherwise casted normally. Important: the greatest down-side to using the Reading Spellbook+Release Combo is that Amplify Magic does not affect the released skill. This matters because Amplify Magic gives a whopping 50% MATK increase for the spell it affects. Note: Storing the spell uses up the SP required for that skill and needs the normal catalyst for that spell. If you plan on being a Comet-Release build please note that apart from needing the repeated red gemstones per cast, you will also need sp-healing potions. You can buy the spell-books in the Mage Guild in Geffen. They are available in /navi geffen_in 174/112 from Lea. Please note that the Spell Books for the Ultimates are locked by a quest that needs a base level 140 warlock to complete. You may start the quest by asking Lea about it. If you are underleveled you may buy them from players as they are tradable. |
 Freezing Spell Freezing Spell | Each level in Freezing Spell increases the mind slots of a Warlock. Please refer to Reading Spellbook and Release Section for a more detailed explanation. | Note that Freezing Spell is not a requirement for the Reading Spellbook and Release combo. If you are a high-leveled Warlock, spec’d with INT, you will likely be able to memorize about 1 ultimate and 1 non-ultimate even without any skill point to Freezing Spell. For a Lvl 175 Warlock with 120 INT, you approximately need to allot at least Lvl 4 to Freezing Spell to memorize two Ultimates. |
 Frost Misty Frost Misty | Deals water damage around the Warlock with a chance to inflict the Frost/Freezing Status for 10 seconds to the target. Higher levels means higher damage and higher chance to freeze (50% chance at lvl 5). Frosted targets will have reduced movement speed by 30%, reduced ASPD by 30%, reduced Hard DEF, and increased FCT by 50%. Most importantly, will take significantly increased damage from Jack Frost. | This skill is combos with Jack Frost. As a rule of thumb, always cast this skill first before spamming Jack Frost. If the freezing status will kick in, Jack Frost’s damage will tremendously increase (about 80k increase for some mobs). The freezing status also slows mobs down. To top it all off, it also deals some damage (slightly weaker than Jack Frost). It is helpful in every scenario. |
 Jack Frost Jack Frost | Deals water property damage around the caster, with a very large AOE of 19×19 cells. It inflicts the Frozen Status on enemies. Damage is greatly increased if the target is suffering from the Frost/Freezing Status (from Frost Misty or some other source). | One of the signature spells of a Warlock. The large AoE of this skill plus its spammability make the Warlock one of the best AoE farmers in the game. Please note, however, that because of its relatively lower damage (compared to other skills), it is best for lower level mobs. The damage potential of this skill is unlocked by the Freezing Status from Frost Misty. Please note that Freezing/Frost is not the same as Frozen status. For the effects of Freezing/Frost status, see Frost Misty Section. The Frozen status that this skill gives immobilizes the mob and forces its element to be Water 1. This means wind spells, such as Chain Lightning, are good to combo with this skill. |
 Sienna Execrate Sienna Execrate | A status-inflicting skill. Chance to inflict Stone Curse/Petrify on enemies in the target area. Chance to inflict Stone Cruse and AoE of target area are increased per level (7×7 area and 70% chance to Stone Curse at lvl 5). Consumes 2 red gemstones upon cast. | Petrified enemies are imobilized and become forced Earth 1. This is good to combo with Crimson Rock (but do not use it on every mob, as it needs a catalyst). Note that Undead and Boss mobs cannot be petrified. Useful for PvP/WoE because of its AoE. Just note, however, that its range is relatively lower compared to other skills. Usually not maxed for PvM warlocks for the lack of skill points. |
 Drain Life Drain Life | Deal neautral magic damage to a single target, with a high chance to absorb or leech health based on the damage dealth. Higher levels mean higher damage, higher chance to leech (95% at lvl 5), and higher damage leeched (40% of dmg at lvl 5). | This skill is good for solo warlocks as its heal is very significant (it heals almost full health if maxed) and thus effectively reduces the need to pump health potions. Your SP use can be covered by Soul Drain (high-wizard skill). Another notable thing about this skill is it is neutral element. This means it is okay for Shadow and Holy mobs. Its damage is not that high though. Best used for the leech only. |
 Crimson Rock Crimson Rock | Deals good fire property magic damage around the target area (7×7 AoE). Enemies hit will also be knocked back. | This is the best leveling skill for Warlocks inasmuch as (1) it deals good damage; (2) many enemies are weak to Fire (earth mobs, undead mobs); (3) fire magic is cheap to increase (alchemist glove, mora crimson set); (4) it is AOE, albeit small; (3) it does not take too much mind slots to store. The usual method this skill is used is through the Reading Spellbook+Release combo. 1-3 succeeding crimson rocks should be able to kill most mobs when leveling. |
 Chain Lightning Chain Lightning | Deals wind property magic damage to a target that chains to nearby enemies near the suggested target. If one target only, the chain will hit the target 4 times. If the target has other enemies beside it, the chain will bounce between them about 5 to 9 times dependin on how they near they are with each other. | One of the signature spells of a Warlock. This is one of your best single target DPS skills. It deals good damage, it bounces (semi-AoE), and it has no skill cooldown. Meaning, it deals pretty devastating damage when you’re stepping on a Poem of Bragi/Magic Strings. For Boss Hunts with a party, this should be your main spell to spam, especially if Intense Telekinesis is down for the SE+IT combo. You skip the animation delay of this skill once you achieve instant cast. |
 Stasis Stasis | Disables skill usage over a huge AoE around the Caster. This affects the Caster, allies and foes. Lasts for 60 secs and affects a 27×27 AoE at Lvl 5. | This skill has a 5-minute cooldown. Thus, it is mostly only relevant for rare PvP/WoE scenarios where you want to play hero and change the tides of battle. Note that this skill also affects you. You will be unable to cast anything after casting this. Run (or change to resist equipment). |
 Marsh of Abyss Marsh of Abyss | A targetted skill that reduces the movement speed, DEF, and Flee of the target (up to 90% at lvl 5). It also removes the effects of movement-speed and agi increasing skills and ASPD potions. | This is very useful for PVP/WoE if you have the extra skill points for it. For PvM, this can be ignored. Just kill the mob outright with your offensive skills. |
 Hell Inferno Hell Inferno | Deals both fire (minor) and shadow (major) magical damage to a target and has a chance to leave the target with the Burning status (80% at lvl 5). The Burning status debuff inflicts a fixed irreducible max HP based % damage to the target. It also lowers their MDEF. Bosses are immune to Burning. | This skill is not good damage-wise on its own. It is, however, the only non-neutral skill in your arsenal that will hit Holy 4 mobs (like Valkyrie Randgris in Endless Tower). For Holy 4 mobs, this is a spammable DPS (no choice as all your other elemental skills will miss), assuming you are under a Poem of Bragi/Magic Strings. Take also good note of the Burning status chance of this skill. This burning chance is often used to cheese the non-MVP mobs in instances like Geffen Magic Tournament. Even without gear, you can take them down once they are burned as it will eat a percent-based damage of their HP. |
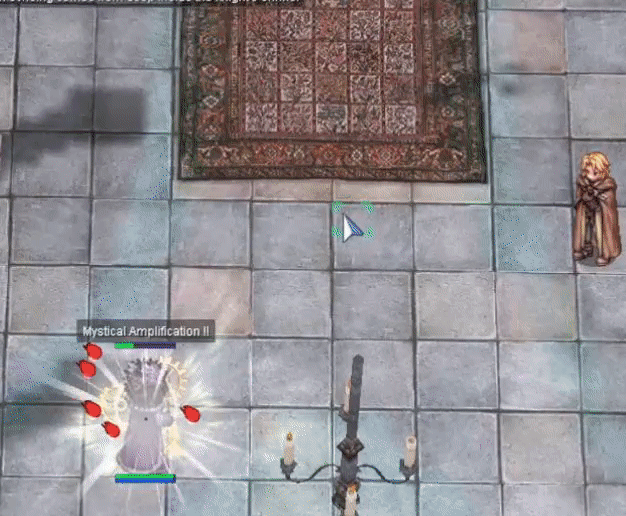
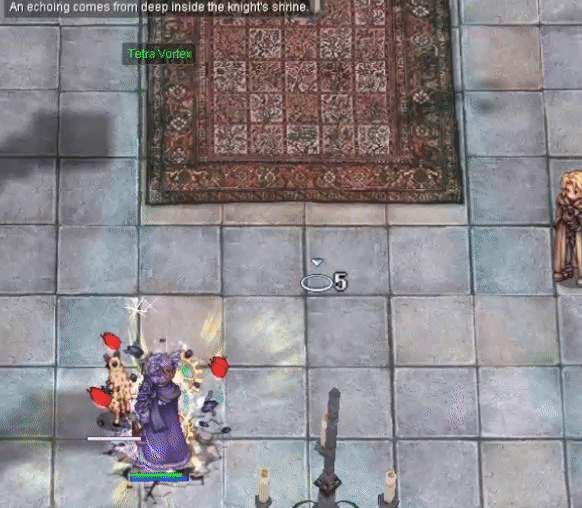
 Earth Strain Earth Strain | Deals earth-property AoE (15×9 AoE at lvl 5) damage in the direction you will target. In PvP, it has a chance to strip/divest the affected targets of their Helm, Armor, Shield, Accessories (50% chance at lvl 5) | Note that this skill has a unique AoE mechanic. It can only travel North, East, West and South (not diagonally). The animation and damage will be in one wave. It deals good earth damage, especially if combo’d with Iron Staff. You skip the animation of this skill once you achieve instant cast. See sample gif above in the Instant Cast section. Note the divest effect of this skill. This is very helpful in PvP. It’s an AoE divest, with good damage. |
 Comet Comet | Deals considerable neutral property magical damage area in a selected 19×19 AoE. Enemies closer to the targetted center area are damaged more than the ones farther (3500% vs. 5000% damage). Inflicts Burning Status on all affected targets at 100% chance. Consumes 2 red gemstones. If a warlock stands beside you, the need for the gemstones is removed. | One of the ultimate skills of a Warlock. Positives: Very big AoE; okay damage; neutral element (thus good against holy and shadow mobs); useful for Old Glast Heim instance; storable via Reading Spellbook to skip cooldown. Negatives: needs a catalyst to cast; heavy sp consumption as it needs 800 SP to use or store; not spammable as it has a one-minute cooldown (if not through Release); damage is not that amazing. |
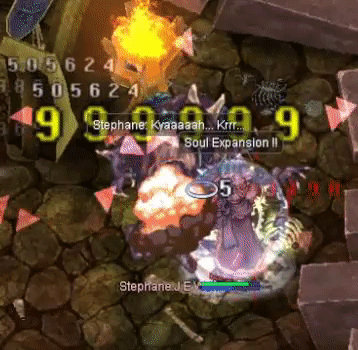
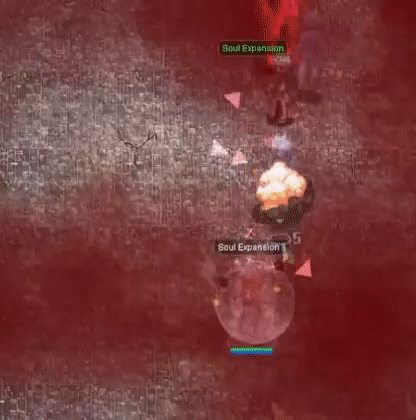
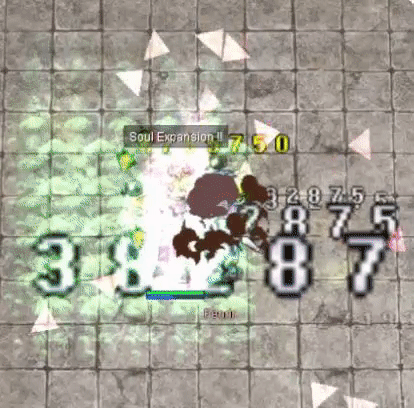
 Soul Expansion Soul Expansion | Deals Ghost magical damage in a small AoE. If the target is under the effects of White Imprison, damage of this skill is doubled. +200% damage if Intense Telekinesis (max leveld) is on. This skill scales with INT and base level. | This skill has no cooldown, has low ACD (0.5 seconds), and has short cast time. It is perfect as a quick finisher for other Warlock Spells. If combo’d with Intense Telekinesis, it will be one of your main damage dealers. It is very viable for boss hunting. Know which mobs are ghost. In parties, they will rely on you to have this skill with IT handy. You can also combo this with White Imprison. You deal double damage to the Imprisoned target but you break the Prison. Familiarize yourself with this mechanic. This means when the Imprison ends will be up to you (save for the duration) and your strategy. |
 Intense Telekinesis Intense Telekinesis | Gives the Warlock a 60-second buff that grealty boosts ghost-property magic damage. During such duration, it also decreases the VCT and SP consumption of all skills. | Combos with Soul Expansion. See Soul Expansion section above. The greatest gripe with this skill is that it has a whopping 5-minute cooldown, while just lasting 1-minute. While it may be a strategy to use this at every minute the cooldown is up, make sure to know the map/instance to reserve this when needed as well, as when you’re entering the boss room. Minor note, remember this gets removed when you die (triggering the 5-minute cooldown). Do not waste it when you think you are about to die. |
 White Imprison White Imprison | Status-inflicting and damaging skill. Imprisons a single target at a high chance (90% at lvl 5 for mobs;70% if against players; 100% if cast against self). When imprisoned, the target cannot move, cast skills, or use items (for 18 seconds at level 5). The target will also be immune to all forms of damage, except Ghost property attacks, which will immediately break the imprisonment. After the imprisonment, you deal fixed irreducible damage to the imprisoned target (2000 at lvl 5). You cannot imprison boss monsters. | Underrated skill. This skill is a very good and reliable disable for both PvM and PvP alike. For 18 seconds, it makes the target (which can be the Warlock himself) immune from all forms of damage (physical, magic, everything!) save for ghost attacks (which are very rare in PvM scenarios). This makes it one of the best defensive skills in the whole game. Warlocks can tank bosses with this skill. Please see Tips Section below for a sample clip showing its potential. Another helpful thing to note about this skill is that it is one of the rare skills that give fixed irreducible damage. Meaning, mobs with mechanics that reduces most other attacks to 1 (like plant mobs), will still be receiving fixed damage from this skill. For this reason, this skill can cheese some plant-mechanic (event) mobs. |
 Recognized Spell Recognized Spell | A self-buff that makes the Warlock use the highest possible MATK variance when casting skills. You will deal the maximum magical damage you can for every skill cast during the buff duration. The downside is that it increases the SP consumption of all skills (by 25%). | This is a must-have buffing skill. Note that magic damage greatly differs in damage because of the variance formula, which in turn is based on weapon refinement (see Variance Formula in the MATK Section above). Note that the damage will not be entirely fixed at max damage when this buff is up. There is still minor variance in damage. Leave this at Lvl 1 because higher levels mean higher cooldowns (with the same damage increase) and the cooldown does not refresh upon death. The duration of lvl 1 ends almost exactly with its cooldown. |
 Radius Radius | Increases the cast range and decreases the FCT of Warlock Skills. At lvl 3, it gives +3 range and less 20% FCT. | I recommend maxing this, not for the FCT reduction (which is easily outclassed by other FCT skills), but for the added range. The added range helps with kiting mvps/mobs better. +3 is a lot. See my solo ET run in the Videos Section below for a demo on kiting bosses with Radius lvl 3. Tip: note that this skill gives WLs 20% FCT. As FCT% does not stack, any gear below 20% fct is useless to you if you have this skill maxed. |
High Wizard Skills
| These are the skills that are pre-requisites to Warlock Skills. In the minimum you have to add these skills with the following levels (see image on right): You are free to choose where you want to place the remaining 14 skill points. | 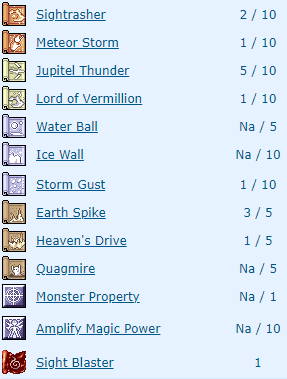 |
| My suggested build is as follows (see image on right): You are free to choose where you will spend the remaining four skill points. | 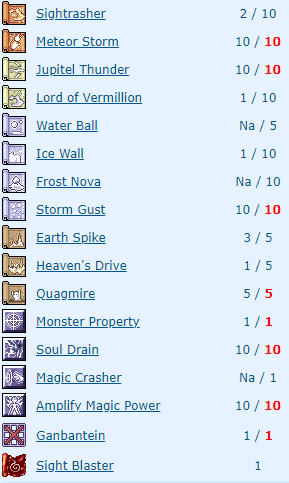 |
| If you will use the Pororoca Shoes + La’cryma Stick combo, my suggested build is as follows (see image on right): You are free to choose where you will spend the remaining three skill points. |  |
- Notable skills:
| Creates a small debuffing AOE (5×5) that lowers AGI and DEX, and removes agility buffs. | Underrated debuff skill. It does not only significantly slow down mobs (works for bosses), but it also lowers their hit. It has no cast time as well. Very good for mobbing and kiting. Please see Tips Section for visuals relating to this skill. Note: only three (3) quagmires can be active at the same time. | |
| Throws a barrage of water balls that inflict water magical damage to the target in a series of hits (up to 25 at level 5). Requires a body of water under the caster to cast. | This skill deals massive amount of water magical damage to a single target (which can easily be buffed by +water magical damage gear and cards). It, however, requires a body of water (which, if not from the map itself, can only be artificially made through a sage’s Deluge skill or a ninja’s Watery Evasion skill). Note that Waterball consumes a portion of the body of water (5×5 tiles at lvl 5) under the caster. To recast it in its full potential, the body of water (if made through a skill) has to be remade also. Update (11/26/23): With the release of Pororoca Shoes, Warlocks can now make their own Deluge, making a waterball build a very viable end-game build for warlocks. If you will pursue this route, max this skill along with Frost Nova. | |
| Summons meteors that fall on a selected AOE multiple times. Each hit deals fire magical damage with a chance to stun. | This skill is useful even as a warlock because Crimson Rock (your new fire spell as a warlock) is locked by an irreducible skill cooldown (as of this patch). If you do not have Freezing Spell, and consequently, cannot store multiple Crimson Rocks, it will be better DPS-wise for you to spam Meteor Storm for fire damage in party-play (assuming under a Poem of Bragi/Magic Strings). This deals respectable fire damage and stuns enemies. Tip: to get most damage out of this skill, it is best to stack it. When you are preparing for an enemy spawn in a certain location, spam MS on such location. | |
| Throws a lightning orb to the selected single target that hits mutliple times, each dealing wind magic damage and knocks the target back. | You level either this skill or Lord of Vermillion. Both are not really that useful for a Warlock, however, as Chain Lightning (your new lightning skill) has a lot more base damage. If you play solo, however, this skill is good to have because of its spammability. It does not have both a skill cooldown and ACD. With this skill, you can infinitely push enemies back at anytime they are near, and its lightning damage can be grealy boosted by Wizard Shadow Armor. It shines well with insant cast. | |
| Amplifies the MATK of the next skill by 50% for 30 seconds or until the next skill is used. | 50% is a tremendous boost in damage. Spam it whenever you can. Max this skill. Note: it only affects StatusMATK and WeaponMATK. Additional note: The cast time is irreducible, even with an instant cast build. | |
| Allows to absorb SP from monsters when they’re killed with single target spells. This skill also enhances Max SP. | Very helpful for farming. If you use single target spells, this will be helpful. Crimson Rock and Chain Lightning work with this skill. Tip: when you are an AoE damage dealer in a party, you can quickly replenish some SP with this passive skill by inserting a few single target spells here and there. Note: Max this if you will use the High Wizard/Warlock Shadow Stone set. Every level of Soul Drain lowers FCT with the Warlock Garment Stone on. |
- For a more comprehensive list of all High Wizard skills with my individual comments, have a look at my Wizard/High Wizard Guide here.
Mage Skills
| These are the skills that are pre-requisites to High-Wizard and Warlock Skills. In the minimum you have to add these skills with the following levels (see image on right): You are free to choose where you want to place the remaining 14 skill points. | 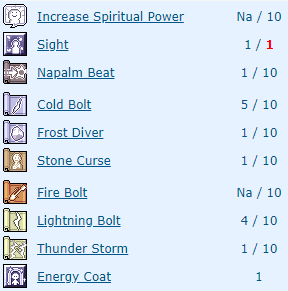 |
| My suggested build is as follows (see image on right). You are free to choose where to spend the remaining 2 points. | 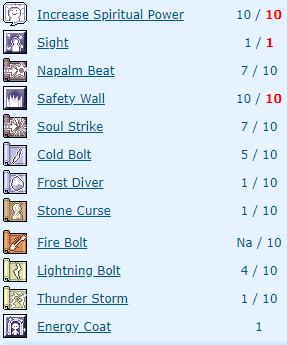 |
- Notable skills:
| Passively increases SP recovery speed when not moving. Also increases efficiency of SP-restoring items consumed and thrown by an Alchemist | Helpful even as a warlock. AoE spells use up a lot of SP and your Soul Drain does not work on them. Max this skill. | |
| Creates a wall on a selected cell that blocks melee physical attacks equal to a percent of your HP. Uses 1 blue gemstone. | This is your best available skill for survivability. It protects you from melee physical attacks up to a certain threshold of damage. Tip: make sure to carry a few blue gemstones always. |
- For a more comprehensive list of all mage skills with my individual comments, have a look at my Wizard/High Wizard Guide here.
Builds
- First, choose your (set of) Ultimate(s).
- Comet.
- Comet has the biggest AOE in the game (almost screen-wide).
- You get to skip the damage penalty that elemental magic skills have against Shadow and Holy mobs.
- Downsides: need catalyst to cast (2 red gemstones), high sp usage, high cooldown (need to be stored and released repeatedly), has the lowest damage of all ultimates.

- Tetra Vortex (TV).
- Flexible with elements. You get to choose between fire, water, wind, and earth.
- Has the most damage of all 3 ultimates.
- Downside: need a bit of prep time as you need to resummon 4 balls every cast, also has high skill cooldown (but can be stored with Reading Spellbook)

- Soul Expansion plus Intense Telekinesis (SE+IT).
- Not really technically an ultimate (it is not storable with 22 slots like Comet and TV) but I’m treating it as so given the amount of pre-requisites and skill points it needs to max.
- High damage potential and AOE (did I mention it’s AoE?).
- You do not only get to damage ghost mobs (some physical classes cannot), you deal so much damage to them.
- Downside: Your damage potential is locked by a whopping 5-minute cooldown. SE without IT activated is bad damage. For this reason, this might not be the most beginner friendly ultimate to get.
- Note: You can get 1-3 ultimates. Getting 3 would spread your skill points too thin, though.
- Second, choose your Elements.
- You can either master a few, or be a jack of all trades (and a master of none).
- In choosing elements to master, take note of the accessory cards that increase magical damage (they increase damage by 40% if equipped on both accessories, so yes, they matter a lot). They come in twos:
- Mavka increases Fire and Earth;
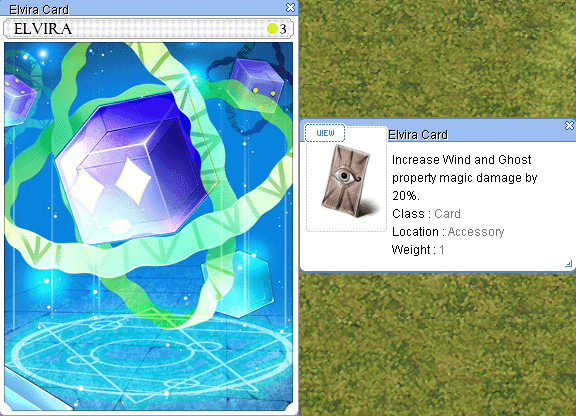
- Elvira increases Ghost and Wind;
- Headless Mule increases Water and Holy; and
- D.Y. increases Neutral and Shadow.
Author’s note: Please do not box yourself to the element combos below. I only forced a system to sort them but in reality, it is impossible to dictate fixed builds for a warlock. Remember, you chose the class to be a master of all elements. Experiment as you see fit. Enjoy the game!
- Fire (primary) and earth (secondary):
Sample Skill Build (up to you to use the last 2 skillpoints):

- Skill build: Max Crimson Rock, max Earth Strain, get a lot of Freezing Spell, and get Sienna (optional). Choose 2 ultimates. Other skills are up to you. Soul Drain is good to get for this build for leveling.
- Suggested skill sequence/combo: Reading+Release Crimson Rock. Use Earth Strain for remaining mobs (assuming they are not Earth).
- Item build:
- Headgear: Red Lichtern or Yellow Lichtern Card
- Garment: Nightmare Ancient Mummy Card or Elder Card
- Accessory: Mavka Card in Alchemy Gloves
- Alternatively, check out Crimson Set from Mora for +40% fire magical damage (Crimson Staff, Crimson Robe, Crimson Shoes, Crimson Orb).
- Shadow Stones: High Wizard (Upper, Mid, Lower) plus Warlock (Garment) set.
- Notes: This is the most newbie-friendly build. It is the cheap to gear (relatively) and there are a lot of earth and undead mobs (weak to fire) in early-leveling areas.
 |  |
- Ghost and wind (both primary):
Sample skill build (feel free to change your ultimates):

- Skill Build: Max Soul Expansion, max Intense Telekinesis, max White Imprison and max Chain Lightning. Choose 1 other ultimate. Other skills are up to you.
- Suggested skill combo/sequence: Use Intense Telekinesis ever 5mins (but reserve it for boss fights); use Chain Lightning for all else. For weak mobs, Soul Expansion them even without Intense Telekinesis. You can box up a mob with White Imprison first to double your Soul Expansion damage.
- Item Build:
- Headgear: Tikbalang or Green Lichtern Card
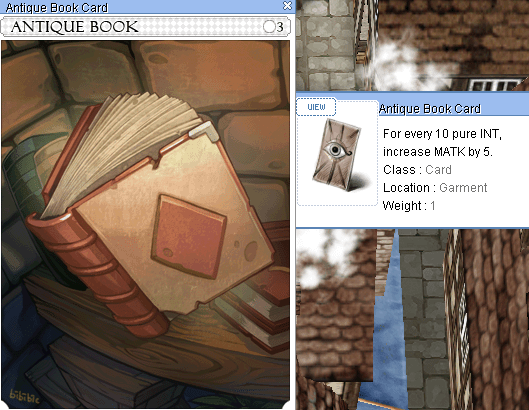
- Garment: Antique Book Card
- Accessory: Elvira Card, Scaraba Card.
- Note: any +MATK equipment will do.
- Notes: You need to stack a lot of MATK to make your damage matter. Not that newbie-friendly to gear. Best for high-end instances/mobs.
 |  |
- Water (primary) and Wind (secondary):
Sample Skill Build (feel free to change ultimates):

- Skill Build: Max Frost Misty, max Jack Frost, max Chain Lightning. Choose 2 ultimates. Other skills are up to you. Make sure you max Waterball and Frost Nova in the Wizard Skill Tree.
- Suggested skill sequence/combo: Frost Misty to Jack Frost to Chain Lightning to Jack Frost to Chain Lightning (repeat to Frost Misty). If you are wearing the Pororoca Shoes + La’cryma Stick combo*: Deluge + Waterball (repeat).
- Stat Build: Aspd helps with the animation for this build.
- Item Build:
- Headgear: Blue Lichtern Card
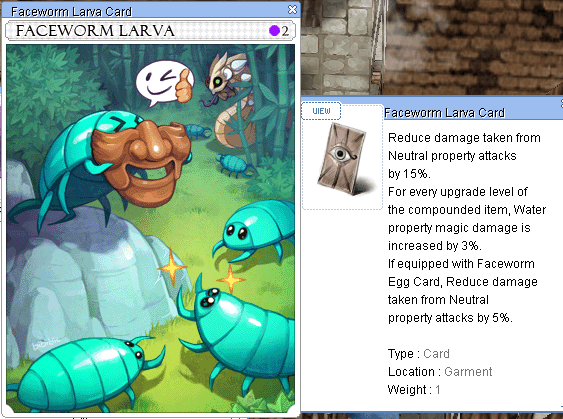
- Garment: Faceworm Larva Card
- Weapon: La’cryma Stick*
- Shoes: Pororoca Shoes*
- Accessory: Headless Mule Card
- Alternatively, check out Aqua Set from Mora for +40% water magical damage (Aqua Staff, Aqua Robe, Aqua Shoes, Aqua Orb).
- Notes: This build is good for farming low-level mobs. As Jack Frost does not trigger Soul Drain, make sure to use single-target spells once in a while for SP (like Chain Lightning).
- *Update (11/26/23): The recent patch just introduced Pororoca Shoes. The Combo with La’cryma Stick makes Water (specifically, Waterball) builds viable for end game as it now lets you cast Deluge, in addition to a very significant increase in waterball damage.

 |  |
- Jack of all trades/master of none:
Sample skill build (you can choose to get lvl 5 IT instead of lvl 5 Freezing Spell):

- You can also choose to max all of the elemental skills mentioned above, of course, at the small cost of losing one ultimate (as you would lack skill points).
- You can get Comet as your main ultimate to add Neutral damage to your elemental Arsenal. D.Y. card will help with Comet damage.
- Also check out the Kardui Ear gear combo if you want to maximize Comet.
- The safest bet for this build is to stack MATK-increasing gear (Antique Book Card) and Cast Time reduction gear so all skills get a boost.
- See Tips Section below on Switching Equipment.
Again, in addition to the elemental combos listed here, you can always merge YOUR OWN combos of elements and skills. Your build will always depend on the gears that YOU HAVE. If you have the resources for multiple elemental combos, use a custom build that can accommodate all the skills that your gears will amplify.
- Essential Skills. Some skills I suggest to include in every build:
- Recognized Spell (lvl 1 only) – for consistent damage
- Reading Spellbook (lvl 1) – for storing spells
- Release (forced lvl 2 as a pre-requisite) – for releasing spells
- Chain Lightning (lvl 5) – Reliable single target dps skill
- Soul Expansion (lvl 5) – Reliable quick AoE when mobbed
- Radius (lvl is up to you) – more range
- White Imprison (at least lvl 1) – for defense
- Third, choose your Play Style.
- If you will do a Release Spellbook+Release build, add some skill points to Freezing Spell. Stack on Magic Damage/MATK-increasing gear. Stacking cast time gear is only secondary.
- If you will do an Amplify Magic+normal cast build, skip Freezing Spell. Make sure Magic Amplification is at lvl 10 (high wizard skill). Try to stack as much VCT and FCT gear as possible, with uninterruptible cast effect, or reach instant cast.
- Note: It is very viable to mix both of these builds. Feel free switch between amplify+normal cast and reading+release any time and mix both MATK and cast time gear.
Equipment
Gearing your warlock is up to your preference:
Cast time (Priority): You can prioritize getting cast time reducing gear and aim for instant cast as fast as possible (Fallen Angel Wing, Survival Set, Skull Cap with enchanted Thorn Staff of Darkness Combo, Angel Egg combo, Crown of Deceit, Magic Intensifier Ring enchanted with VCT, etc.). Get Temporal Dex Boots as soon as you can as it is a cheap way to get fixed stackable FCT reduction with some VCT reduction, if enchanted correctly.
Damage (Priority): You can prioritize stacking MATK/Magical damage adding gear for maximum damage output (Celine Set, Flattery Robe, Selina’s Magic Robe, Wickebine’s Cat Ears, Agav Card, Archpriest’s Glove, Mavka/Headless Mule Card, etc.). This build works well on Reading Spellbook+Release combo built Warlocks.
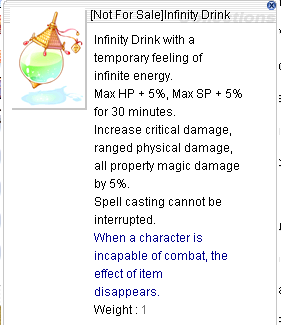
You can also mix both. Just note: if you do not aim to remove or drastically reduce cast time, it will greatly benefit you to at least secure the “casting uninterrupted” effect, either through gear (Hero Mage Coat, Caster Shadow Set, Orlean’s Set) or items (Infinity Drink) or skills (Devotion from a party member). We have horrid cast times without gear.
ACD (optional): You may also theoretically stack ACD-reducing gear (Pope Hat, Excelion Set, Spritual Cloth, Heart Wing Hairband, Fallen Angel Shield, Diabolus Robe, Feather Shield, Expert Rings, etc.). Apart from cast time, the after cast delay of our AOE skills also hold us back for solo play.
MDEF Pierce (recommended): Also, do not forget to stack MDEF piercing gear. See Magic Defense Section above for a more detailed discussion about MDEF. See also Shadow Equipment Section below for the sets we have as of current patch.
If I were to rank the options to focus on: Magical damage increase (different from MATK) > Cast time reduction (instant cast or uninterruptible cast) (VCT+FCT) > MATK/MATK% > MDEF Pierce > ACD > ASPD.
Please see the following table for a more comprehensive list of options for gears:
Upper Headgear Celine Ribbon (with Celine Brooch combo) Survival Circlet (with Survival Rod combo) Spell Circuit Thornbush Hairband Ordinary Black Magician Hat White Lady Cap Wickebine’s Cat Ears Skull Cap (with TSOD combo) Themis Helmet Deep Blue Angel Hairband (with Angel Egg combo) Magician Knit Hat Rainbow Angel Hairband Witch’s Pumpkin Hat Improved Mage Hat Pecopeco Hairband Crown of Deceit Heart Wing Hairband Red Pom Band Necktie (with Blush combo) Kafra Staff Headband (with Kafra Uniform combo) Ulle’s Cap (with Odin’s Blessing Combo) Apple of Archer Cards: Lichtern Red Card Lichtern Green Card Lichtern Yellow Card Lichtern Blue Card Engkanto Card Isilla Card Jaguar Card Toucan Card Tower Manager Card Kathryne Keyron Card Tikbalang Card Corrupt Life Card Banshee Card Cendrawasih Card Carat Card Nightmare Card Marduk Card |   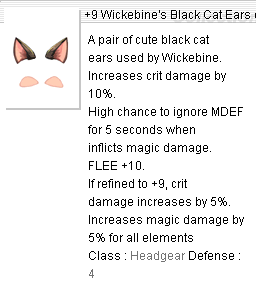  |
| Middle Headgear Floating Beads Kardui Ears (Tree Sprout Combo) Sunglasses/Glasses (with Mob Scarf combo) Magical Booster Scuba Mask (with Oxygen Tank and Surfer Swimsuit Combo) Blush Blinker Cards: (Same cards as Upper Headgear) Lower Headgear Yawata Seal Survival Orb Sacred Lapel Mob Scarf Tree Sprout Chatty Parrot Rainbow Scarf Charm of Great Nature Chilly Breath Long Tongue CD in Mouth Love Love Balloon Poring/Marin Balloon Jinn Marin Balloon Blue Rear Ribbon |   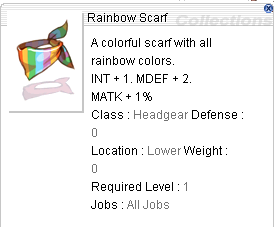 |
| Armor Selina’s Robe Flattery Robe (enchanted with two INT 1/2/3s) Sea Dragon Armor Excelion Suit (with Excelion Wing combo, INT MATK MATK enchants) Diabolus Robe (with Diabolus Ring Combo, Int+3 Enchant) Celine Dress (with Celine Ribbon and Celine Brooch) Anti-Magic Suit (with Magic Intensifier Ring Combo, enchantable) Temporal INT Armor (with Tenmporal Int Shoes Combo) Geffen Magic Robe (with Magic Intensifier Ring Combo, enchantable) Kardui Robe (with Rafini Staff/Laphine Shield Combo) Orlean’s Gown (with Orlean’s Server and Orlean’s Glove Combo) Excelion Armor (with Excelion Suit Combo) Predator Mail Golden Rod Robe Aqua Robe Crimson Robe Forest Robe Sprint Mail (with Sprint Shoes and Spring Ring Combo) Kafra Uniform Surfer Swimsuit Odin’s Blessing Puente Robe Cards: Agav Card Banshee Master Card Marc/Evil Druid/Pasana/Dokebi Card Weapon Crimson Rod Crimson Staff Survival Rod (INT) Survival Rod (DEX) Iron Staff Vicious Mind Rod (optioned) Thanos Staff (optioned) Rafini Staff (with Laphine Shield and Kardui Robe Combo) Crimson Rod (one-handed) Crimson Staff (two-handed) Staff of Geffen Golden Rod Staff (can be Empowered) Aqua Staff (can be Empowered) Crimson Staff (can be Empowered) Forest Staff (can be Empowered) Staff of Destruction (SOD) Kronos La’cryma Stick (with Pororoca Shoes combo) (can also combo with Geffenia Water Book) Survivor’s Rod Wizardry Staff (with Spiritual Ring combo) Staff of Geffen Evil Bone Wand Wing Staff Thorn Staff of Darkness (TSOD) Cards: Nightmare Mimic Card Pinguicula Card Naga Card Curupira Card Big Ben Card Necromancer Card Demon God’s Essence Int1/2/3 | 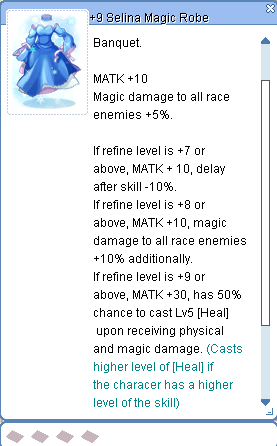    |
| Shield Laphine Shield Orlean’s Server Anemos Shield Fotia Shield Feather Shield Mad Bunny Shield Solomon’s Key Valkyrja’s Shield Immune Shield Platinum Shield Round Buckler Memory Book (with Monocle and Pocket Watch Combo) Cards: Neo Punk Card Nightmare Arclouse Card Hodremlin Card Horn Card Alice Card |  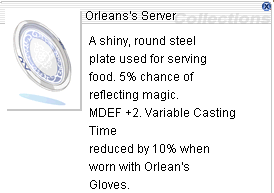 |
| Garment Survival Manteau Fallen Angel Wing Violet Halo (with Magical Booster Combo) Temporal Int Manteau (with Temporal Int Shoes Combo) Seraphim Robe Skin of Typhos Felock’s Cape Excelion Wing Bravery Bag Airship Cloak Predator Manteau (with Predator Boots Combo) Wool Scarf (with Tidal Shoes Combo) Excelion Wing Piece of Angent Skin Oxygen Tank Flame Manteau of Naght Sieger Cards: Antique Book Card Faceworm Larva Card Nightmare Ancient Mummy Card Salamander Card Raydric Card Noxious Card Harpy Card Deviling Card |    |
| Shoes Pororoca Shoes Temporal Dex Boots Temporal Int Boots Elemental Boots Applause Sandals Hero Nepenthes Shoes Golden Rod Shoes Aqua Shoes Crimson Shoes Forest Shoes Sprint Shoes Ancient Hero Boots Tidal Shoes Variant Shoes Predator Boots Cards: Nightmare Verit Card Piranha Card Firelock Soldier Card Gold Acidus Card Miyabi Doll Card Sohee Card |  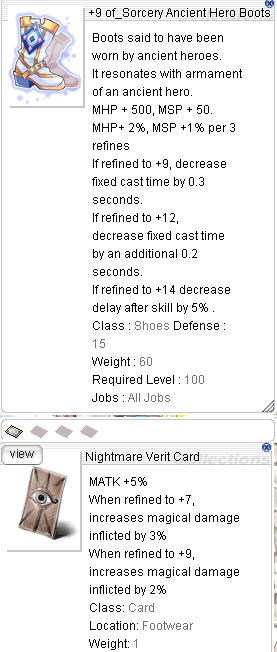 |
| Accessories Celine Brooch Perverse Demon Mask Temporal Ring Archpriest’s Gloves Magic Intensifier Ring Metal Riff Ring Themis Libra Angel Egg Gyges Ring Sprint Ring Golden Rod Orb Aqua Orb Crimson Orb Forest Orb Bradium Earring Spiritual Ring Diabolus Ring Spiritual Ring The Sign Expert Ring Orlean’s Glove Predator Magic Ring Monocle and Pocket Watch Cards: Mavka Card Elvira Card Headless Mule Card Dwigh Card Phen Card Scaraba Card Vitata Card Bloody Butterfly Card Zerom Card Creamy Card Imp Card Siroma Card |   |
| Shadow Enchants MATK (Upper) MATK (Middle) MATK (Lower) Variable Cast Time (Upper) Variable Cast Time (Middle) Variable Cast Time (Lower) High Wizard (Upper) High Wizard (Middle) High Wizard (Lower) Minor Casting Stone (Garment) Casting Stone (Garment) Warlock Stone (Garment) Shadow Armor Magical Shadow Armor Caster Shadow Armor Wizard Shadow Armor Spell Flow Shadow Armor Dexterous Shadow Armor Shadow Weapon Clever Shadow Weapon Dexterous Shadow Weapon Greed Shadow Weapon Caster Shadow Weapon Magical Shadow Weapon M Exorcist Shadow Weapon M Executioner Shadow Weapon M Dragon Killing Shadow Weapon M Holy Water Shadow Weapon M Insect Net Shadow Weapon M Vibration Shadow Weapon M Scissors Shadow Weapon M Corrupt Shadow Weapon M Fishing Shadow Weapon Shadow Shield Clever Shadow Shield Caster Shadow Shield Magical Shadow Shield Spell Flow Shadow Shield Vital Shadow Shield Shadow Shoes Caster Shadow Shoes Magical Shadow Shoes Wizard Shadow Shoes Spell Flow Shadow Shoes Vital Shadow Shoes Shadow Accessories Tempest Shadow Earring Tempest Shadow Pendant Magician Shadow Pendant Magician Shadow Earring Intelligent Shadow Pendant Intelligent Shadow Earring Caster Shadow Pendant Caster Shadow Earring Magical Shadow Pendant Magical Shadow Earring Almighty Earring Almighty Pendant |  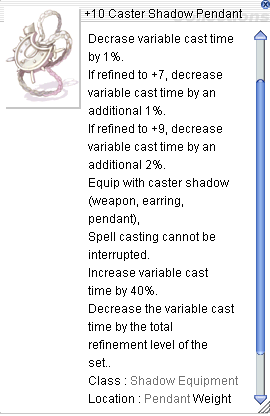  |
Extra Tips
1. Malangdo Enchants
With the Malangdo patch came the Malangdo Enchant system. This system allows you to bestow upon select weapons different enchantments using Class A Coins, converted from Nyang Vine Fruits, or Seagod’s Anger, lootable from Malangdo Instances.
Of much relevance to Warlocks are Spell Enchants. (Note: Spell enchants are only available for weapons.)
Weapons that are enchantable:
Wing Staff
Gentleman Staff
Dead tree Cane Staff
Thorn Staff of Darkness
Eraser
Wizardry Staff
Kronos
Staff of Destruction
Possible Spell Enchants
Note: You can get two enchants per weapon. If you’re lucky, that is basically 20% VCT reduction from weapon alone.
Enchant Type – Enchant Description
Spell 1 – MATK +6, reduces Variable Cast Time of skills by 4%
Spell 2 – MATK +9, reduces Variable Cast Time of skills by 6%
Spell 3 – MATK +12, reduces Variable Cast Time of skills by 8%
Spell 4 – MATK +15, reduces Variable Cast Time of skills by 10%
Spell 5 – MATK +18, reduces Variable Cast Time of skills by 10%
Spell 6 – MATK +21, reduces Variable Cast Time of skills by 10%
2. Optioned Weapons

Apart from wearing enchanted weapons, you should also consider wearing optioned weapons. As of this patch, we have Thanos Weapons and Vicious Mind Weapons. Damage-wise they will be have higher damage output to the monsters subject of the specific race and element of the options compared to generic weapons. The downside is that you need to collect lots of them for different monster elements and races.
Check this guide for the available enchantments of Thanos Staves. Check this guide for the available options for Vicious Mind Weapons. Vicious Mind weapons have better options than thanos weapons but they are harder to farm. While Thanos weapons can be reenchanted, vicious mind weapons drop with options already and cannot be re-enchanted.
One more benefit of optioned weapoins is that some are one-handed and you can wear shields for added protection.
Computing Options. There are two rules when computing for options:
1. Race, Size, Element, and Class are multiplicative of each other. For instance, to compute how much magic damage is added in the thanos staff on the right, we go: 1.20×1.16 = 1.392 (about 39% increase in damage).
2. Race, Size, Element and Class are additive to its same type. Meaning, if you slot in a Zakudam Card (increase magic damage for Demi-Human by 10%; not in-game yet btw) in that Thanos Staff, you would compute the added damage as follows: 1.20×1.26 = 1.512 (about 51.2% increase in damage to Demi-human monsters). The Demi-Human card and option would additively stack to each other.
3. Consumables
Possible consumables you may want to look at:
Almighty
Booster Wine
Mana Plus
Power Booster
Infinity Drink (Tip: this has a Phen card effect without the VCT penalty!)
Red Booster
Ultimate Cook (Note: does not stack with Almighty, save for MATK)
Small/Medium Life/Mana Potion
4. Poem of Bragi
For parties, your DPS potential is best unlocked when you stand in a Bard’s or Clown’s Magic Strings or Poem of Bragi.
Tip: Advise your clown to stack INT or DEX as it affects the reductions in VCT and ACD reduction of Bragi. Ask them to activate Improve Concentration and ask for Blessing level 10 when able.
5. Gym Membership or Kafra Storage Bell
To counter one of the disadvantages of the class, you might want to consider buying Gym Membership Card Boxes or a Kafra Storage Bell Box to handle weight issues.
6. Do not forget to use your defensive maneuvers. You are not a high wizard anymore.
The time when Wizards, to be viable, have to be glass-cannon and party-dependent has long passed. Gravity gave Warlocks some good defensive skills. Let’s make the most out of them. Some sub-tips on this topic:
- Use Quagmire to slow enemies down. This even works on Bosses. Note that you can only have a maximum of three quagmires running at the same time.

- Abuse Safety Wall. Be sure to have enough blue gemstones in your inventory.
- Quagmire reduces the dex/hit of enemies. Thus, if you cast quagmire on top of your safety wall, it helps make safety wall last longer as mobs will normally miss with low hit.
- Do not forget to keep Energy Coat up for painful enemies. That 30% damage reductions is huge. It’s a free imaginary carded shield, essentially. Remember to keep your SP up to get the most out of this skill.
- Tip: If you are just farming, no need to keep Energy Coat up to avoid SP problems.
- White Imprisonment is one of the best (if not the best) defensive skills in the game. It completely nullifies all damage (physical and magic!), save from ghost element attacks, for a short duration and is at 100% success rate if casted on yourself (Shift+WI Shortcut+Click Yourself). This is especially effective for boss fights as most bosses have distinctive and timed major one-shot skills.
- To stress the importance of learning how to self WI, WI is only one of the very few skills in the game that can block Earthquake (which usually wipes parties).

7. Incorporate a shield into your equipment build.
- Two-handed staves are good for damage but they are a two-edged sword. They open you to more damage and thus force you to invest more on health potions (or worse, Tokens of Siegfried, given the deaths that no-shield runs will invite).
- If you can, consider incorporating a shield in your build, at least learn to switch it in when necessary. Playing with a party? Two-handed staves are welcome. Playing solo? wear. that. damn. shield.
- Shield cards give 20-40% damage reduction from varied sources, in addition to the def and other useful stats that other specialized shields give.
- Some shields give VCT reduction, additional matk (see Anemos Shield), and even MATK% (see Mad Bunny Shield.
- Some common shield cards to get include: Alice Card, Thara Frog Card, Hodremlin Card

- As a class without a naturally high HP pool, we rely on reductions and resists to outlive one-shot attacks/spells from foes.
8. Plan your skill build.
GGH’s system has a maximum job level of 60. Plan your skills wisely through some online skill simulator as it is very likely you cannot accommodate all the skills that you want in the same build. Some sub-tips on this point:
- Best to choose just 1-2 ultimates to specialize in. You can get 3 of course, but other skills cannot be maxed anymore.
- Note the amount of pre-requisites required for Recognized Spell.
- Do not dump random spell points into Freezing Spell unless you are a reading spellbook+release build. Sometimes, depending on your base level and INT, Freezing Spell is not needed. Please see Freezing Spell Section above.
- Note the skills that some skills are only worth to get if you PVP (like Stasis and Marsh of Abyss).
- Do not get Full Throttle.
9. Be open to getting better equipment and learn to switch.
- As a beginner, you will find that stacking any MATK+ gear would be the easiest way to increase damage. When you are more comfortable zeny-wise, however, make sure to consider buying some of the specific-element boosting cards discussed in the Build Section slowly.
- This is important because the damage boost they give will be far more significant than normal matk+ gear.
- You will notice that Antique Book Card will add very minimal damage for example, compared to let’s say Nightmare Ancient Mummy Card (and they occupy the same slot).
- Once you have gathered your elemental damage-increasing cards, learn to switch them when you’re using the necessary skill that correlate to the cards.
- Are you going into a dungeon with an Earth boss and foresee using Crimson Rock or summoning Fire balls for Tetra? Switch to Mavka-carded accessories and a Nightmare Ancient Mummy Carded Garment.
- Make use of the easy equipment-switching menu in-game.
- To effectively use this mechanic, you need to set a shortcut button that you will press to swap your equipment.
- To do this, press Escape > Shortcut Settings > Interface Tab > go to page 2 > Set a key for Equipment Switch.
- To effectively use this mechanic, you need to set a shortcut button that you will press to swap your equipment.
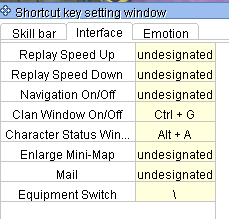
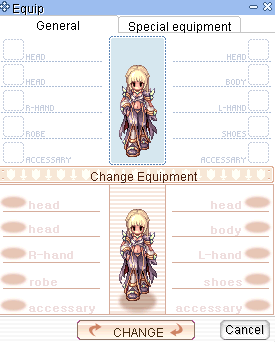
- Make sure to set up the equipment you need to swap onto in Alt+Q > Item Setting. You can also press the “Change” button on this window to swap equipment.
Changelogs
April 2024:
- Updated Water Build Section
- Updated FCT Section
- Updated Equipment Section to include new gears from eggs
March 2024:
- Updated Equipment Section to inclued new gears from eggs
- Added Vicious Mind Weapons in Tips Section
December 2023:
- Revised Tips Section (added instructions and more tips for White Imprisonment)
- Revised Builds Section on Water Build
- Revised Pros and Cons
- Added updated Endless Tower Solo Run Video
- Added AOGH Solo Warlock Run Video
- Added Temple of Demon God Solo Warlock Run Video
November 2023:
- Updated Equipment Section to include new gears from eggs (selected items)
- Incorporated the Pororoca Shoes combo build (see Skills, Builds, and EQ Section)
- Incorporated Flattery Robe patch
- Incorporated Warlock + High Wizard Shadow Stones set
- Added sample Warlock skill trees (3 samples)
- Added an alternative High Wizard skill build
- Revised Builds Section.
- Fixed typos.
October 2023:
- Revised Introduction write-up
- Revised Pros and Cons Table
- Corrected some skill descriptions
- Updated images/gifs
- Updated Equipment Section to include new gears from eggs (selected items)
- Fixed typos.
September 2023:
- Refined Builds Section and revised Essential Skills list
- Revised section on instant cast in line with 9/21/23’s FCT Skills Update
- Incorporated Royal Banquet Patch
- Updated Equipment Section to include new gears from eggs (selected items)
- Fixed typos.
August 2023:
- Revised Preferences in gearing up a warlock under Equipment Section
- Added Youtube Videos
- Updated Equipment Section to include new gears from eggs (selected items)
- Added Section on Weapon Options under Tips Section
- Added guide to easily switch gears via Equipment Menu under Tips Section
June 2023:
- Added Cooldown v. ACD Section
- Incorporated Old Glast Heim Patch and gears
- Updated Equipment Section to include new gears from eggs (selected items)
- Added gif references
- Refined VCT Computation Section
May 2023:
- Revised Tips Section
- Added more image references.
- Updated Equipment Section to include new gears from eggs (selected items)
- Fixed formatting, typos, run-on sentences, and incorrect data
Videos
— END (for this patch at least) —
Disclaimer: Some parts of this guide are based off of wikis and other online sources. I disclaim ownership of the parts lifted.
Author’s Note: This guide is still in the process of being vetted. If you see some incorrect applications, miscalculations and typos, DM me. Discord Username: .jrk
Was this helpful?
17 / 0

And this is the reason I choose to be a maestro.
Being a Warlock is very, very complicated T_T
Thanks! This is a very clean guide. It’s the easiest to read for me compared to what I’ve found at other places.
I do not see the skill guide for Warlock,
theres only mage and wiz.
So where is it?