 Introduction
Welcome to my Cannon Spear Royal Guard Guide.
The Royal Guard is highly skilled in both up-close combat and defense. They wear heavy armor, use a variety of weapons, and excel at confronting enemies head-on while ensuring the safety of their friends no matter the circumstances. What makes the Royal Guard really special is how well they’ve mastered the spear. They can deal massive damage to enemies and still keep their team safe by absorbing and reducing the impact of damage.
Renowned for safeguarding its party members through the use of Sacrifice, a Royal Guard can alternatively embrace a path of aggression by making full use of its spear-oriented skill set. While there exist numerous potential builds for a Royal Guard, this guide will focus solely on the Cannon Spear build.
Changelog
March 16, 2026
- Added new items (Memento Mori, 17.2-related cards and equipment, Tiara Crown, & Shield Ring
- Overhauled the whole guide to focus Cannon Spear only.
October 2, 2025
- Added Platinum Arbitrator and Arbitrator Shawl.
January 15, 2025
- Adjusted alignment
- Added a few items
- Added Prestige dodge chance calculator
April 29, 2025
- Removed outdated items like Bone Plate, etc.
- Updated clips with better FPS.
June 23, 2025
- Added section for pure Cannon Spear build with video.
Julyl 29, 2025
- Added a better sample skill build section
- Added the importance of Cavalry Mastery when using Peco Peco Ride.
- Overhauled the equipment section
 Cannon Spear
With the introduction of items that reduce the cooldown of Cannon Spear, Royal Guards can now achieve zero cooldown without needing to grind for an enchanted Fortridge (EDDA Biolab) with Trial Diadem.
Key items include the following:
- Guardian’s Shield
- Fallen Protect Manteau
- Vanishing Cannon Shadow Shoes.
- Arbitrator Shawl
- Platinum Arbitrator [1]
- Biolab Libra Diadem [1] when paired with Fortridge [2]
Achieving high STR, skill & physical/ranged damage modifiers, and ATK is essential for dealing high damage.
Some additional info:
- You will need high attack speed to spam Cannon Spear efficiently.
- Thanks to the attack buff from Shield Spell 1, we can achieve a high equipment attack (eATK) without requiring significant investment in flat ATK equipment. This makes gearing up easier. With that in mind, look for equipment and cards that enhance your range modifier, as well as increase damage against specific classes, sizes and races.
- This build struggles against monsters that uses NPC_AGIUP. Luckily, we have some equipment that can help us get more hit rate and perfect hit like Imperial Ear Wing.
- Cannon Spear will usually stack a lot of STR stat to maximize its damage.
- Using Inspiration skill will turn you into a demi-god, improving all of your stats for 90 seconds.
Stats
| Stat | Note |
|---|---|
| STR | Our primary stat for damage. Every point of STR gives 1 status ATK and 0.50% weapon ATK. Cannon Spear greatly benefits from this stat as well. |
| AGI | Mainly added for more attack speed. Attack speed is important for Cannon Spear, as it allows you to use the skill faster. |
| VIT | An important stat for survivability. 1 point of VIT gives you 1% HP, increases your potion healing potency by 2%, and also gives you resistance to various status effects in the game. |
| INT | INT is not really important for this build, but if you plan to use prestige for its magic dodge, I suggest adding some. |
| DEX | An important stat for reducing cast time, increasing the HIT stat and a slight amount of ATK, and also used in the damage formula for Overbrand’s swing. |
| LUK | If you have extra stat points, put it here. |
| Sample Stat Build |
|---|
| STR 120 AGI 90-100 VIT 90-100 INT 1-20 DEX 90-120 LUK 1-40 |
Skill Information
In this section, you will find the skills commonly used by Cannon Spear Royal Guards.
Important: When building for Vanishing Point and 0 cooldown Cannon Spear, it is absolutely necessary to get Cavalry Mastery Level 5 if you plan to use a mount (Peco Peco Ride). This is to avoid the massive attack speed penalty incurred while mounted.
Cannon Spear
Attack all enemies in a straight line up to 11 cells (width 3 cells) from the caster. Increase Damage depending on caster’s STR. Must have spear equipped to cast.
| Level | Base Damage (ATK) | SP Cost |
| 1 | 50% | 12 |
| 2 | 100% | 16 |
| 3 | 150% | 20 |
| 4 | 200% | 24 |
| 5 | 250% | 28 |
Vanishing Point
Attack long distance enemy that is within 7 cells. Increase Accuracy rate as skill level gets higher. Give additional damage depending on Bash level. Requires a spear to cast.
| Level | Base Damage (ATK) | HIT Bonus | SP Cost |
| 1 | 50% | 3 | 20 |
| 2 | 100% | 6 | |
| 3 | 150% | 9 | |
| 4 | 200% | 12 | |
| 5 | 250% | 15 | |
| 6 | 300% | 18 | 25 |
| 7 | 350% | 21 | |
| 8 | 400% | 24 | |
| 9 | 450% | 27 | |
| 10 | 500% | 30 |
Earth Drive
Brandish your shield to causing all targets in an area to receive Earth elemental damage. Targets hit will have their defense and attack speed reduced by 25%. The weight of your shield can increase the damage dealt.
| Level | Base Damage (ATK) | Effect Duration | Area of Effect | Break Chance | Cooldown | SP Cost |
| 1 | (Shield Weight × 2)% | 3s | 3×3 | 1% | 7s | 52 |
| 2 | (Shield Weight × 3)% | 6s | 2% | 6s | 60 | |
| 3 | (Shield Weight × 4)% | 9s | 5×5 | 3% | 5s | 68 |
| 4 | (Shield Weight × 5)% | 12s | 4% | 4s | 76 | |
| 5 | (Shield Weight × 6)% | 15s | 7×7 | 5% | 3s | 84 |
This skill is quite useful as it can remove ground-based skills like Pneuma, Magnetic Earth, and others. Level 3 Earth Drive should suffice for now.
Pinpoint Attack
Quickly move close to the target and hit its vital point. Has a chance to cause different status change or other effect depending on the skill level used. The caster’s Agility can increase the damage. Deals critical damage regardless of the user’s crit rate.
| Level | Base Damage (ATK) | Base Chance of Effect | Effect Applied |
|---|---|---|---|
| 1 | 100% | 35% | Bleeding |
| 2 | 200% | 40% | Remove spirit spheres from target |
| 3 | 300% | 45% | Break Shield |
| 4 | 400% | 50% | Break Armor |
| 5 | 500% | 55% | Break Weapon |
Chance of Effect = [Base_Chance_of_Effect + {(AGI + BaseLv) ÷ 10}] %
Piety
Endows you or a party member and nearby party member’s armors with Holy element. Consumes 2 Holy Waters.
| Level | Duration | SP Cost |
|---|---|---|
| 1 | 60s | 40 |
| 2 | 80s | 45 |
| 3 | 100s | 50 |
| 4 | 120s | 55 |
| 5 | 140s | 60 |
Pretty useful if you don’t have access to Holy Armor scrolls.
Inspiration
Increases your accuracy, stats, attack and MaxHP. Costs 1% of your experience to cast. Consumes your HP and SP over time. 1% of your damage will be reflected back to you. The skill deactivates when your SP reaches 0.
| Level | Base ATK Increase | Base HIT Increase | Max HP Increase | HP Drain | SP Drain | Duration | Cooldown |
| 1 | 40 | 5 | 5% + 600 | 3.0% | 4.0% | 30s | 9m |
| 2 | 80 | 10 | 10% + 1,200 | 2.5% | 3.5% | 45s | 8m |
| 3 | 120 | 15 | 15% + 1,800 | 2.0% | 3.0% | 60s | 7m |
| 4 | 160 | 20 | 20% + 2,400 | 1.5% | 2.5% | 75s | 6m |
| 5 | 200 | 25 | 25% + 3,000 | 1.0% | 2.0% | 90s | 5m |
HIT Increase = Base_HIT_Increase + (JobLv ÷ 2)
All Stat Increase = (BaseLv ÷ 10) + (JobLv ÷ 5)
This skill is what makes Royal Guards feel like demigods in both PvP and PvE/PvM. The stat increases and immunity to specific status effects make this skill a must-have. When Inspiration is active, it allows the Royal Guard to use Hesperus Lit and Ray of Genesis without the Banding requirement. At max level (200), the EXP consumption will be 1m per cast instead of 1%.
One downside of using this buff is the damage recoil. To put it simply, you take 1% of the damage you deal. However, this can also be used to trigger enchantments like ![]() Bear’s Power.
Bear’s Power.
Negative effects:
- Drains HP and SP throughout the duration of the skill.
- 1% of your damage done to a monster will be reflected back to you while the skill is active.
- Cancels buffs upon cast. [collapse]
Immunity to the following debuffs:
- Bleeding
- Blind
- Body Painting
- Burning
- Chaos
- Crystallization
- Curse
- Deep Sleep
- Fear
- Freezing
- Frozen
- Guillotine Cross’ Poisons
- Poison
- Saturday Night Fever
- Shadow Chaser’s Masquerades
- Silence
- Sleep
- Stone
- Stun
Prestige
Chance to completely evade damage from magic attacks while increasing physical defense. The magic evasion rate depends on your stats. Your defending Aura level influences the physical defense rate.
| Level | Base DEF Increase | Base Dodge Chance | Duration | SP Cost |
| 1 | 15 | 1% | 30s | 75 |
| 2 | 30 | 2% | 45s | 80 |
| 3 | 45 | 3% | 60s | 85 |
| 4 | 60 | 4% | 75s | 90 |
| 5 | 75 | 5% | 90s | 95 |
Dodge Chance = [Base_Dodge_Chance + {(INT + LUK) × (SkillLv ÷ 20) × (BaseLv ÷ 200)}] %
This skill provides additional survivability through its defense increase and magic evasion.
I’ve added a Prestige dodge chance calculator at the bottom of this page.
Understanding Shield Spells
Royal Guards have access to a skill called Shield Spell. This skill provides buffs or utilities to the Royal Guard based on the equipped shield.
The Shield Spell is divided into three groups: Shield’s defense, Shield’s magic defense, and Shield’s refine level. Each group is further divided into three random effects.
Shield Spell Level 1 (Shield’s defense)
- Spell 1 – This will inflict damage to all enemies around the user. The AoE depends on the shield’s defense.
3×3 for shields with 40 below defense.
5×5 for shields with 80~41 defense
7×7 for shields with 81 or above defense.
The damage is neutral and will push enemies hit 2 cells away from the caster. - Spell 2 – This will allow the Royal guard to reflect melee damage.
- Spell 3 – This one is what we’re looking for. Spell 3 will temporarily increase our equipment attack based on the shield’s base defense. For example, an Anemos Shield will provide 150 equipment attack and the buff will last for 7m 29s.
Shield Spell Level 2 (Shield’s magic defense)
- Spell 1– Similar to shield spell level 1’s spell 1, this will also inflict damage to enemies around the user, but this time, the damage will be holy property.
3×3 for shields with 3 below MDEF.
5×5 for shields with 4 to 5 MDEF.
7×7 for shields with 6 or above MDEF. - Spell 2 – This casts Lex Divina around the user. Duration of the status depends on the shield’s MDEF.
3×3 for shields with 3 below MDEF.
5×5 for shields with 4 to 5 MDEF.
7×7 for shields with 6 or above MDEF. - Spell 3 – Casts Magnificat to the user.
Shield Spell Level 3 (Shield’s refine level)
- Spell 1 – When the buff is up, any damage you inflict will cause armors to break at 100%. Very good spell if you’re into PVP/WoE. Buff’s duration depends on the shield’s refine level.
Duration = shieldRefineLevel × 30 - Spell 2 – A spell that increases physical defense and status resistance.
Defense Increase = ( baseLevel / 100 ) + ( shieldRefineLevel * 10 )
Status Resistance = [( totalLUK / 10) + ( shieldRefineLevel * 10 )]%
Duration = shieldRefineLevel × 30 - Spell 3 – Heals the user.
Heal = [(baseLevel / 10) + (shieldRefineLevel + 1)] %
Most of the time, Royal Guards without Inspiration skill will still get Shield Spell at level 1, mainly due to the equipment attack buff.
Sample Skill Build
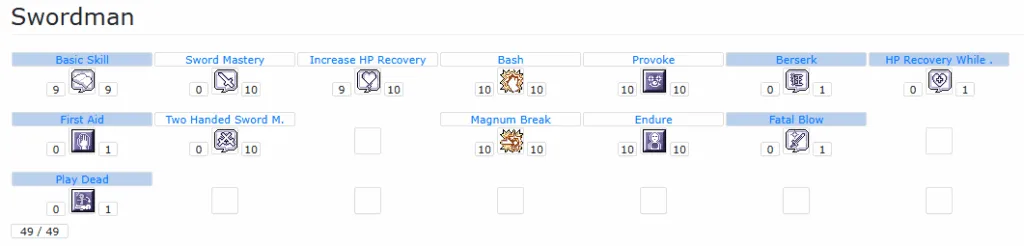
For the Swordsman skill tree, these are the most common skills you’ll need to get. There’s really no point in taking the Sword Masteries, as we won’t be using a sword for this build.

In the Crusader/Paladin skill tree, you have some flexibility in what to take. However, Cavalier Mastery Level 5 is mandatory if you plan to use mounts, as it removes the significant attack speed penalty while mounted.
Personally, I don’t really recommend maxing Guard since it interrupts attacks when it triggers. Spear Quicken can also be left at Level 6 if you don’t plan to use Overbrand. After the skill rework, each level mainly increases critical rate and flee, so you can save points depending on your priorities.
During the leveling phase as a Paladin, you can pick up Rapid Smiting if you’re having trouble killing monsters with Holy Cross. Just keep in mind that you’ll need a way to reset your skills later on, especially if you change your mind mid-leveling or after advancing to Royal Guard.
Lastly, Devotion isn’t required for this build unless you intend to support party members.
However, if you choose to use Shield Rings, picking up Lv. 5 Devotion is mandatory to fully utilize the ring’s effect, granting you +5 STR/INT/DEX, as well as 100 flat ATK.
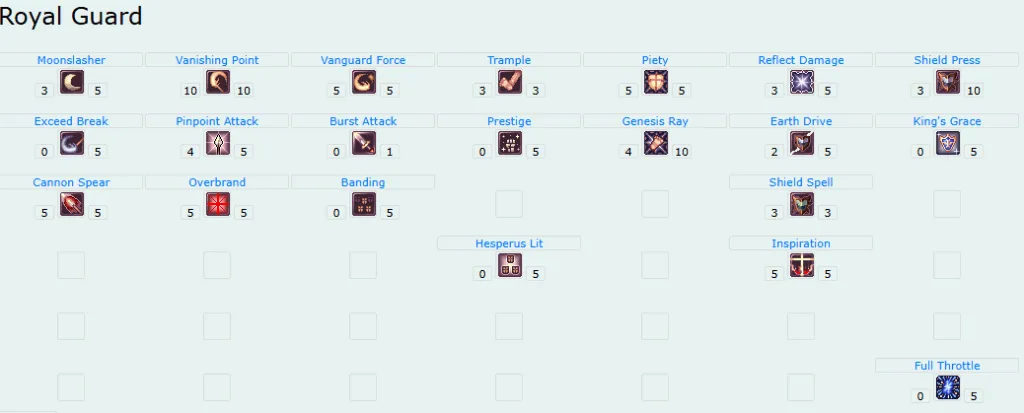
The Royal Guard skill tree is a bit more straightforward. The main priorities are getting at least Shield Spell Level 1, and maxing Vanishing Point and Cannon Spear. The rest of the skills are optional and can be picked based on your specific needs.
During the leveling phase, Pinpoint Attack is useful against monsters with high Flee or those that have used Power Up or Increase Agility. It always lands as a critical hit regardless of your Crit rate and benefits from critical damage boosts.
Prestige is another option, as it can stack with Inspiration. You can activate Inspiration first to gain bonus stats, which can increase your chance to dodge using Prestige. As explained in the Prestige skill section, you can use the calculator linked here: Prestige Dodge Chance Calculator.
Inspiration is also a viable skill, though it may be difficult to use early on since it consumes experience and inflicts self-damage when attacking. This makes it more suitable for endgame content like PvP/WoE, Memorial Dungeons/Instances, or field and dungeon boss hunting.
If you want to plan ahead, you can use Divine Pride’s Skill Simulator to map out your desired skill path.
Cannon Spear Equipment
Below is a list of equipment options for each slot that you can choose from to customize your Royal Guard’s setup. This list includes both farmable and gacha-exclusive equipment options
Headgears
| Item | Why | Acquisition |
|---|---|---|
| Obtained from the Tomb of Honor. Use this if you’re aiming for big Cannon Spear numbers. It can be enchanted with Mettle for more ATK%, or Adamantine for HP%. Acute is also considered once the Tomb of Honor enchant update rolls in. | Can be crafted in Tomb of Honor | |
| Gains ATK and MATK every 2 refines, with additional bonuses at +7, +9, and +11 including ASPD, ATK%, holy magic damage, all-size damage, and fixed cast reduction. Set with Biolab Libra Diadem and Fortridge reduces Cannon Spear cooldown and boosts its damage based on Fortridge refine. | Gacha | |
| A headgear crafted using the materials obtained from Old Glast Heim: Challenge Mode. Gives ATK every 2 refines, ASPD every 3 refines, and boosts Vanishing Point, Cannon Spear, and long-range damage at higher refine intervals, with an extra ATK bonus at +11. | Old Glast Heim: Challenge Mode | |
| Another excellent option for this build, offering flat ATK per 2 refine levels, ATK%, range bonus, and increased attack speed. | Gacha | |
| This item proves particularly valuable when facing formidable ghost monsters such as Fenrir, as it grants the user the ability to endow the ghost property, enhancing combat effectiveness. | Gacha | |
| An item that replaces Catherina von Blood after reaching Lv. 120. Provides huge amount of stats, HP and SP leech, reduces Cannon Spear Cooldown by -0.5 seconds, and increases Cannon Spear’s damage by 5% per 2 refine level of the Thanatos Long Spear. | Gacha | |
| Another hat akin to the Rideword hat. | Nightmare Clock Tower dropped by Nightmare Ridewords | |
| A suitable headgear option for novice players, offering a fair chance to drain HP/SP upon dealing damage. | Gacha | |
| Comparable to the Rideword Hat, at +9 enhancement level, you’ll gain an extra 1% chance of draining HP/SP. | Gacha |
Mid Headgears
| Item | Why | Acquisition |
|---|---|---|
| Currently the best in slot for middle headgear. Grants +40 ATK, -10% skill delay, 5% chance to absorb 5% of physical damage as HP, and 3% chance to recover 3% of physical damage as SP; if pure STR is 120 or above, grants an additional +60 ATK, +15% physical damage to all property enemies, and +15% ranged physical damage. | Gacha, Expensive | |
| Provides a whopping total of 220 flat ATK, 100% Perfect Hit, Immunity to Blind and Silence statuses, 6% After-cast delay reduction, 20% Increased attack speed and +3 flat attack speed if the user have 120 AGI. | Gacha, Expensive You need an Imperial Mod Cube and 10 Imperial Feathers to craft this. | |
| The optimal middle headgear choice for this build. | Gacha | |
| A great middle headgear option for an additional +1 ASPD boost. | Gacha |
Low Headgear
| Item | Why | Acquisition |
|---|---|---|
| Possibly the best in slot if worn with Platinum Arbitrator [1]. Grants ATK +10% and -5% skill delay, with additional ATK, Perfect HIT, HP/SP, and Cannon Spear or Vanishing Point damage boosts scaling with refine level and when equipped with Platinum Arbitrator. | Gacha | |
| A lower headgear that comboes with Imperial Feather. Provides a whopping 180 ATK and 15% ASPD if all requirements are met. | Gacha, Expensive | |
| A lower headgear that increases your Physical and Magical Damage to enemies % depending on your pure STR and INT. | Gacha | |
| A good lower headgear if you’re planning to utilize Illusion Armor pieces from Episode 17.1.Increases item drop rate by 5%, and when paired with Illusion Engine Wing Type A or B, grants 5% neutral resistance; at +7 refine, it gives +100 ATK/MATK and +10% max HP/SP, and at +9, it adds +7% MATK, +7% physical damage to all class enemies, and +25% resistance to Fire, Water, Wind, and Earth; when equipped with Modification Orb (Speed), it provides +50 HIT, -20% skill delay, and +25 perfect hit. | Gacha | |
| Must be worn along with Temporal STR Manteau and Overwhelm STR Armor to fully utilize its effect. It provides 110 flat ATK, 7% ACD reduction, and 10% melee physical damage if all refinement requirements are met. | Gacha | |
| Make sure you reach the stat quota and wear the sunglasses or geek glasses for its effect to work. | Gacha | |
| It has a chance to cast level 1 Aspersio without requiring holy water, making it perfect for solo players who prefer not to spend KP on Aspersio scrolls. | Gacha | |
| If you’re into PVM, more drop rate boost is needed to get that luxurious drop! | Gacha | |
| Provides All stats +1 and +1 ASPD. | Gacha | |
| A relatively cheap option for more range bonus. | Gacha |
Armor
| Item | Why | Acquisition |
|---|---|---|
| A gacha item that provides ATK boost, DEF pierce, physical damage increase against demon and brute/beast monsters. At +11, it enhances your physical damage against wind and earth property monsters. Can also be enchanted (info here).Pairs with Temporal STR Boots. | Gacha | |
| This item provides a ton of flat ATK and range bonus, making it a worthy choice for the build. | Gacha | |
| A great HP/SP leeching item for the armor slot. | Gacha | |
| An upgraded version of the Illusion Armor Type A obtained from Episode 17.2. Can be enchanted with Vanishing Cannon skill modules. One of the best F2P-friendly armors if you can’t afford a Platinum Arbitrator. | ||
| An item from Episode 17.1. Pretty easy to farm as long as you do the content’s daily quests. Can be enhanced by socketing Power Modules, etc. | Farmable thru Episode 17.1: Illusion – THE ROGGH LIBRARY | |
| An item from Episode 16.1, you can exchange your Honor Tokens obtained from the Banquet of Heroes for this armor. Can be enchanted with STR or DEX runes. For more information, visit the page for Episode 16. | Farmable thru Episode 16.1: Banquet of Heroes – THE ROGGH LIBRARY | |
| Currently the best armor for Vanishing Point and Cannon Spear. Requires Pinpoint Attack level 5 to fully maximize its huge damage increase. | Gacha |
Garment
| Item | Why | Acquisition |
|---|---|---|
| Currently the best-in-slot garment, it grants +20 ATK per 2 refine levels, +5% size damage per 4 refine levels, +7% ATK and +10% ASPD at +7, +15% ranged damage at +9, and per 2 Base Levels at +11, +1% Cannon Spear damage and +2% Vanishing Point damage per 2 base levels, with HP/SP absorption and -0.5s Cannon Spear cooldown when paired with a +11 | Gacha | |
| If you’re no longer struggling to hit 193 ASPD, get this manteau with range damage, ATK%, or increase attack speed option. Enchanting details here.Pairs with Temporal STR Boots. | Gacha | |
| The maximum Expert Archer enchants on a Fallen Angel Wing will result in the highest damage output for skills like Vanishing Point and Cannon Spear. | Gacha | |
| A garment that provides significant stat bonuses when the stat requirements are fulfilled. This item is often preferred over the Fallen Angel Wing because of its superior stats, despite the Fallen Angel Wing offering more damage. | Gacha | |
| A decent and farmable garment from Episode 17.1. The set bonus depends on the equipped armor and engine. Ideally, you’d want to use Above All and ASPD modules for this. | Farmable thru Episode 17.1: Illusion – THE ROGGH LIBRARY |
Footgear
| Item | Why | Acquisition |
|---|---|---|
| If worn with Egnigem Cenia Card and Boss Egnigem Cenia Card, Unknown Swordsman Boots become the best-in-slot footgear, providing a high amount of STR, which Cannon Spear needs. | Gacha | |
| A pair of shoes from one of the KP events. Grants +10% physical and magical damage against all property enemies, restores 150 HP and 15 SP per monster kill, and at refine levels +10 and +11, grants an additional +10% damage per level and enables Lv.1 [Greed] at +10. | KP event Possibe gacha item in the future | |
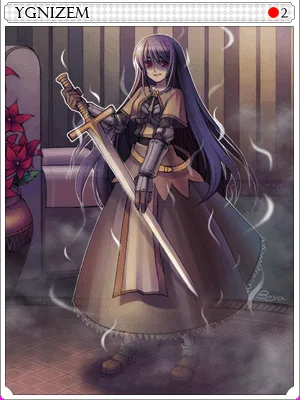
| An amazing footgear that can give you 15% physical damage to boss monsters. For every 2 refine level of the shoes, you receive: ATK +15, ASPD 2%, MaxHP & MaxSP 2%. If worn with Boss Egnigem/Sealed B Egnigem Card (Ygnizem), For every 3 refine level of the boots, STR + 20, FLEE + 15.Currently the best in slot for stable Cannon Spear damage. | Gacha | |
| The ideal enchants would be Expert Archer for normal enchant and either Bear’s Power (Cannon Spear boost) or Lucky Day for special enchant. Tip: | Farmable from Old Glast Heim Normal and Hard Modes | |
| Another alternative for Temporal STR boots. Can be enchanted with | Farmable thru Episode 17.1: Illusion – THE ROGGH LIBRARY |
Weapons
| Item | Why | Acquisition |
|---|---|---|
| An upgraded version of Aquatic Spear that provides slightly stronger effects. | Crafting via Mod Cube | |
| While the Imperial Set threatens its position as the best spear for the build, the Aquatic Spear can still shine when used in combination with a Brooch of Hero and Hero Plate. Can also be enchanted. Details here. | Gacha & KP events | |
| A weapon randomly dropped from EDDA: Biolab. ATK +5%, reduces post-skill delay by 1% per refine, and gives +20% Cannon Spear damage at +9 and +20% Overbrand damage at +11. When paired with Randel’s Memory: Set bonus with | EDDA: Biolab | |
| Due to its perfect hit rate bonus, Gungnir becomes a favorable option for spamming VP against monsters with AGI UP. When combined with the General Helmet, Gungnir enhances your Vanishing Point damage by 7% for every 2 refinements. | Dropped by Mistress Obtained from High Weapon Box | |
| This weapon offers bonus damage to Vanishing Point and Cannon Spear. To maximize their damage output, players should also wear the Imperial Feather and Imperial Ring. | Dropped by Unihorn Scrabas in Scaraba Dungeon. Obtained from High Weapon Box |
Shields
| Item | Why | Acquisition |
|---|---|---|
| The best-in-slot shield for spamming Cannon Spear, as it reduces its cooldown by 1 second. | Gacha | |
| PKS or Purified Knight’s Shield is an upgraded version of Cursed Knight’s Shield. You can get this from enchanting CKS at a really low chance. PKS is also enchantable and comes with a better enchantment table compared to CKS and BKS (Bloody Knight’s Shield). | Gacha | |
| This shield provides a plethora of stats that is usable. Can also be enchanted and has a chance to become a Purified Knight’s Shield, or worse, Bloody Knight’s Shield. | Gacha | |
| A shield that provides after-cast delay reduction but comes with +50 ATK/MATK when upgraded to +8. ACD reduction isn’t really important for VP/CS build. | Gacha | |
| A shield with 170 base defense, meaning it will give you 170 equipment attack with Shield Spell 1 attack buff. | Gacha | |
| Part of the imperial feather set that will boost VP and CS damage by 20% | Dropped by Rake Horn Scaraba Egg | |
| A decent shield that boosts flat ATK and ATK%. | Gacha | |
| This is a decent starting shield. The Shield Spell Level 1 ATK effect proc will also grant 130 equipment attack if used in conjunction with this shield. | Dropped by Alice, Alicel, and Dark Pinguicula. | |
| Another decent shield that provides 130 base defense. | Dropped by Incarnation of Morroc |
Accessories
| Item | Why | Acquisition |
|---|---|---|
| An item that provides 7% ATK to all classes and 10% ASPD. Quite cheap in the current market. Can also be crafted. | Crafted from Pintados Festival in Malaya | |
| This is pretty much an upgrade of Bakonawa Agimat Tattoo with a slot. | Gacha | |
| You may need this accessory for MVPs/monsters with AGI Up skill, perfect hit is a must against them. | Gacha | |
| Must be paired with Hero Plate to utilize its full potential. | Gacha | |
| A piece of the Imperial Set. You only need to equip the Imperial Spear to utilize this ring. | Gacha | |
| This item already provides 5% ATK and still can be enchanted with more ATK% or ASPD%. | Exchanged in Geffen Magic Tournament | |
| These accessories can be farmed in the Sarah vs Fenrir instance by just killing the gigantes. Must be enchanted with Expert Archer to see its potential. | Exchanged in Sarah and Fenrir Instance | |
| A farmable accessory from Episode 17.1 that can be enchanted with Expert Archer, Attack Speed and STR modules. | Farmable and enchantable thru Episode 17.1: Illusion | |
| A farmable accessory from Episode 17.2 that can be enchanted with more powerful modules such as All-Force, which grants +5% Melee Physical Damage, +5% Long-ranged Physical Damage, and +5% All Elemental Magic Damage. It can also be enchanted with the improved Expert Archer and Attack Speed modules. | Farmable and enchantable thru Episode 17.2: Legacy of the Wise One | |
| One of the best accessory that you can use; provides STR +5, INT +5, DEX +5 Physical damage to all class enemies +5%. And if Devotion is learned to Lv. 5, you also gain an additional STR +5, INT +5, DEX +5, ATK +100. Thanks to zetsumeeii of ROGGH Discord for this idea. | Gacha | |
| A relatively cheap accessory that gives +10 all stat, 10% physical damage to all class, as well as 10% after-cast delay reduction. | Gacha | |
| A god item that provides 40 STR, additional 1 STR per 5 base level and increased physical damage to bosses if the user’s base STR is 120 | God Item QuestGolden Emperium Reward |
Ideal Cards to Use
Here are some cards you will normally see in this build.
 | Broken Beta Guard Card VIT +3. Max HP +10%. [Vanishing Point] and [Cannon Spear] damage +10%. Equip with Verporta Card and Senior Assistant Bot, [Vanishing Point] and [Cannon Spear] damage +20%, For every 2 refine levels of shoes, [Vanishing Point] damage +5% additionally, For every 2 refine levels of weapon, [Cannon Spear] damage +5% additionally. |
 | Empathizer Card Ranged physical damage +10%, Max SP -25%. Equip with Dame of Sentinel Card, If base level is 200 or above, For every 40 pure DEX, Ranged physical damge +15% additionally. Class : Card Jobs : Garment Weight : 1 |
 | Polluted Wander Man Physical damage to medium, large size enemies +30%. Class : Card Location : Weapon Weight : 1 |
 | Khalitzburg Knightage Card DEF +20. Physical and magic damage taken from Medium and Large enemies -25%. Equip with White Knightage Card, physical and magic damage taken from Medium and Large enemies -5% additionally, physical damage to Medium and Large enemies +15%. Class : card Location : Shield Weight : 1 |
 | White Knightage Card ATK +15. Physical damage to Medium and Large enemies +20%. Equip with Khalitzburg Knightage Card, physical damage to Medium and Large enemies +15% additionally, physical and magic damage taken from Medium and Large enemies -5%. Class : card Location : Weapon Weight : 1 |
 | Egnigem Cenia Card Adds 1 STR for every 18 points of base INT. Class : card Location : Armor Weight : 1 |
 | Boss Egnigem Card Restores 50 HP and 10 SP every 10 seconds. Max HP, Max SP +10%. Class : card Location : Shoes Weight : 1 |
 | Verporta Card STR +2. Max HP +10%, Max SP +10%. [Magnum Break] damage +25%. Class : Card Location : Shoes Weight : 1 |
 | Senior Assistant Bot Card Equip with One-handed Spear or Two-handed Spear, Ranged physical damage +10% additionally. For every 2 refine levels of weapon, Ranged physical damage +2% additionally. Class : Card Location : Weapon Weight : 1 |
Resistance against elemental, racial, and size attributes is also crucial. Therefore, if you find yourself facing a deadly MVP monster and possess cards and gear that can enhance your survivability, make sure to utilize them.
Useful Shadow Gear Sets
Shadow gears play a major role in enhancing your Royal Guard’s stats, so getting them is a must.
Below are examples of shadow gears that you can use:
High-end Shadow Gears
- Racial Penetration Weapon Shadow Set
- Almighty Shadow Earring / Almighty Shadow Pendant
- Blue Physical Shadow Set
- Maximum Mammoth (Armor, Shield, Shoes set)
- Full Penetration Shadow Accessory Set / Full Penetration Shadow Armor Set
Royal Guard Shadow
| Increase damage of Magnum Break by 20%. For every refine level, increase damage of Magnum Break by 5%. | |
| Decrease SP consumption of Bash by 20%. For every refine level, decrease SP consumption of Bash by 3%. Equip with Swordman shadow (Earring and Pendant), ATK +1%, Max HP +1%. If the total refine level of the set is +10, ATK +2%, Max HP +2%. | |
| Increase the damage of Grand Cross by 20%. For every refine level, increase damage of Grand Cross by 5%. Equip with Crusader Shadow Shoes, Increase damage of Holy Cross by 20% Decrease SP cost of Grand Cross by 20% | |
| Decrease the SP cost of Holy Cross by 20%. For every refine level, decrease SP cost of Holy Cross by 3% | |
| [Cannon Spear] damage +20%. For every refine level, [Cannon Spear] damage +5% additionally. | |
| [Earth Drive] damage +20%. For every refine level, [Earth Drive] damage +5% additionally. Equip with Royal Guard Shadow Weapon, [Cannon Spear] SP consumption -20%, able to cast Lv3 [Synthesized Shield]. Equip with 2 types of Swordman Shadow, Crusader Shadow, Royal Guard Shadow, All Stats +10, Max HP +5%, Max SP +5%. DEF and MDEF Pierce on Normal class enemies +50%. |
As of May 1, 2024, Shadow Gear Enchanting has been implemented to the server. This feature allows you to randomly get a stat based on the enchanting table. Ideal enchantments are ASPD and range damage.
Shadow Gear Enchanting – THE ROGGH LIBRARY
Acquiring the penetration set will assist you in defeating monsters with high defense more easily. For instance, the Root of Corruption in OGH possesses a defense of 333. As a rule of thumb, if a monster has 200+ defense, use penetration.
For example, the Royal Guard below opted for Maximum Shadows and relies solely on the defense-piercing effect from the Royal Guard Shadow Weapon and Vanishing Cannon Shield.

Consumables
These are the consumables that will enhance your Royal Guard. If you’re facing difficulties in reaching 193 ASPD, there are consumables available that provide a flat ASPD bonus to assist you.
- Almighty
- Infinity Drink
- Power Booster
- Red Booster
- Booster Wine
- Ultimate Cook (Does not stack with Almighty)
- Small/Medium Life Potion
- Elemental Proof Potions (Resist Fire/Water/Earth/Wind)
- Berserk Potion
- Enrich Celermine Juice
- Summer Perfume (ASPD)
- Elemental Converters
- AGI/Blessing scroll
Costume Stones
Costume stones also play a crucial role in enhancing your Royal Guard. Need that extra ASPD to hit 193? opt for an ASPD stone. The other options are geared towards increasing your damage or utility.
- ASPD Stone (Garment or Upper)
- Range Stone
- ATK% Stone
- Size Stone (Medium/Small/Large)
- HP/SP Absorb Stone
Royal Guard Stone Set
[Vanishing Point] damage +15%. Equip with Paladin Stone (Upper), Has 2% chance to absorb 1% of physical damage dealt to enemy as SP. Equip with Paladin Stone (Middle), [Cannon Spear] cooldown -0.5 seconds. Equip with Paladin Stone (Lower), [Vanishing Point] damage +15% additionally. |
For every 2 level of [Faith], Max HP +1%. |
For every 2 level of [Spear Mastery], ranged physical damage +1%. |
[Holy Cross] damage +20%. |
If you require additional attack speed and don’t need the SP leeching effect of the garment and upper stone combo, you can opt for the ASPD Upper Stone instead of the Paladin Stone (Upper).
Prestige Dodge Chance Calculator
This is the calculator for Prestige’s dodge chance. Do note that each level of Prestige increases the base dodge chance by 1%.
Author’s Note:
I want to express my sincere thanks to iRO Wiki, Divine-Pride, and their contributors for generously sharing in-depth information about the game. However, I must clarify that I do not claim ownership over the content provided by them. Their efforts have greatly assisted in gathering the necessary information for compiling this guide and ensuring its accuracy.
If you believe that I have overlooked important details in this guide or if you have additional suggestions, please feel free to comment below. <3
Was this helpful?
20 / 1
Bro, The skill guide is really bad, you didnt include any points in Peco Peco Mastery which is 100% necessary, without it you land one auto attack every two hours, i leveled my royal guard with this guide and had to waste 6 skills points which is a shame xD, impossibly leveling without it.
damn..
Thank you for the heads-up! You’re right, I missed including information about the importance of getting Cavalry Mastery alongside Peco Peco Ride. I apologize if that caused trouble. I’ll be updating the guide to reflect this, so others don’t run into the same issue.
Also, just to clarify, comments go through a filter before they appear, which might be why your earlier message(s) didn’t show up right away.
I really appreciate you taking the time to point it out. Let me know if you catch anything else that needs fixing.