
by Cybie
I. Introduction and Guide Scope
The Archbishop is the 3rd job advancement for the Priest and High Priest class. Continuing their mission of faith and devotion, they are granted some of the most powerful supportive capabilities to aid their allies. Through the strength and grace bestowed upon them by the most holy, they are able to vanquish the evil which spreads through the land. If you wish to support your group and/or fight alongside them as an Archbishop, this class guide will be a great supplement to give you an idea on how to begin your journey as one!
This class guide will cover the basics of what the Archbishop class has to offer – from the job change quest you need to undergo, possible builds with corresponding skills and items, and the other tips and tricks you need to know about playing the class. Keep in mind that this guide will not contain any leveling tips of sorts, and that you have free range on how you want to play your Archbishop.
II. Archbishop Job Change Quest
- Requirements
- Level Requirement: Base 99 / Job 50 (Recommended Job 70 for Archbishop)
- Item Requirement (Not Consumed): 1 Holy Water
- Rewards
- Quest Reward: Job Change into Archbishop
- Item Reward: Mitra [1], Green Apple Ring
1. Speak to the Praying Minister inside Prontera Cathedral at /navi prt_church 103/88 and say that you wish to go on a Holy Pilgrimage. He will then direct you to look for a priest in Umbala.

2. Find and speak to Priest Dayan at /navi umbala 139/227. Tell him “I’m here for the Holy Pilgrimage”

3. Proceed to the Umbala Dungeon aka Yggdrasil via the portal at /navi umbala 107/285, and make your way to the path going to /navi yggdrasil01 219/47.


Walk forward until a dialogue window appears. Start the prayer by selecting the meditation option.
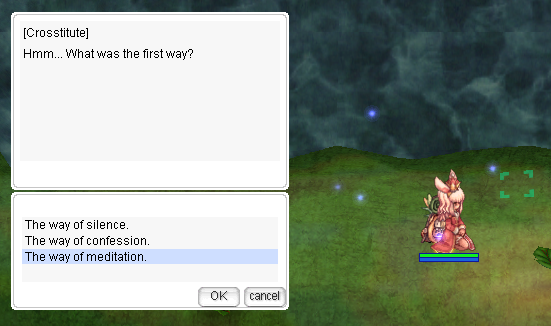
Continuing the prayer, and you will be prompted to enter some text (which you are free to input with any text).

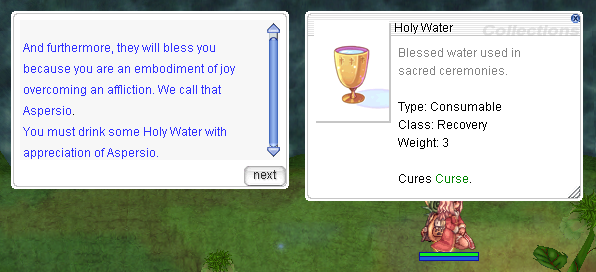
1 Holy Water will be used from your inventory near the end of the prayer, before you are warped back to Priest Dayan.
4. Speak to Priest Dayan again, and he will tell you to visit the Nun Vinue in Hugel.

5. Proceed to the church in Hugel and speak to Vinue, the Praying Nun at /navi hu_in01 205/204. Ask her to describe her dream, and offer to investigate for her.

6. Locate the Boatman over at /navi hugel 209/109 who will bring you to Odin’s Temple.

7. Make your way to the second map of Odin’s Temple and locate the Valkyrie Illusion over at /navi odin_tem02 281/275.

Her location will be indicated on your minimap (which disappears when you Teleport, but reappears when you re-enter via map change. If the NPC does not appear, walk some cells directly south first until she does.

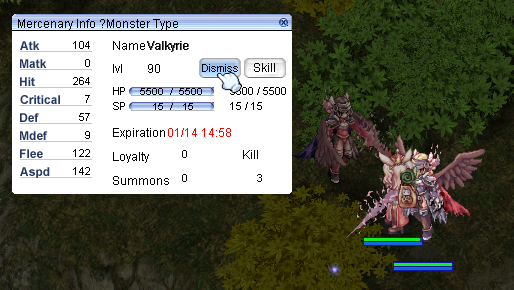
8. Speak to Valkyrie and offer to help her. You will then be given an Ancient Language Scroll to summon a Valkyrie Mercenary, before unequipping your gear and warping you to the job change map (similar-looking map to Odin’s Temple 3; /navi does not work in this map).

9. Summon the Valkyrie Mercenary immediately after being warped into the map and re-equip your gear. Avoiding the mobs that spawn, proceed to the northwest corner of the map (minimap-marked) and defeat the Valkyrie’s Nightmare.


Keep this mercenary alive until after defeating the first Valkyrie’s Nightmare, else you will fail the job change and need to restart the fight. If one is using a Mercenary AI, set your Valkyrie to Passive or Standby so she doesn’t start attacking the Valkyrie’s Nightmare before you do.

If you die inside the map, do not leave and wait for the timer to run out, so you will be respawned in the job change room. In order to speak to the Valkyrie NPC again, you will be required to dismiss your mercenary (in case you respawn after the timer has run out).
 |
Valkyrie’s Nightmare Lv98 Undead, Medium, Undead 3 HP 11780, ATK 910-1315, MATK 203-293 DEF 16, MDEF 20 Required HIT 322, Required FLEE 354 |
10. Once the Valkyrie’s Nightmare is defeated, pick up the Broken Horn Pipes she drops.

Dismiss your first Valkyrie Mercenary right after (open Mercenary Window via CTRL+R and Dismiss).
11. Talk to the Valkyrie NPC which appears at job3_arch02 114/328, and she will give you another Ancient Language Scroll. She will then task you to find the last piece.

12. Summon your new Valkyrie Mercenary, set her to Passive / Standby like in the previous step, and make your way to the south of the map (minimap-marked). Find and kill the Valkyrie’s Nightmare, then pick up the Broken Horn Pipes she drops.

13. A Valkyrie NPC will spawn at job3_arch02 243/49 to reassemble the pieces you have gathered. She then tells you to bring the Will of Exhausted Warrior and make your way to the shrine at the center of the map.


14. Proceed to the top of the hill at the center of the map. Avoid the Frus which spawns near the location by running towards Valkyrie and for it to despawn (be cautious as you might disconnect when you click + walk past the Valkyrie NPC when the dialogue window pops up).


15. Speak to the Valkyrie, and she will change your job into an Archbishop. You will also be rewarded the Mitra [1] headgear as well as a Green Apple Ring.


Alternatively, you can change job into an Archbishop by speaking to the Valhyrie’s Whisper in the Prontera Cathedral at /navi prt_church 19/33 for 25 Nyangvines Fruits. This feature can only be done by High Priests (not Priests), and you will not receive a Mitra and Green Apple Ring upon changing via this method. This can also be done even if you were in the middle of the actual job change quest.

III. Stat Breakdown
STR: Boosts ATK (CRIT-type Archbishop’s offensive stat for damage alongside LUK) and increases max weight limit; can also be invested on by Exorcist-type Archbishops with Perverse Demon Mask for MDEF Pierce bonus.
AGI: Provides FLEE and ASPD, with the latter being an important factor in terms of DPS for auto attack-type Archbishops, as well as spamming some spells with ASPD-based animation delay under Aftercast Delay Reductions (ex: Magic Strings); also adds some resistance to Masquerade debuffs in PvP environments.
VIT: Boosts HP, HP RECOVERY, DEF, resistance to STAT AILMENTS and increases healing amount of HP POTIONS. A must-have stat for Full-Support variants to invest in (minimum of 100 Total VIT for Stun Immunity, but can go higher for more HP or if using specific equipment like the Protect Feather Set).
INT: Main stat for majority of the Archbishop variants as it boosts MATK (which improves HP recovered via Heal and damage dealt by offensive magic spells) as well as SP and SP Recovery. Also boosts MDEF and increases healing amount of SP POTIONS
DEX: Decreases VARIABLE CAST TIME (not to be confused with FIXED Cast Time), allowing Archbishops to release spells faster. Minimum of 120 base DEX is required in order to reduce Fixed Cast Time by 0.5s when wearing Temporal DEX Boots. Also boosts HIT and slightly increases MATK and ASPD.
LUK: Increases CRIT, and slightly increases ATK/MATK and PERFECT DODGE. Minimum of 77 base LUK is required if utilizing headgears compounded with Arch Angeling Card (for increased natural HP/SP recovery), or multiples of 18 for other items such as Perverse Demon Mask or Heavenly Order. Also adds a bit of resistance to some status ailments.
IV. Possible Archbishop Builds
A. Full Support
High INT and DEX, High to Moderately High VIT, Moderately High to Mid LUK, Low STR and AGI
The standard support-type Archbishops’ role is to guarantee effective healing and party buffing while staying alive on the battlefield. They focus on investing high amounts of DEX and INT to attain the least variable cast time possible (in order to get their supportive spells bestowed onto their team), as well as having a generous amount of SP in order to do so. Heal, Coluseo Heal and High Heal rely on MATK as well, further making INT a solid investment for their build. A good amount of VIT will grant a suitable amount of Max HP, and can be used to avoid some status effects like Stun. Support Archbishops who utilize Arch Angeling’s HP/SP Regeneration boost will opt to have their Base LUK at 77, but depending on your items or if you will be using the said card, you can go higher or lower from that. STR and AGI do not offer much besides a bit of weight limit increase and ASPD for spamming skills under high ACD-reduction conditions respectively.
B. Pure Exorcist
High INT and DEX, Moderately High VIT, Mid to Low STR, AGI and LUK
Often referred to as Adoramus and/or Magnus Exorcismus types, these Archbishops put healing and buffing roles aside to take up a more-offensive one. With access to two powerful Holy-property offensive spells, they either fight alongside their party or fly solo by dealing damage to their opponents (with Demon/Undead races and Shadow/Undead property monsters as their preferred choice for the bonus damage). Much like the Full Support build, they tend to focus on the highest amounts of INT and DEX possible for MATK and cast time for these spells, and will need a good amount of VIT in case they need to tank some hits while spellcasting. Base LUK can also be set to 77 for Arch Angeling Card users especially for those who have problems with SP upkeep, but is not entirely a necessity and can allocate said points to the previous parameters, or to AGI or STR for ASPD and weight limit increase respectively.
C. Support-Exorcist Mix
High INT and DEX, Moderately High VIT, Mid LUK, Low STR and AGI
Some Archbishops tend to see-saw between the first two variants, and end up being a mix of both – having some of the necessary supportive capabilities while having the offensive means as well. Though challenging when it comes to skill distribution, these players can secure a versatile position of either supporting the party or dealing damage when the need arises. Stat point distribution will be a mix of the first two variants: having enough VIT for Stun Immunity, attaining 77 Base LUK for Arch Angeling (assuming it will be used) investing most points into INT and DEX, and having just enough points (or no investment at all) for STR and AGI.
D. Duple Light Melee
High INT, High to Moderately High AGI and DEX, Mid STR, Mid to Low VIT and LUK
Pre-renewal brought about Battle Priests and High Priests, focusing on melee attacks to deal damage instead of heal bombing, casting Magnus or supporting DPS partymates to gain levels and progress in-game. With Renewal, Archbishops gain access to the Duple Light skill, which grants them a chance to deal extra physical or magical damage when doing normal attacks. Since the skill’s formula has higher scaling in its MATK side compared to its ATK side, Archbishops who wish to utilize this skill in their melee builds can opt to spec more points in INT instead of STR, giving them a more magic-inclined autocast playstyle similar to Shadow Spell Chasers or Hindsight Sages. A good investment into AGI is recommended not just to attain high ASPD for better autocast procs, but FLEE to further dodge attacks while having a barrier from Praefatio or Safety Wall up as well. DEX is necessary for your hits to connect and proc autocasts, as well as provide a small boost in ASPD. Remaining stat points can be distributed between VIT and LUK to provide some HP, ATK and MATK.
E. CRIT Melee
High LUK, High to Moderately High STR and AGI, Moderately High to Mid VIT, Mid to Low INT and DEX
Battle Archbishops who wish to relive the days of dealing normal attacks and seeing CRIT numbers fly can also opt for the physical variant. These types will focus more on building up their CRIT rate with LUK and CRIT damage with items, as well as high investments in STR for ATK and AGI for ASPD and FLEE. Some VIT is still recommended for HP and status effect resistance, and a bit of DEX for some ASPD helps as well. Due to its playstyle, INT will only serve as some boost for Max SP.
| High: 100+ | Moderately High: 99-78 |
| Mid: 77-41 | Low: 40-1 |
V. Equipment Proper
Whether building for a support or a DPS character, Archbishops will need specific kinds of equipment to excel them further in their playstyle. Below are some of the equipment we recommend taking for your character depending on what build you’re aiming for.
- Weapons
 Eden Staff III (F2P starting weapon which can be enchanted with Archbishop 1 via Eden Quest to boost healing)
- Wand of Affection (Normal / Empowered; part of Affection Set to boost healing effectiveness)
- Mace of Judgement (Normal / Empowered; part of Judgement Set to boost Adoramus damage)
- Holy Stick [1] (highly-recommended one-hand staff for Exorcist-types; paired with Exorcism Bible to boost Magnus Exorcismus damage by 20% or Amistr Beret to boost Adoramus damage by 30% per two refines)
- Crimson Weapons [2] (refining these will increase ATK and MATK, which are beneficial to both battle and support/caster-type; also comes in various elements)
- Thanos Weapons (obtainable via trading Gray Shards farmed in Ghost Palace instance, these have a chance to regain HP and/or SP when dealing damage, while one-hand staff has innate boost to healing effectiveness; can also be enchanted for additional stat bonuses)
- Vicious Mind Weapons [1] (obtainable via Sky Fortress monster drops, and has similar ATK/MATK boost per refine level as Crimson Weapons; comes with random enchants upon Item Appraisal)
- Thorn Staff of Darkness (MDEF-pierce one-hand staff when paired with Skull Cap; an okay alternative for Exorcists if they don’t have access to previously-mentioned staves)
- Croce Staff (combo with Clergy Nurse Hat and Rosary Necklace for additional healing effectiveness)
- Recovery Light (standalone one-hand staff which increases healing effectiveness of Heal, Sanctuary, Coluseo Heal and High Heal per refine at the cost of increased SP usage)
- Healing Staff (increases healing effectiveness per refine lower than Recovery Light, but no increased SP usage)
- Bellum Bible (must-have weapon especially in PvP or WoE scenario, making Lauda Agnus and Lauda Ramus spammable)
- Spoon [1] (ASPD+10; good option for Emperium-breaking or spamming skills when you reach 0% ACD and skills have ASPD-based animation delay)
- Saint Mace [2] (Ancient Hero Weapon for Adoramus-types and combo with Ancient Hero Boots for chance to increase INT and MATK; not as strong as Judgement Set or Amistr Beret + Holy Stick, but workable when you have it over-upgraded and enchanted with Ancient Hero Wisdom’s magic stats)
- Exorcist’s Bible [2] (Ancient Hero Weapon for Duple Light-types and combo with Ancient Hero Boots for chance to increase INT and MATK)
- Death Note [2] (slight boost to MATK, increases ASPD per refine, and chance to inflict Coma on Demi-Human targets)
- Stunner [2] / Lunakaligo [3] (chance to Stun targets when dealing physical melee attacks, with 15% for Lunakaligo when Base STR is 77 or higher, and 10% for Stunner regardless of stats)
- Grand Cross (autocasts Turn Undead for a certain chance when dealing physical melee attacks; a simple way to deal with Undead-property monsters when leveling)
- Noble Cross [1] (upgrade from Grand Cross and can be crafted using it + Bloody Coins in Lutie; autocasts a higher level of Turn Undead when dealing physical melee attacks, restores SP when attacking/killing Undead-race targets and increases MATK by 150)
- Carga Mace [2] (early 3rd job access mace with decent ATK and two slots)
- Robot’s Arm [2] (obtainable via drop by MVP Charleston 3 in King’s Heel; a nice upgrade from Carga Mace and has +20 CRIT)
- Valkyrie Hammer [4] (Lv4 Weapon with 4 card slots; provides ATK/MATK and per refine increases ASPD by 1%)
- Shields
- Round Buckler [1] (cheap shield with decent DEF; can be obtained from Orc Warriors at early levels)
- Stone Buckler [1] (slightly better upgrade from Round Buckler; has damage reduction vs Large-type monsters)
- Valkyrie Shield [1] (great all-around shield with resistances to some elements)
- Bible of Promise Vol. 1 or 2 [1] (grants Power of Odin Lv1 or 2, boosting ATK and MATK by 75 or 100 respectively; good support shield for DPS teammates or yourself)
- Exorcism Bible (paired with Holy Stick for increased Magnus Exorcismus damage)
- Orlean’s Server [1] (chance to reflect magic damage, combo with Orlean’s Glove for reduced VCT)
- Platinum Shield (chance to reflect magic damage, and reduces damage from all sizes by 15% and Undead monsters by 40%)
- Immuned Shield [1] (Neutral-property damage reduction based on refine)
- Rose of Eden [1] (increased healing effectiveness)
- Ancient Shield of Aeon [1] (resistance to all elements by 10%, and adds some HP and SP)
- Giant Shield of Water [1] (+2 ASPD at +7 and reduced damage from water-property attacks; combo with Shining Trapezohedron for reduced aftercast delay)
- Fallen Angel Shield [1] (chance to reduce aftercast delay when dealing magic damage; ACD reduction further boosted when worn with Diabolus Robe)
- Anemos / Fotia / Nero / Gaia Shield [1] (reduced damage from specific elements/monsters; at +8 gives bonuses when base stats hit at least 90)
- Themis Libra [1] (increases Holy-property damage depending on the level of Heal learned; great option to boost Adoramus and Magnus Exorcismus damage)
- Mad Bunny [1] (provides ATK, MATK, reflect damage, CRIT, and uninterrupted cast time depending on refine rate)
- Cursed Knight’s Shield [1] (provides ATK, MATK, damage resistance from enemies, ASPD, chance to gain HP/SP and aftercast delay reduction depending on refine rate; can be enchanted for more additional boosts)
- Feather Shield [1] (provides ASPD, ATK, MATK and aftercast delay reduction depending on refine rate)
- Royal Guard Shield [1] (grants Lv1 Spell Shield for a chance to boost ATK; great buffing shield for melee battle-types before switching to their desired shield)
- Titan Shield [1] (provides MDEF, as well as elemental resistance depending on base stats that are at least 108; also increases HP, SP and all-property elemental resistance at +12)
- Excelion Shield [1] (provides MDEF, HP and SP; further increases HP and SP every 3 refines and/or if Base Level is 130 or higher)
- Body Armor
- Eden Group Armor (F2P starting armor with decent HP and SP boost)
- Puente Robe [1] (boosts healing effectiveness and reduces FCT by 3%; can be obtained from Orc Ladies at an early level)
- Kafra Uniform [1] (increased EXP gained from killing monsters; paired with Kafra Staff Hairband for further EXP increase from monsters, as well as drop rate increase and +4 all stats; decent armor option for early leveling)
- Robe of Affection (grants Holy 1 property to the user; part of Affection Set to boost healing effectiveness)
- Robe of Judgement (grants Shadow 1 property to the user; part of Judgement Set to boost Adoramus damage)
- Orlean’s Gown (uninterruptible cast time at the cost of +15% VCT)
- Valkyrie’s Armor [1] (indestructible armor and grats +1 all stats)
- Diabolus Robe [1] (increases healing effectiveness and reduces aftercast delay; combo with Fallen Angel Shield for chance to further decrease ACD)
- Overwhelm Armor [1] (DEX / INT / VIT / LUK; set combo with Temporal Boots, Temporal Manteau and Young Leaf of the World Tree for boosts depending on the chosen stat and refine rate; can be enchanted)
- Evil Dragon Armor [1] (chance to gain HP/SP when dealing physical damage)
- Sea Dragon Armor [1] (boosts MATK and reduces SP cost of skills)
- Excelion Suit (obtainable via Verus Exchange; can be enchanted with reactors for additional boosts, such as Recovery 202 for SP recovery, Max HP, INT, MATK and Unfrozen Reactors; combo with Excelion Wing for aftercast delay reduction)
- Flattery Robe or Invective Robe [1] (obtainable via Royal Banquet Exchange using Honor Tokens; former grants Lv1 Endure and increases MATK by a significant amount, while the latter grants Lv1 Improve Concentration and DEF pierce to Demi-Human, Demon and Undead; can be enchanted with bonuses depending on refine level, such as +5 INT at +7 refine via Rune of Intelligence 1)
- Selina Magic Robe (boosts MATK, reduces aftercast delay and at +9 has a chance to autocast Heal on self when taking damage; good alternative armor to use when facetanking mobs)
- Ritual Robe [1] (+9 with Bathory Card for full effect: increased healing effectiveness and HP, reduced aftercast delay and SP consumption, immunity to Sleep and Frozen)
- Medical Scrubs [1] (+9 with Argiope Card for full effect: increased healing effectiveness and DEF/MDEF, reduced aftercast delay and indestructible armor, immunity to Petrification and Frozen)
- Kardui Robe [1] (+9 with Angeling Card for full effect: increased MATK and MDEF, indestructible armor, immunity to Frozen)
- Hero Judgement Shawl [1] (obtainable via Prize of Hero reward box; chance to autocast either Lex Aeterna or Kyrie Eleison, and boosts Adoramus and Judex damage; combo with Brooch of Hero for increased Adoramus damage per refine rate of armor)
- Abyss Dress (Shadow 1 property armor, indestructible and immune to knock back; increases physical and magical damage vs Shadow/Undead-property and Demon/Undead-race monsters depending on refine rate)
- Samael Dress (Holy 1 property armor, indestructible and immune to knock back; increases physical and magical damage vs Holy/Poison-property and Plant/Insect-race monsters depending on refine rate)
- Kukulkan Skin [1] (provides HP/SP and some damage resistances; also grants Lv3 Guard at +13 refinement)
- Celine’s Dress [1] (stand-alone effects at +12: MATK +50, VCT -10%, All-Property Magic DMG +10% and ACD -15%; combo with either Celine’s Ribbon, Celine’s Brooch or Evil Spirit Glove for additional boosts)
- Garments
- Eden Group Manteau II (F2P starting garment with neutral attack resistance and FLEE)
- Shawl of Affection (autocasts Renovatio; part of Affection Set to boost healing effectiveness)
- Shawl of Judgement (autocasts Oratio; part of Judgement Set to boost Adoramus damage)
- Piece of Angent Skin [1] (elemental resistances and increased SP, with chance to recover when dealing physical damage)
- Etran’s Undershirt [1] (increases MDEF and HP, as well as immune to knockback at +10; combo with Deviling Card to remove card’s elemental damage penalty)
- Hero Manteau [1] (reduces neutral-property attacks and increases FLEE depending on refine; cannot combo with Deviling Card)
- Manteau of Mystic Frozen (resistance to Water and chance to freeze targets when being physically attacked; combo with Charm of Mystic Frozen for chain-casting Canto Candidus-Clementia and reduced CD for Coluseo Heal)
- Manteau of Great Nature (resistance to Earth and chance to petrify targets when being physically attacked; combo with Charm of Great Nature for Maya Purple effect when Manteau is refined to +10)
- Temporal Manteau [1] (DEX / INT / VIT / LUK; set combo with Temporal Boots, Temporal Manteau and Young Leaf of the World Tree for boosts depending on the chosen stat and refine rate; can be enchanted)
- Excelion Wing (obtainable via Verus Exchange; can be enchanted with reactors for additional boosts, such as Recovery 202 for SP recovery, Max HP, INT and MATK Reactors; combo with Excelion Suit for aftercast delay reduction)
- Violet Halo [1] (increases MATK, CRIT damage and ranged damage, and further boosted per refine rate; pair with Magical Booster for reduced VCT, Crimson Booster for increased ranged damage, Dark Blinkers for reduced aftercast delay or Sigrun Wings for CRIT damage)
- Skin of Typhon [1] (adds resistance to Neutral and Poison-property attacks, as well as from Fish and Demi-Human enemies; +8, increases MATK by 15 and DEF by 20 for every 20 Base AGI + VIT)
- Bravery Bag [1] (grants Greed Lv1, and gives bonuses at +7 and +9 refine rate when Base stats are at least 90)
- Ancient Morocc Shawl [1] (boosts FLEE and Perfect Dodge depending on refine rate)
- Scarlet Poncho [1] (increases CRIT damage; combo with Critical Anklet to further increase CRIT damage and CRIT rate)
- Spiritual Cloth (increases Max HP, SP and Demi-Human resistance; also decreases aftercast delay)
- Fallen Angel Wing [1] (at +9, can be enchanted 3x with Spell Enchants to further boost MATK and reduce VCT)
- Battle Surcoat [1] (grants Double Attack and Raging Trifecta Blow when dealing physical melee attacks)
- Owl Baron Cloak [1] (chance to increase ASPD when dealing physical or magic damage; combo with Executioner/Ogretooth/Mysteltainn Cards for bonus dmg vs specific sizes)
- Christmas Guardian Tree [1] (set combos: Noble Cross + Hurt Mind for MATK and Duple Light, or Red Lantern + Evil Spirit Glove for ASPD, HIT, MATK and Psychic Wave autocast)
- Footgear
- Eden Group Shoes IV (F2P starting footgear with boost to HP/SP recovery)
- Shoes of Affection (+10% resistance to Demi-Human at the cost of -10% resistance from other races; part of Affection Set to boost healing effectiveness)
- Shoes of Judgement (+10% resistance to Demon and Undead at the cost of -10% resistance from other races; part of Judgement Set to boost Adoramus damage)
- Ancient Hero Boots [1] (increases HP/SP and reduces FCT and ACD depending on refine; combo with Ancient Hero weapons for chance to trigger additional boosts)
- Excelion Leg (increases HP/SP, with additional increase when Base Level is at least 130 and for every 3 refine levels)
- Variant Shoes (Normal granting 20% Max HP/SP boost, but reduced per refine; Enhanced granting 12% Max HP/SP, but no penalty when refined + slotted)
- Temporal Boots (DEX / INT / VIT / LUK; set combo with Temporal Boots, Temporal Manteau and Young Leaf of the World Tree for boosts depending on the chosen stat and refine rate)
- Applause Shoes [1] (reduces aftercast delay per refine; combo with Amon Ra Card to further increase the reduction bonus and add +3 all stats per refine)
- Boots of Judgment [1] (adds MDEF, Physical/Magic Damage vs Human/Demon/Undead races, and reduced SP consumption; combo with future armor Agenda Robe to increase Holy-Property magic damage per refine and reduce Adoramus CD)
- Upper Headgear
- Kafra Staff Hairband [1] (combo with Kafra Uniform for bonus EXP gain/drop rate from monsters and +4 all stats)
- Clergy Nurse Cap [1] + Rosary’s Necklace (upper headgear grants uninterruptible cast time without the VCT penalty from Phen Card or similar items; increases healing effectiveness which is further boosted depending on refine and when paired with Croce Staff)
- Panagia’s Gift [1] (support headgear which provides VIT/INT+5 and Stun Resist +50%; at +10, Healing effect +40%, ACD -20%, SP consumption -20%; paired with Mora Accessories with Archbishop/Catholic/Cure enchants for additional bonuses)
- Drooping Pope Hat [1] (increases MATK and healing effectiveness)
- Sitting Pope [1] (reduces aftercast delay by 30% at +9)
- Wickebine’s Black Cat Ears [1] (used either for its CRIT damage boost or its chance to proc 100% MDEF pierce on all targets when dealing magic damage)
- Priest Ribbon Hat (obtainable via 3rd Class Hat Box; at +9 adds +40% increased damage to Magnus Exorcismus and a 5% chance to cast highest-learned Heal onto self when receiving physical damage)
- Amistr Beret [1] (main headgear for Adoramus-type Archbishops using Holy Stick; also increases ATK/MATK and Neutral/Holy-property magic damage depending on refine)
- General Helmet [1] (at +11, gives +75 ATK, +10% ASPD, +1 ASPD, +5% ATK and +15% CRIT damage)
- Woof Woof Officer [1] (at +11, gives +105 ATK, +5% ASPD, +3% ranged damage and +3% CRIT damage)
- White Lady Cap (INT +3, MDEF +9, Magic damage vs Undead-race enemies +10%, and chance to transform into White Lady which increases MATK depending on refine)
- White King Tiger Hat [1] (STR and DEX +2, Physical damage vs Brute-race enemies +10%, and chance to transform into Eddga which increases ATK depending on refine)
- Asgard Blessing (+2 all stats, -5% resistance to all property attacks and restores 2% HP and 1% SP every 10 seconds; regen works even when overweight)
- Celine Ribbon [1] (MATK +5% and VCT -10%; combo with Celine’s Ribbon for -0.3s FCT plus additional bonuses depending on Celine Ribbon’s refine rate; now can be enchantable with stats in Lutie)
- Skull Cap [1] (increases MATK, and combo with Thorn Staff of Darkness for MDEF Pierce)
- Golden Fish Hat [1] (chance to increase Holy-Property magic damage when magically attacking)
- Lunar Rainbow [1] (autocasts various elemental magic spells when combo with weapons slotted with Laurel Weinder Card, Red Ferus Card, Hill Wind Card or Pitman Card; chance and level of spells depend on Lunar Rainbow’s refine)
- Magical Feather [1] (chance to autocast Holy Light when dealing physical melee attacks; increases Holy Light damage and autocast rate depending on refine)
- Feather Beret (defensive headgear for PvP and WoE environments, increasing resistance from players by 10%; combo with Protect Feathers for increased ASPD and Max HP)
- Old Pink Poop [1] (slotted defensive headgear option for PvP and WoE, increasing resistance from players by 13%; combo with garment slotted with Steel Chonchon Card to gain Freeze immunity and have a chance to Freeze enemies in a 11×11 AoE centered on you when receiving physical melee or magic damage)
- Jejecap (increases recovery rate of Mastela Fruit; also increases resistance vs Demi-Human race and normal enemies depending on refine)
- MVP Basketball Hat [1] (increases recovery rate of Mastela Fruit, increases resistance to Demi-Human enemies and decreases VCT)
- Middle Headgear
- Bell Pigeon [1] (slotted middle headgear, all stats +1 and chance to autocast Ruwach when being hit with physical attacks)
- Crimson or Magical Booster [1] (slotted middle headgear; combo with Violet Halo for either increased ranged damage using Crimson Booster or reduced VCT using Magical Booster)
- Sigrun’s Wing (increases INT and healing effectiveness; combo with Violet Halo for increased CRIT damage)
- Bio Protector (HIT +10, Perfect HIT +5%, decreases ACD by 5%)
- Ancient Elven Ears (LUK +10, MDEF +10, Perfect Dodge +2)
- Little Garden (increases ATK and CRIT damage, and further boosted when Base LUK is at least 90 or 125)
- Floating Beads (increase MATK and magic damage vs bosses, and further boosted when Base DEX is at least 90 or 125)
- Heavenly Order (Every 18 STR, HIT +2 and Max HP +2%; every 18 AGI, Flee +2 and ACD -2%; every 18 VIT, MDEF +2 and VCT -2%; every 18 INT, Max SP +2% and SP consumption -2%; every 18 DEX, CRIT +2 and APSD +2%; every 18 LUK, DEF +20 and ATK/MATK +15; also grants Lv1 Item Appraisal)
- Lower Headgear
- Mob Scarf + Glasses / Sunglasses (Every 80 Base STR+LUK, +6% physical damage to normal, boss and guardian targets, CRIT +5 and CRIT damage +10%; every 80 Base INT+DEX, MATK +120, VCT -3%, healing effectiveness +10%; every 80 Base AGI+VIT, ASPD +5%, Max HP +5% and damage from players -2%; also able to cast Lv2 Spell Breaker)
- Tree Sprout + Kardui Ear (reduces VCT, increases MATK and resistance to players; boosted further when Base DEX is at least 108 or 120)
- Cloth of Protection + Protect Feathers (increases Max HP, DEF, MDEF, VIT and damage resistance against players; boosted further when Base VIT is at least 108 or 120)
- Seraphim Feather + Seraphim Coronet (reduces VCT, increases ATK, healing effectiveness and resistance to players; boosted further when Base INT is at least 108 or 120; also reduces Coluseo Heal VCT by 100% and grants immunity to Bleeding and Chaos)
- Heart Card in Mouth + Gambler’s Seal (increases CRIT, CRIT damage, ASPD and resistance to players; boosted further when Base LUK is at least 108 or 120; grants splash damage for physical melee attacks when Base LUK is 120)
- Guardian Claus (MDEF +5, Max HP +15%, -3% from Demi-Human monsters)
- Charm of Mystic Frozen (increases healing effectiveness depending on Base AGI and VIT; combo with Manteau of Mystic Frozen for chain-casting Canto Candidus-Clementia and reduced CD for Coluseo Heal)
- Charm of Great Nature (grants MDEF pierce to normal monsters depending on Base INT and DEX; combo with Manteau of Great Nature for Maya Purple effect when Manteau is refined to +10)
- Disk in Mouth (increases magic damage of all properties; chance to cast Soul Strike when dealing physical melee damage)
- Royal Manteau (grants resistance to all elements)
- Yawata Seal (every 50 Base INT+DEX, ASPD+2% and magic damage to all sizes +4%)
- Sacred Lapel (grants 15% aftercast delay reduction; reduces Oratio skill CD by 1.5s if maxed, and increases magic damage to all sizes by 15% if Clearance is maxed; great option for MVP-hunting Archbishops or as a stat stick because of the ACD reduction)
- Young Leaf of the World Tree (DEX / INT / VIT / LUK; set combo with Temporal Boots, Temporal Manteau and Young Leaf of the World Tree for boosts depending on the chosen stat and refine rate; can be enchanted))
- Chatty Parrot (MATK +1% per 50 Base Lv, and VCT -1% per 30 Base INT)
- Ninja’s Scroll (MATK +1%)
- Panda Balloon (All stats +1, ASPD +1)
- Blue Poring Balloon (All stats +2, Perfect Dodge +2)
- Jinn Marin Balloon (ATK and MATK +5, INT and DEX +1, HP +100)
- Love Love Balloon (All stats +1)
- Accessories
- Cat Hand Glove [1] (General Slotted Accessory)
- Physical Enhancer Ring [1] (obtained via Geffen Magic Tournament, for ATK-based builds and enchantable using Geffen Magic Accessory Scrolls)
- Magic Intensifier Ring [1] (obtained via Geffen Magic Tournament, for MATK-based builds and enchantable using Geffen Magic Accessory Scrolls)
- Spiritual Ring + Rosary [1] or Clip [1] (Magnus Exorcismus Accessories)
- Light of Cure w/ Cure 1 Enchant (High Heal CD -3s; obtained in Mora by exchanging Mora Coins)
- Seal of Cathedral w/ Catholic 1 Enchant (Coluseo Heal SP Cost -30; obtained in Mora by exchanging Mora Coins)
- Ring of Archbishop w/ Archbishop 1 Enchant (healing skill effect +3%; obtained in Mora by exchanging Mora Coins)
- Arch Bishop Ring (reduces SP consumption, and increases healing effectiveness/received, LUK per Perfect Dodge; combo with enchanted Mora rings above for additional bonuses)
- Orlean’s Glove and/or Necklace [1] (boosts DEX and MATK; combo with Orlean’s Server and/or Orlean’s Gown)
- Shining Trapezohedron [1] (combo with Giant Shield of Water for Aftercast Delay Reduction)
- Angel Egg [1] (Physical/magical damage, and +1 all stats)
- Book of Concentration [1] (ATK and MATK +5%; provides Lv2 Improve Concentration)
- Gyges Ring [1] (MATK boost which scales with Job Lv; provides Lv1 Hiding)
- Recovery Ring [1] (+HP Accessory)
- Archpriest”s Glove [1] (INT, MATK and SP cost reduction; combo with Spell 1 and 2 enchanted equips for additional magic damage)
- Celine’s Brooch [1] (MATK and VCT reduction; combo with Celine’s Ribbon for FCT reduction and additional magic damage)
- Valkyrie Drop [1] (increases magic damage to all sizes depending on Impositio Manus level, and provides Lv2 Power of Odin when said skill is maxed; also has bonuses with Magnus Exorcismus and Oratio)
- Bangungot Agmiat Tattoo (Healing Effectiveness)
- Bakonawa Agimat Tattoo (ATK and ASPD)
- Verus Core [1] (Physical damage, ASPD and Perfect HIT)
- Critical Anklet [1] (combo with Scarlet Poncho for CRIT and critical damage)
- Fallen Monk Rosary [1] (CRIT and ASPD)
- Giant’s Protection [1] (Physical damage, with bonus ATK, HP and SP at Base 120 STR)
- Luminous Blue Stone [1] (ASPD, CRIT rate and critical damage; combo with Sharp 1 and 2 enchanted equips for critical damage)
- Evil Spirit Glove (HP+500, SP+200, provides Lv1 Fiber Lock; chance to autocast Psychic Wave via Kimi’s mind confusion when being attacked)
- Red Lantern (SP-300, grants Lv1 Sight, chance to drop Alcohol, Detrimindeta or Karvodailnirol when monsters are killed)
- Hurt Mind (SP+200, grants Lv3 Dazzler)
- Kind Heart (HP+500, restores 300 HP every 10 sec)
- Brooch of Hero [1] (combo with Hero Judgement Shawl for bonus Adoramus damage)
- Temporal Ring [1] (combo with Temporal Boots 3rd enchants)
- Ring of Jupiter [1] (offensive/defensive bonuses depending on LUK, VIT and accessory side equipped to)
- Perverse Demon Mask [1] (MDEF/DEF pierce per 18 Base STR/LUK respectively, among other bonuses such as ACD and Max HP depending on other base stats)
- Shadow Equipment
- Priest Shadow Set
- Acolyte Shadow Set
- Race Penetration or Tempest Shadow Set
- Gemstone Shadow Set
- Spell Flow Shadow Set
- Healing Shadow Set
- Reload Shadow Set
- Blue Physical Shadow Set
- Durable Shadow Weapon + Shield
- Critical Hit Shadow Weapon + Armor
- Mortal Blow Shadow Set
- Critical Hit Shadow Weapon + Armor
- Blue Magical Shadow Set
- Clever Shadow Weapon + Shield
- Almighty Shadow Earring + Pendant
- Infinity Shadow Weapon, Armor or Accessory Set
- Maximum Mammoth Shadow Armor + Shoes or Accessory Sets
VI. Card Options
With the different build options and equipment that come with them, a good number of monster cards will further help Archbishops’ potential in their preferred roles and playstyles. Below are some card options which you may slot into your equipment to further boost your Archbishop’s potential:
Weapon Cards
| – Zakudam – Hell Apocalypse – Ancient Tree – Pinguicula – Big Ben – Nightmare Mimic – Centipede Larva – Necromancer – Little Fatum – Red Eruma – Immortal Wind Ghost – Lady Solace – Sidewinder – Sedora – Sropho – Aunoe – Powerful Soldier Skeleton – Warrior Lola – Big Bell – Nightmare Minorous – Santa Poring – White Knightage – Abysmal Knight – Evil Dwelling – Dancing Marionette – Time Holder* – Doppelganger* – Corruption Root* – Celine Kimi* – Sealed Drake* |
 |
Shield Cards
| – Hodremlin – Khalitzburg Knightage – Khalitzburg – Teddy Bear – Alice – Thara Frog – Mysteltainn – Ogretooth – Executioner – Flame Skull – Medusa – Horn – Enchanted Peach Tree – High Orc – Neo Punk – Nightmare Arclouse – Maya* – Bijou* |
 |
Body Armor Cards
| – Marc – Pasana – Dokebi – Bathory – Argiope – Angeling – Ghostring – Pest – Rybio – Clock – Agav – Entweihen Crothen* – Hatii* – Detardeurus* – Amdarais* – Tao Gunka* – Nightmare Amon Ra* |
 |
Garment Cards
| – Raydric – Noxious – Deviling – Orc Baby – Choco – Jejeling – Antique Book – Cenere – Petal – Randel Lawrence – Infinite Chimera |
 |
Footgear Cards
| – Rechenier – Geffen Thief – Dio Anemos – Ipodus – Geffen Thug – Nightmare Verit – Verit – Green Cenere – Green Ferus – Abandoned Teddy Bear – Amon Ra* – Dark Lord* – Boss Ygnizem* – Fallen Bishop Hibram* – Faceworm Queen* |
 |
Headgear Cards
| – Arch Angeling – Uzhas – Bungisngis – Corrupt Life – Nightmare – Ungoliant – Parus – Carat – Isilla – Vanberk – Fulbuk – Clock Tower Manager – Dark Illusion – Kathryne Keyron – Margaretha Sorin – Maya Purple – Mistress* – White Lady* – Kiel D-01* |
 |
Accessory Cards
| – Headless Mule – D.Y – Phen – Scaraba – Gold Scaraba – Owl Baron – Alligator – Smokie – Errende Ebecee – Zerom – Spore – Demon God’s Apostle Ahat – Demon God’s Apostle Shnaim – Osiris* – Beelzebub* |
 |
*MVP Monster Cards
VII. Catalysts and Consumables
Much like other 3rd Job classes, Archbishops rely on certain items to help them perform well. These are either catalysts necessary to cast some of their skills, consumables which give additional buffs or other quality-of-life items that can aid in the Archbishop’s gameplay. Here are some catalysts and consumables one is recommended to carry with them when playing the class:
- Blue Gemstone (Warp Portal, Safety Wall, Sanctuary, Magnus Exorcismus, Adoramus, Ancilla)
- Holy Water (Aspersio, Epiclesis)
- Ancilla (Epiclesis + Emergency SP)
- Green Potion / Panacea (Self-care Blind, Silence, Chaos, Poison, Hallucination; additionally Curse for latter)
- Token of Siegfried (Resurrect self, important especially for solo ABs in party)
- Geneticist Potions (Hp/Sp Inc Pots, Celermine for ASPD, Cure Free for Bleeding and Change Undead)
- SP Recovery Items (Small Mana Potion, Blue Herb, Light Blue Potion)
- Emergency Healing Items (Yggdrasil, New Year Bun, Fish Slice to counter burst HP loss like Coma and Earthquake ticks)
- Almighty, Infinity Drink, Red Booster, Booster Wine, Blessing of Tyr (ATK/MATK/Stats Boosters)
- Shiny Physical DEF Scroll (Hard DEF +500, great combo with Assumptio buff)
- Resist Potions and Armor Scrolls (counter elemental magic damage like Meteor Storm, Lord of Vermillion, Darkness Soul Strike)
- Elemental Converter and Cursed Water (for melee ABs for additional DPS via elemental advantage)
- Abrasive (for CRIT builds who need extra CRIT rate)
- Guyak Pudding or Boarding Halter (faster walking when needed; cannot attack or cast spells while on Halter, not as fast as Guyak even if Increase AGI move speed stacks, and has 3s CD per mount/dismount, but has less weight vs Guyak)
VIII. Archbishop Tactics
A. Party Window Support
Trying to support your partymates with your single target buffs and cures can be challenging at times, especially in a crowded area full of monsters or in the heat of battle during War of Emperium. Though Archbishops are able to spread party-wide buffs such as Clementia and Canto Candidus freely, there will come situations where a party member will request for Odin’s Power, Expiatio or Status Recovery. During these times, it is often much easier to cast said single target spells through the Party Window.

Left-clicking on a party member’s name in the Party Window after you press a spell (whether via your Skill Window or Hotkey Bar) will cast the said skill onto the target. Do note that these only work for single-target spells (cannot be used with ground spells such as Safety Wall and Pneuma). To avoid accidentally opening a chat window, click the mini padlock button on your Party Window to disable the chat and other party setup functions.

Additionally, you can coordinate with your partymates by inviting players with specific roles in a specific order (ex: Archbishop as Party Leader, main tank second, main DPS third, sub DPS and supports last). That way, it will make Party Window supporting much more convenient as you don’t have to jump between multiple names to cast single target spells.
B. SP Maintenance
As a class which is very skill-dependent, whether it be supporting others via Heals and Buffs or setting yourself up before dealing damage to opponents, it is important to have a good flow and source of SP. Naturally, the Priest line is built to have a sufficient SP pool and regeneration capabilities, but some scenarios where you might run out (gradually or instantly through effects) may still occur. It is important to have safety nets from when these do happen so you may continue to fulfill your roles effectively.

- Always have Magnificat up and stay under 70% weight limit. A constant flow of SP through natural regeneration most often than not will be enough as an Archbishop to support teammates or cast offensive spells. These, along with the mentioned Magnificat buff, can be further boosted with INT and SP-regen items such as Excelion parts with Recovery 202 enchants or Arch Angeling Card on one’s headgear and having Base 77 LUK.
- Prepare SP-restoring consumables when in a pinch or at 70% weight and above. Needless to say, when natural SP regeneration is disabled or you end up burning through SP pool fast, always have some backup consumables ready (as mentioned in the Catalyst and Consumables section). For example, Blue Herbs are accessible SP restorative items which can be bought from Geffen, while Yggdrasil Seeds can be used for a more burst form of SP recovery.
- Aim to lessen or fully mitigate damage to avoid unnecessary healing and save SP. Simply using defensive skills such as Pneuma on a stack right before an enemy Ranger fires off an Arrow Storm can help save you from having to spend SP to heal party mates back to full HP (not to mention spend time on other supportive or offensive rolls).
- Be mindful of status effects which may reduce or prevent you from regenerating SP (such as Coma and Bleeding), as well as how to properly counter them quickly (can pop a few Blue Herbs before casting Heals for Coma, and use Offertorium or a Geneticist’s Cure Free to cancel out Bleeding status).
- Coordinate with party members. Let your teammates know when you may be low running on SP so they don’t dive into the next clash or walk straight up to the next boss. If you have a Sorcerer, Geneticist or a pair of performers in your party, feel free to ask for some SP when the need arises.
C. PvE / MvP Scenarios
Priest classes have always been a staple when it comes to Player vs Environment (PvE) and boss fights (MvP) due to their supportive capabilities and the option to be subtanks when needed to. As they progress and change into Archbishops, they become even more valuable supports, and sometimes even end up dealing the damage to MvPs (especially those of Shadow and Undead properties). Whether you plan on hunting bosses in the overworld or inside instances, it is recommended to keep these tips in mind before doing so.

- Research and learn about your target MVPs and their mechanics ahead of time. Whether it’s a specific boss monster in an instance or a field boss with green aura, it is important to know what skills your target MVPs have in order to properly counter them. For instance, Satan Morroc has a chance to either inflict Frozen, Petrification or Sleep on you, so it is advised to have the necessary items to counter these conditions.
- Maximize your usage of defensive spells such as Safety Wall, Pneuma and Praefatio, especially right before you attack the MVP. Being able to mitigate damage ensures you don’t replace time spent on either dealing damage or curing status effects with unnecessary healing.
- If there comes a time when you need to avoid a hard-hitting spell like Earthquake or Comet when fighting an MVP solo, always have Teleport or Guyak Puddings ready to quickly avoid these attacks. It is better to try and avoid any damage than try to tank a boss monster’s attack, with the possibility of being incapacitated by it and having to revive and rebuff once again.
- When doing MVP runs with a party, prioritize the safety of your team’s tank. Spam Safety Wall, Heals and status-recovering spells to assure they maintain aggro on MVPs. If another Archbishop is present in the party, coordinate who gets to use spells like Heal and Safety Wall on the tank, Lex Aeterna on the boss and Pneuma and Epiclesis on partymates in the backline.
- When reviving fallen partymates, prioritize resurrecting Priest classes or performers with Death Valley. This assures another support character helps you in building your team back up to face the MVP.
D. PvP / War of Emperium
Aside from their utility in PvE skirmishes, Archbishops are known to be great in PvP scenarios as well. War of Emperium is a great example where the class shines, as including them in one’s roster of DPS, tanks and other supports will be vital in the guild’s goals of surviving clashes and acquiring castles.

- Unless your Guild Leader or team mates assign you a specific request or task, always assume a supportive role when in a PvP or WoE environment. An Archbishop’s kit consists of different support skills not easily accessible by other classes, making them effective healers and buffers during clashes. You will most often than not be required to rotate through these spells for your guild to effectively overtake or defend a castle.
- Spam Lauda Agnus and Ramus constantly especially during clashes. A plethora of status ailments such as Frozen, Crystallization and Howl of Mandragora are most often thrown around in WoE, and chances are a guildmate will succumb to at least one of them. Having your Laudas up every now and then can assure that your guildmates are immediately cured from these effects. Equipping a +6 Bellum Bible is highly recommended to remove the cooldown time for both skills.
- Cast Oratio to mark hiding/cloaking players. PvP and WoE scenarios are filled with players trying to conceal themselves from enemies – whether they be Guillotine Cross and Shadow Chasers, or other classes utilizing Gyges Rings or Smokie-carded accessories. Casting Oratio even behind walls and on ledges could help mark opponents trying to sneak in through your defenses.
- Carry and use HP (and SP) healing consumables. It can often be tempting to just rely on skills like High Heal and Magnificat to restore your HP and SP, but during clashes it is highly recommended to use some consumables like Mastelas or Slims. Choosing to only rely on your heals will not only impose unnecessary cast delays on yourself, but you can potentially lose a small window where Laudas could be used on guildmates afflicted with abnormal statuses.
- Presence of mind goes a long way. In the adrenaline of clashes, one may find it difficult to remember all the planned strategies and to execute them properly, thus ending up scrambling on how to deal with certain situations. That is completely normal! Take a deep breath, observe the teammates and enemies around you, and do your best on taking your next course of action.
IX. Pet Recommendations
With the implementation of Pet Evolutions in GGH back in 2023, players are able to have monster pet companions alongside them in their travels. These pets provide additional stats to their master when they have reached a specific intimacy level (most preferably Loyal for a full bonus). Archbishops have different pets to choose from depending on what they need, and as such here are some of them for your character to choose from:
| Cute Monster Pet | Previous Monster Pet | Loyal Intimacy Bonus |
Angeling | Evolves from Poring > Mastering | Max HP +2%, Increases Heal Effectiveness by 8% |
Am Mut | Evolves from Dokebi | MATK +4% |
Abandoned Teddy Bear | Evolves from Teddy Bear | Max SP +150, Chance to recover 40SP/sec for 5 seconds when dealing magic damage |
Choco | Evolves from Yoyo | CRIT +9, Long Ranged Damage +3% |
Earth Deleter | Evolves from Earth Petite | ASPD +3%, AGI +3 |
 Hodremlin | Evolves from Gremlin | CRIT Dmg +9%, DEX +2, HIT +2 |
 Nightmare Terror | No Evolution (no Autofeed function) | Sleep Immunity, INT +1 |
Keep in mind however that Pet Intimacy will decrease every time you fall incapacitated (whether in PvE or PvP environments), and it is recommended to put them back in egg form before facing dangerous scenarios to avoid Intimacy loss. You can learn more about the other pets in GGH through the link below:
X. Skill List
A. Archbishop Skill Tree
| Skill Name | Description and Analysis |
| Casts the highest level of Heal learned to the user and all party members in a 31×31 area (at max level) around oneself. Effective party-wide healing without having to group up in an area for Sanctuary. Has 0s FCT, 3s VCT and 2s CD at max level. Note that healing will only be delivered to the caster and all players between the party leader and a Mado Mechanic or Undead-property character listed in the Party Window. | |
| Casts the highest level of Blessing learned to the user and all party members in a 31×31 area (at max level) around oneself. Gives additional +1 STR, INT and DEX per 10 Job Levels of the caster (does not overwrite bonuses of other Archbishops casting the skill if they have higher Job Level). Has 1s FCT and 3s VCT at max level. | |
| Casts the highest level of Increase AGI learned to the user and all party members in a 31×31 area (at max level) around oneself. Gives additional +1 AGI per 10 Job Levels of the caster. Has 1s FCT and 3s VCT at max level (does not overwrite bonuses of other Archbishops casting the skill if they have higher Job Level). | |
| Bestows upon the caster and all party members a barrier which blocks between 7~16 hits of Physical Damage until it expires (120 seconds) or its durability runs out (30% of Max HP), with a Shield DEF bonus of (No. of Party Members divided by 2)%. Has 1s FCT, 2s VCT and 13s~40s CD. The level of Kyrie Eleison learned does not affect this skill’s barrier. | |
| Has a 45%~90% chance to place a debuff on all enemies around a 31×31 area centered from the caster. Targets affected will have decreased resistances from Holy-property damage for 30s. Affects Boss monsters and targets under effects of Hiding/Cloaking. | |
| Calls forth two balls of light which trigger either Duple Strike (Physical 200% Max Level) or Duple Magic (Magical 400% Max Level) damage with a 12%~30% chance when dealing physical melee attacks. Duple Strike is considered Ranged and takes weapon elements or enchants into consideration, while Duple Magic is forced Neutral. | |
| Places a buff which regenerates 3% of a single target’s Max HP every 5 seconds. Inflicts damage to Undead-property monsters every 5 seconds. Can be used to heal Barricades and Guardian Stones in WoE Second Edition. Has a 2s FCT and 3s VCT. | |
| A stronger version of Heal, with a Healing Rate of 200%~320% and SP Cost of 70~190, while dealing Holy-property damage equal to half of the HP restored to Undead targets. Retored HP is affected by INT, Base Level and Heal Level. | |
| Consumes 30% of SP and 1 Blue Gemstone to create an Ancilla, a catalyst for the Epiclesis skill or to restore 15% Max SP upon using the item directly. A max of 3 Ancillas can be in the inventory at a time. | |
| Resurrects non-Undead property players within a 5×5 AoE, and every 3 seconds restores 3%~5% HP and 2%~4% SP to players. Also grants 5%~25% Max HP increase, and reveals Hiding players or monsters within its AoE at 5 second intervals. | |
| Grants a buff which gives 5%~25% Physical DEF Pierce vs enemy targets for 30s~150s. | |
| Shortens a single target’s FCT by 10%~50% for 60s~180s. A must-have buff to cast on characters with high FCT spells. Note that with how FCT reduction works, any flat value from other sources will reduce the base FCT first before the highest percentage value (Ex: 3s Base FCT – 0.5s from Temporal DEX Boots = 2.5s, reduced by 50% from Sacrament buff = 1.25s FCT). | |
| Deals 320%~400% MATK Holy-property damage, affected by Base Level, to a single target and enemies within a 3×3 AoE around it. Can be spammed after Adoramus to deal some DPS while the skill is on CD or vs low-HP mobs to save on SP and Blue Gemstones. | |
| Burst single-target Holy-property damage dealing 600%~1500% MATK affected by Base Level, and the main offensive spell for Adoramus-type Archbishops. Has a chance to Blind or Decrease AGI the target. Has 0.5s FCT, 2s VCT and 2s CD. | |
| Increases VIT and has a chance to cure the following status effects for the party (80% success rate at max): Blind, Burning, Freezing, Frozen, Crystallization, Petrification (last three are not cured by the caster if under these effects). | |
| Increases LUK and has a chance to cure the following status effects for the party (80% success rate at max): Stun, Sleep, Deep Sleep, Silence, Howl of Mandragora. | |
| Attempts to remove buffs and the following status effects from a single target (100% success rate at max): Bleeding, Blind, Burning, Chaos, Critical Wounds, Crystallization, Curse, Deep Sleep, Fear, Freezing, Frozen, Hallucination, Petrification, Poison, Silence, Sleep, Stun, RK Runes, Shadow Formation, Body Paint, Harmonize, Siren’s Voice, Song of Despair, Gloomy Shyness, Saturday Night Fever, Vanguard Force, GX Poisons, Venom Impression, White Imprison, Blood Sucker, Howl of Mandragora. This can also be used to try and remove the skills Immune Property (becomes immune to specific elemental damage) and Damage Heal (converts received damage into HP) from MVPs. | |
| Attempts to cast Lex Divina on all enemies within a 9×9~17×17 AoE centered around the caster, silencing them for 20s~60s. Success rate affected by target’s Base Level, VIT and LUK. Has a 15s CD. | |
| Passive skill which increases ATK and resistance vs the Demon race and Shadow-property monsters both by 1%~10%. Benefit stacks if a target is both Demon and Shadow. Effective for physical builds targeting these specific monsters. | |
| Further boosts the healing effectiveness of Heal, Sanctuary, Coluseo Heal and High Heal by 30%~150%, with increased SP cost of all spells by 120%~200%. Magnificat buff will cancel this spell and vice versa. Also removes the following status effects from the caster: Bleeding, Blind, Burning, Chaos, Curse, Freezing, Hallucination, GX Poisons, Howl of Mandragora, Poison. | |
| For 10s~30s, increases all Base Stats and Movement Speed, and fully restores one’s HP. Upon buff expiration, the character gains the Rebound debuff, decreasing Movement Speed, prevents natural HP/SP regeneration and displays the /swt emote. |
B. Priest and High Priest Skill Tree
| Skill Name | Description and Analysis |
| Passive skill which boosts natural SP recovery every 10 seconds when not moving from one’s cell. Also increases the effectiveness of SP-healing items. | |
| Cures the following status effects from a single target: Frozen, Stun, Petrification, White Imprison, while blinding Undead-property monsters. Casting on an aggressive monster forces it to acquire a new target (may include the old target), while casting on a passive monster sets it back to passive. Has a 2s ACD. | |
| Returns a single incapacitated player back up, restoring 10%~80% of Max HP on revival. Has 1.2s FCT, 4.8s VCT and 0s ACD at Lv1, and has 0s FCT/VCT and 3s ACD at Lv4. Players wearing Undead-property armor cannot be revived this way. | |
| Grants a party-wide buff which doubles the natural SP recovery rate. The skill cannot be in conjunction with Offertorium, and disappears as well upon logging out or changing zones (some map changes) in-game. | |
| Blocks 5~10 Physical hits towards a single target by creating a barrier which expires either after 120s or until its durability wears off (12%~30% of the target’s Max HP). Has a 0.4s FCT, 1.6s VCT and 2s ACD. As per the 1st, 2nd and transcended skill rework of 18 January 2024, this skill can coincide with the Assumptio buff. | |
| Party-wide buff with grants +30 LUK to all members from 10s~30s. | |
| Casts AoE Holy magic which heals 100~777 HP/sec over a 4~31-second duration. Effective healing spell which isn’t dependent on INT or MATK like Heal, making it useful on Physical battle variants. Can also provide some knockback damage to Undead-property and Demon-race monsters. Usable to restore HP to Homunculi from the Alchemist class. Each cast costs 1 Blue Gemstone, and a second instance will replace the first when casted over it. | |
| As per the 1st, 2nd and transcended skill rework of 18 January 2024, increases ATK and MATK by 5~25 for all party members for 120s. Has 0.5s FCT, 1s VCT, 1s ACD and 30s CD. | |
| As per the 1st, 2nd and transcended skill rework of 18 January 2024, decreases VCT by 10%~20% for all party members for 60s (does not expire upon casting one spell as opposed to older version). Has 0.5s FCT, 1s VCT, 1s ACD and 30s CD. | |
| Sprinkles Holy Water on a single target, imbuing their weapon with the Holy property for 60s~180s. Buff is removed when the endowed weapon is switched with another weapon. Deals minor Holy-property damage when casted on Demon race and Undead-property monsters. | |
| Consumes 1 Blue Gemstone to set up a pink pillar of light on a target location. Melee physical attacks are blocked until the wall’s durability wears off (300~3000 Base Durability) or expires after 5s~50s. Status effects and knock back are unaffected unless they are side effects of a blocked attack. Cannot be casted on top of Magnetic Earth or Pneuma. Armor DEF and reductions decrease the damage the wall takes, while Perfect Dodge and missed attacks do not reduce durability. Safety Wall’s Durability is calculated as follows: Base Durability + 7000 x (1 + 0.1 x Job Level / 50) + 65 x INT + Max SP. | |
| Enchants the armor of players in a 3×3 area with the Holy 1 property for 40s~200s. Requires two Acolyte classes standing horizontally adjacent to the user (default camera view, one on the left and one on the right). Skill will fail if either Acolyte class has less than 10 SP. Deals damage to Undead-property and Demon-race monsters equal to half of the recovered HP from Heal. | |
| Attempts to silence a single target for 30s~60s. Can be used on allies to remove Silence by holding Shift. Has a 3s ACD. | |
| Calls forth swords of light from above upon a single target, allowing them to take in double damage from the next incoming attack. Cannot be casted on targets that are Frozen or under full Petrification status. Debuff is removed if the proceeding attack was successfully blocked via Parry, Guard or Kaupe. | |
| Deals Holy-property damage to an Undead-property monster, with a 2%~20% base chance to 1HKO non-Boss-protocol monsters. Success rate is further increased by Base Lv, INT, LUK and target’s current HP (capped at 70%). | |
| As per the 1st, 2nd and transcended skill rework of 18 January 2024, consecrates a 7×7 area, dealing 100% Holy-property magic damage to all races, while dealing 130% to Demon/Undead races and Shadow/Undead-property targets. Has a 1s FCT, 4s VCT, 1s ACD and 6s CD. Targets hit with this skill become immune to it for 3s, and can receive a total of 5 waves of damage if they remain in the AoE when the immunity expires. Cells have a maximum amount of hits possible, and it is possible for some cells to disappear when too many monsters occupy a single cell. No damage will occur when the caster becomes incapacitated while the skill’s AoE is active. | |
| Negates the HP drain from the Poison status for a single target for 10s~40s (does not fully cure the target from Poison and thus still incurs the DEF drop). Cannot be casted on self. | |
| Passive which grants Mastery ATK of +3~+30 when wearing Mace-type weapons. As per the 1st, 2nd and transcended skill rework of 18 January 2024, also increases CRIT by 1~10. | |
| Platinum skill of the Priest tree which is unlocked via quest. Revives all fallen party members in a 15×15 area around the caster and regains 50% of their HP back. Caster incurs 1% Base EXP penalty or 1,000,000 Base EXP for max level characters (reduced by 0.2% or 200,000 Base EXP for max level per revived party member), and drops HP and SP to 1. Has a 0.8s FCT and 3.2s VCT. | |
| Passive which increases player’s Maximum SP by 1%~10% and SP regeneration by 3%~30%, as well as improving HP restored via Heal, Sanctuary, Coluseo Heal and High Heal by 2%~20%. A must-have skill for support-types as it caters to their healing and SP maintenance. | |
| As per the 1st, 2nd and transcended skill rework of 18 January 2024, increases a single target’s Hard DEF by 50~250 and incoming healing by 2%~10% for 20s~100s. Has a 0.6s FCT and 2.4s VCT at max level. This skill can coincide with Kyrie Eleison and Praefatio. Cannot be casted inside guild castles (remains on the target if casted outside). | |
| As per the 1st, 2nd and transcended skill rework of 18 January 2024, increases Holy-property magic damage by 3%~15%, while also boosting physical damage vs Shadow and Undead-property monsters by 5%~25% for 60s~180s. Has 1s FCT, 3s VCT and 30s CD. Removed catalyst requirement as opposed to older version. | |
| Passive which permanently reduces the SP cost when using skills by 4%~20%. Only advisable for CRIT battle-types as it requires both Lv10 Demon Bane (Acolyte passive) and Lv10 Mace Mastery (Priest/High Priest passive), to counter their low-INT stat. |
C. Acolyte Skill Tree
| Skill Name | Description and Analysis |
|---|---|
| Restores a target player’s HP based on your MATK and increase healing effectiveness items/buffs. Also deals damage to Undead-property targets. Prerequisite of Lv3 for Increase AGI and Lv1 for Sanctuary in Expanded tree. | |
| Cures a single target from Chaos, Silence and Blind (cannot cast on self when Silenced). Also causes Chaos status when used on Undead-property monsters. | |
| One of the two important support buffs of Super Novices. Temporarily increases a target’s AGI by 3~12, as well as their movement speed. Drains a small amount of HP from the caster per cast. As per the 1st, 2nd and transcended skill rework of 18 January 2024, now adds +1% ASPD per level. | |
| Single target debuff which has a chance to decrease a target’s AGI by 3~12, as well as their movement speed. Not as recommended to invest on vs other debuffs such as Quagmire which reduces DEX/AGI/movement speed over an AoE. | |
| Increases Soft Defense against Demon and Undead-race monsters by 3~30. Prerequisite of Lv3 for Angelus/Demon Bane, Lv5 for Blessing and Lv10 for Iron Fists. | |
| Provides +3~+30 Mastery ATK against Demon and Undead-race monsters. Prerequisite of Lv3 for Signum Crusis and Lv10 for Iron Fists. | |
| Increases Soft Defense for the entire party by 5%~50% of their VIT for the skill’s duration. As per the 1st, 2nd and transcended skill rework of 18 January 2024, now adds +Max HP per level. | |
| One of the two important support buffs of Super Novices. Temporarily increases a target’s STR, INT and DEX by 1~10. Also cures a target from Curse and Stone Curse. As per the 1st, 2nd and transcended skill rework of 18 January 2024, now adds +1 HIT per level. | |
| Allows the creation of Holy Water with Empty Bottle by standing on a Water cell or on Deluge/Watery Evasion. | |
| Screen-wide debuff which decreases Undead-property and Demon-race monsters’ Hard Defense by 14%~50%, with a base success rate of 27%~63%. On a success, enemies will display the sweat “/swt” emote. | |
| Reveals hidden/cloaked enemies within a 5×5 area following the character for 10 seconds, and hits them for Holy-property damage. | |
| Teleports yourself to a random area around the map or back to one’s savepoint. | |
| Consumes a Blue Gemstone to open up a portal (over a set duration) which you can warp yourself or a max of 8 players to one’s savepoint or 1~3 possible locations saved via the “/memo” function. Maps/dungeons/instances/areas that cannot be saved will not allow you to use /memo. A max of three portals can be open at a time. | |
| Casts a spell which blocks physical ranged damage in a 3×3 area. Multiple Pneumas cannot be casted one cell away from each other. |
D. Sample Skill Builds (Archbishop)
1. Full Support Path with Max Laudas and Expiatio, and some investment on Epiclesis, Silentium and Offertorium
2. Adoramus Path with Max Clearance

3. Battle Path with Max Duple Light and Sacrament (for FCT reduction), and max Eucharistica for increased damage and resistance vs Demon race and Undead-property targets

E. Sample Skill Builds (High Priest)
1. Full Support Path with Max Resurrection, Impositio Manus (to utilize Valkyrie Drop bonus) and Gloria (only if you need the +30 LUK boost for 30 seconds; else, can avoid investing on + lowering Kyrie to Lv1, and distributing the skill points to Suffragium, Magnificat and Sanctuary)

2. Magnus Exorcismus Path with Max Basilica, some investment in Meditatio and Safety Wall (for SP/heals and sub-support capabilities) and Lv1 Resurrection (0s aftercast delay vs maxed)

3. Battle Path with Max Impositio Manus (to utilize Valkyrie Drop bonus), Gloria, Mace Mastery and Mana Recharge (recommended for Mace-wielding CRIT builds with low INT/SP regeneration)

4. Post-Rework Magnus Path with Max Basilica (+Holy Property damage), Impositio Manus (party-wide ATK/MATK buff and to utilize Valkyrie Drop bonus) and Suffragium (party-wide VCT reduction buff)

XI. Epilogue
We encounter people whose inner battles and struggles we may not fully see or understand. Often, all they need is a shoulder from a supportive companion to lean onto, and to be told that everything will be fine. We hope this guide has become informative to you, and that you have become more knowledgeable on how to effectively progress with playing your Archbishop. Should you have any questions, please leave a comment below or visit us over at the GGH Discord. Best wishes and happy gaming!
Special thanks to Lumiere Silvamillion and Sardinas from RO GGH Discord for sharing their knowledge on the class and making this guide possible.
Was this helpful?
1 / 0
